
Ready to see how you did this! What mode do you have? I ordered the Big Bend and I don’t think (not 100% sure) it has ambient under passenger side..So, had a warm day where I felt like tackling the project. It turned out to be easy enough to figure out!
I'll make a detailed write-up probably tomorrow, but the gist of it was I bought some 20awg wire, wired it to the ambient light assembly under the passenger side dash, and voila! It will dim/brighten with the controls in the SYNC 3 menu.


- First Name
- John
- Joined
- Apr 11, 2022
- Threads
- 1
- Messages
- 22
- Reaction score
- 39
- Location
- Colorado Springs, CO
- Vehicle(s)
- '22 Bronco Sport Outer Banks, '03 F-150 7700 Pkg
ABOUT THAT, I actually removed the ambient light assembly for easier access to splice into it. It's just a light with a pigtail and a 3-pin connector. I'm wondering if the non-Outer Banks trims might have the female connection that the pigtail plugs in to. I'll have to get a picture of where it connects, it's in a rough spot to get to.Ready to see how you did this! What mode do you have? I ordered the Big Bend and I don’t think (not 100% sure) it has ambient under passenger side..
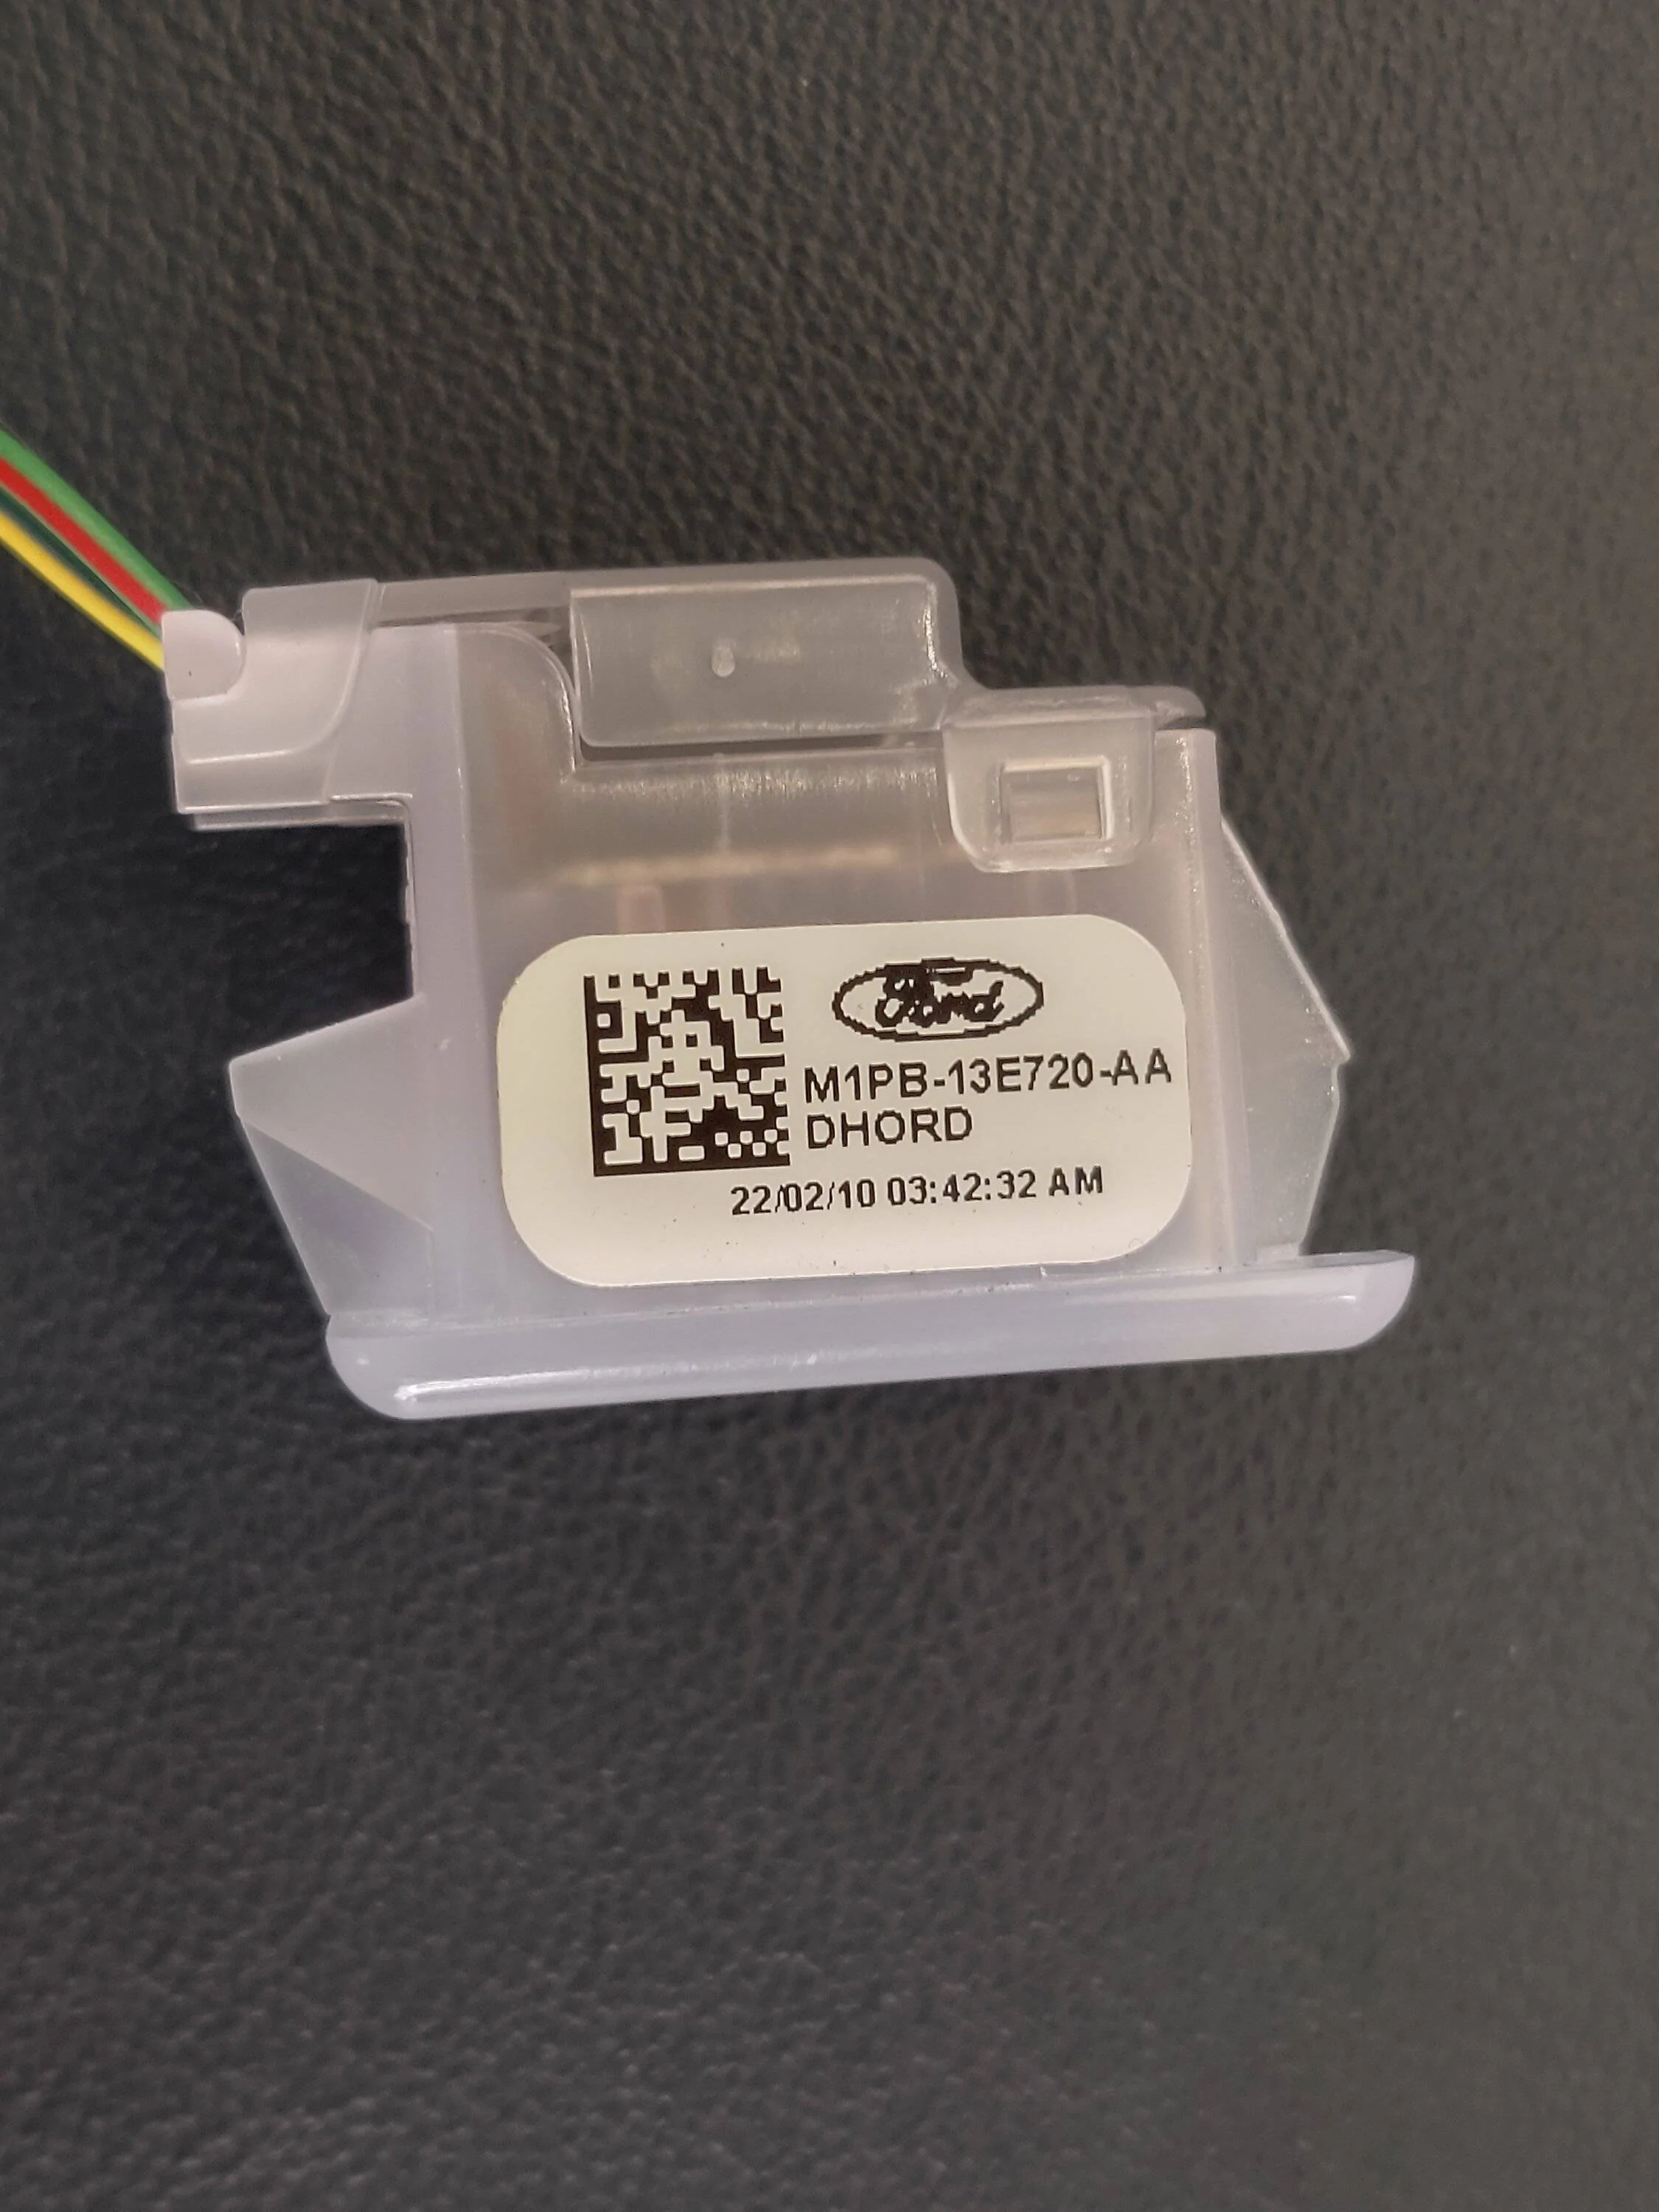
If someone can feel around for it later, and they find the female connection, this is the part you'll need for the dash ambient light:
M1PB-13E720-AA
https://parts.ford.com/shop/en/us/electrical/wire-looms-and-connectors/jumper-wiring-13292717-1#/partMatched?pdp=y

I like your solution to just drive two lights off of one supply. Very doubtful that would cause any sort of weird unexpected effects. Question though; why tap the ambient light under the dash to run the light instead of the one at the front of the console that shines into the phone tray? Only about a 8" run that way.ABOUT THAT, I actually removed the ambient light assembly for easier access to splice into it. It's just a light with a pigtail and a 3-pin connector. I'm wondering if the non-Outer Banks trims might have the female connection that the pigtail plugs in to. I'll have to get a picture of where it connects, it's in a rough spot to get to.
- First Name
- Michael
- Joined
- Sep 18, 2022
- Threads
- 60
- Messages
- 810
- Reaction score
- 995
- Location
- Syracuse, New York 13219
- Vehicle(s)
- '23 OBX, '20 Ecosport, '23 Kymco People S 150i ABS
I'm glad somebody finally figured it out. I was waiting for warmer weather to try my hand at it. Looking foreword to your next writeup for more guidance.
- First Name
- April
- Joined
- Apr 5, 2023
- Threads
- 1
- Messages
- 14
- Reaction score
- 2
- Location
- Miramar, Florida
- Vehicle(s)
- 2021 Ford Bronco Sport
That is not true. My 2021 OB has itAt first I thought maybe since its an Outer Banks it comes without the cup holder lighting, but I went to several dealers and apparently none come with it. According to parts.
I think it’s been removed in the ‘22/‘23 modelsThat is not true. My 2021 OB has it
- First Name
- John
- Joined
- Apr 11, 2022
- Threads
- 1
- Messages
- 22
- Reaction score
- 39
- Location
- Colorado Springs, CO
- Vehicle(s)
- '22 Bronco Sport Outer Banks, '03 F-150 7700 Pkg
I was hoping you were going to attempt it first! I have fairly mild winters where I live, so I figured I'd give it a shot using your idea and wiring diagram.I'm glad somebody finally figured it out. I was waiting for warmer weather to try my hand at it. Looking foreword to your next writeup for more guidance.
- First Name
- John
- Joined
- Apr 11, 2022
- Threads
- 1
- Messages
- 22
- Reaction score
- 39
- Location
- Colorado Springs, CO
- Vehicle(s)
- '22 Bronco Sport Outer Banks, '03 F-150 7700 Pkg
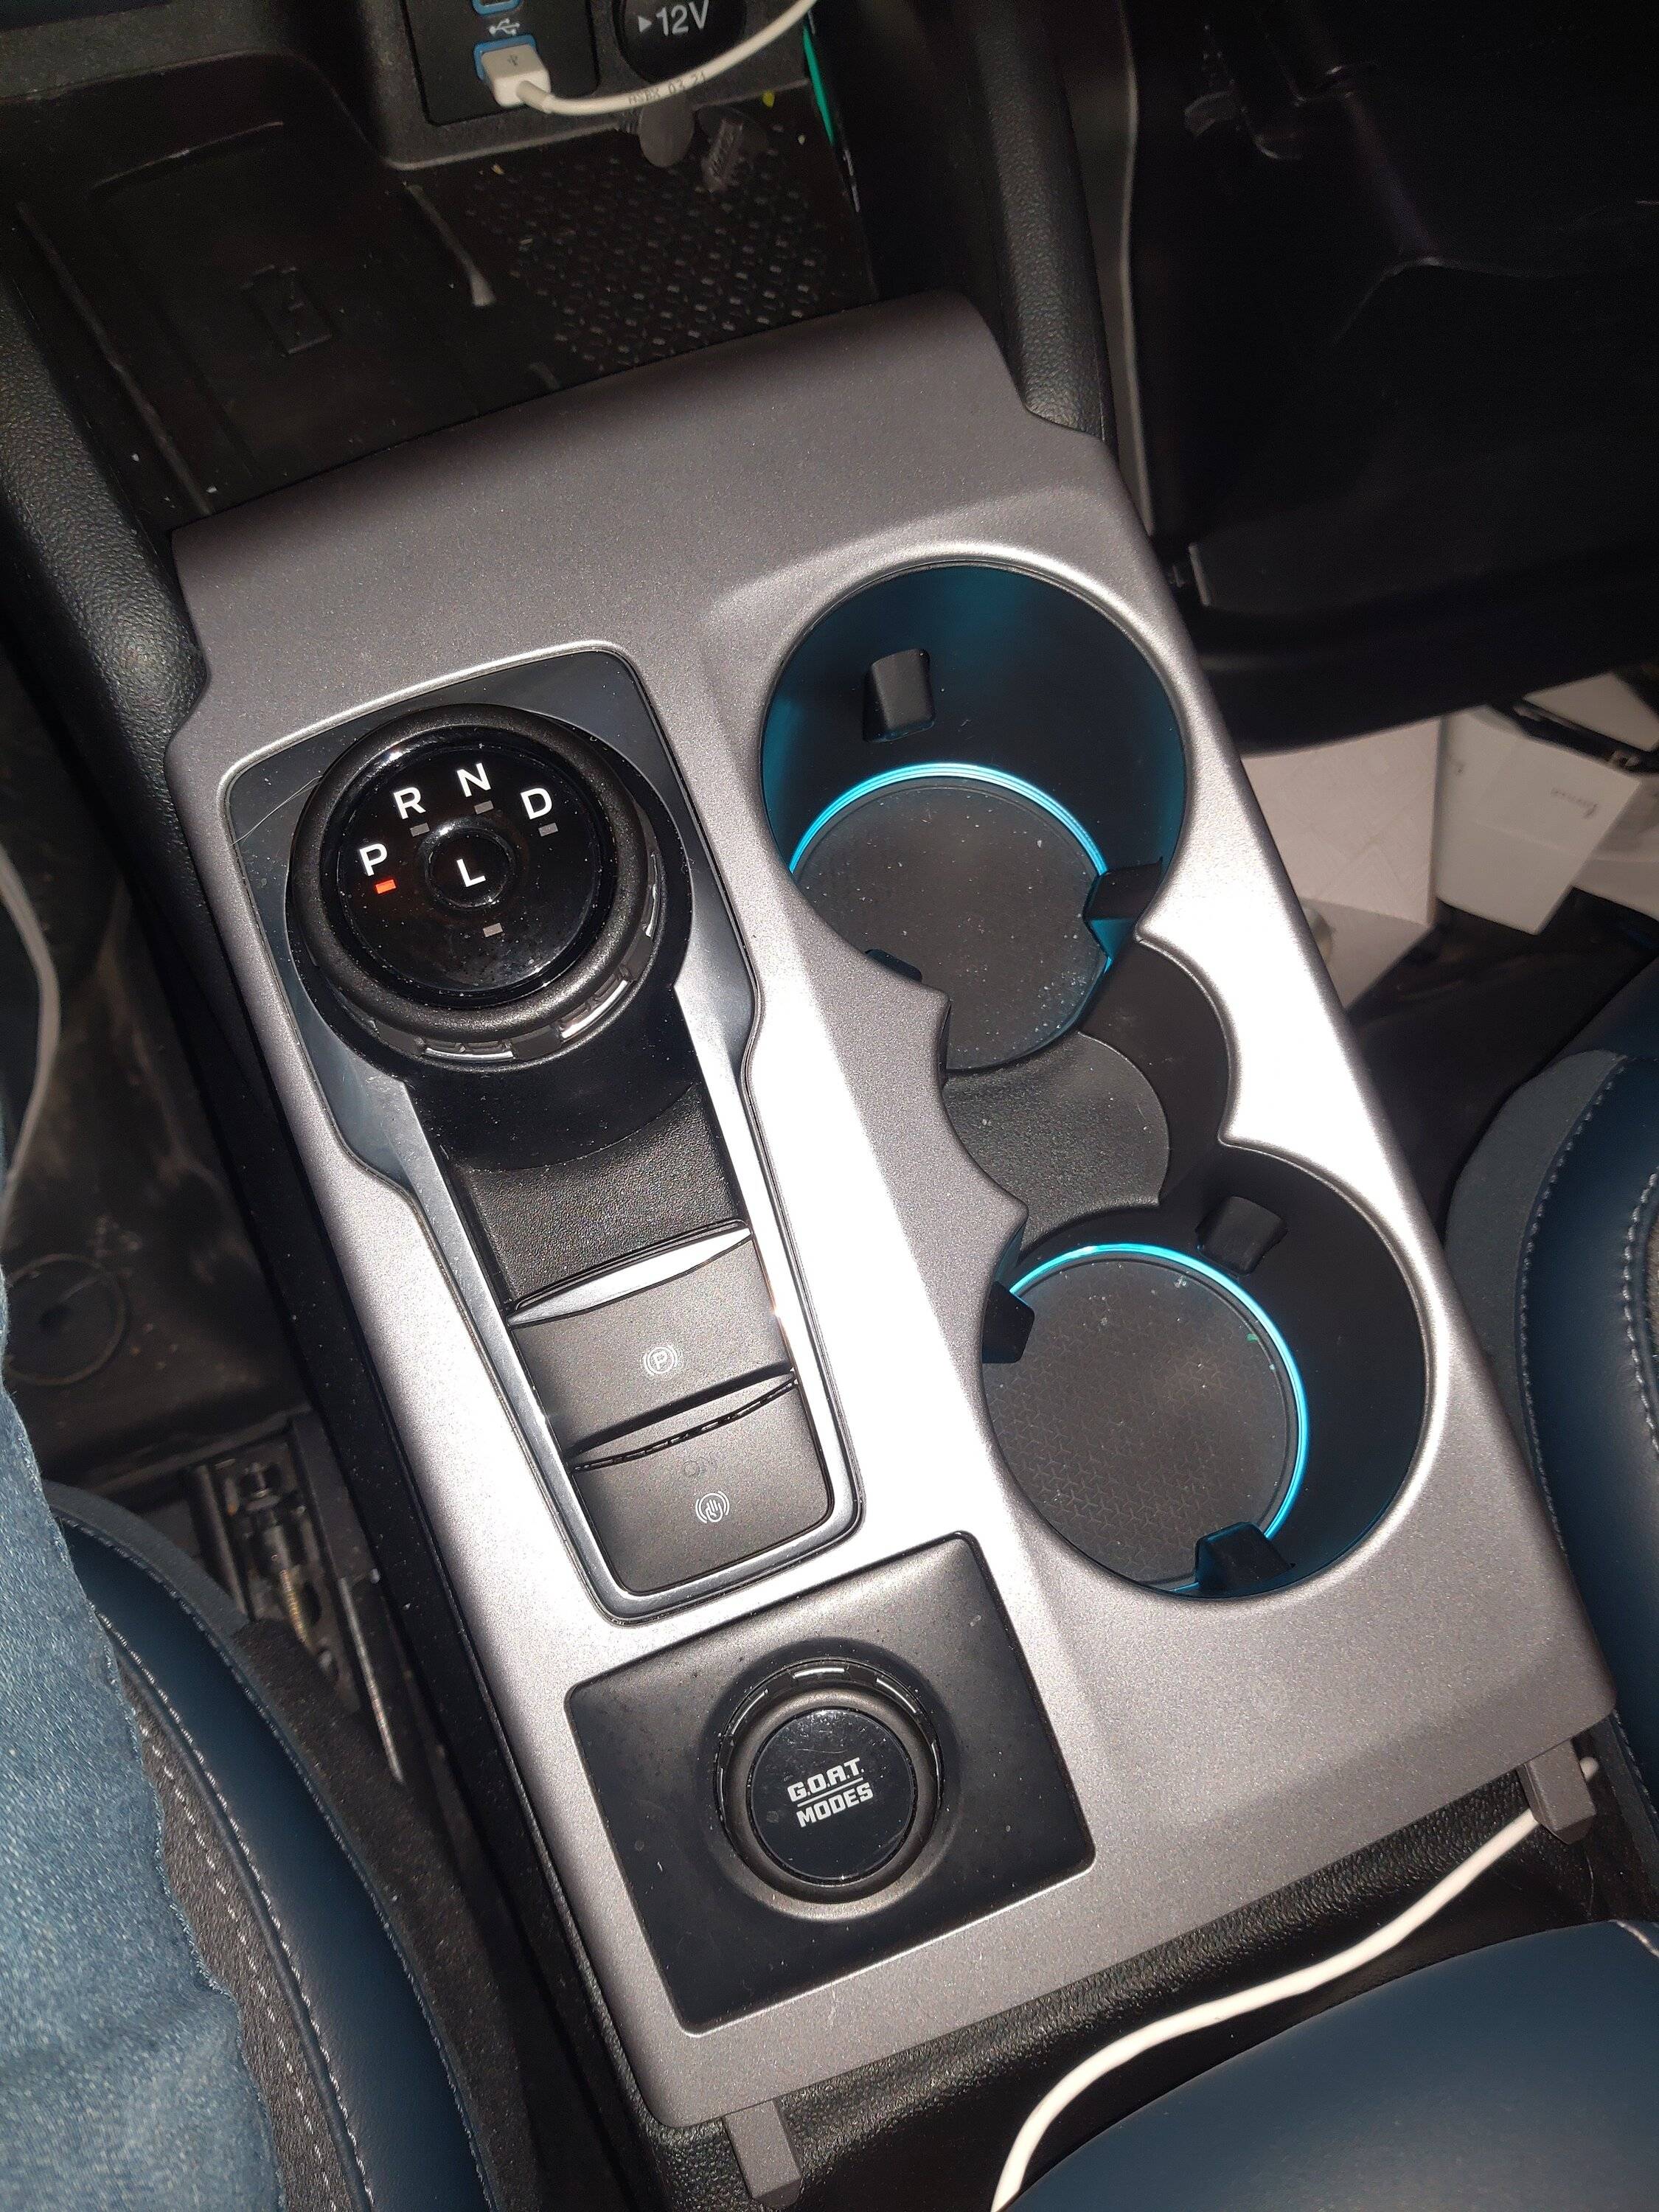
I just looked at my phone tray to make sure I'm not crazy, I don't have a light in that area. The other two sources would've been the gear selector and the G.O.A.T. Mode selector, I didn't want to touch those at all. If it turns out this way is drawing more power than the wires are able to handle, I'll figure something else out.I like your solution to just drive two lights off of one supply. Very doubtful that would cause any sort of weird unexpected effects. Question though; why tap the ambient light under the dash to run the light instead of the one at the front of the console that shines into the phone tray? Only about a 8" run that way.
Oh wow, then you '22 guys did get double-deleted by Ford! Even my '21 Badlands has the lens there for the light (LED light missing because Badlands doesn't have ambient), but the '21 Outer Banks have a light both in the cupholder and in the phone tray. The cupholders while nifty weren't productive enough to change on mine. Honestly the two-piece cupholder makes me nervous overall about spills. I ended up "lighting" my phone area with a 12v voltmeter/USB/light ring plug-in device for like $8 on Big Rainforest. I don't have any real use for the 12v there. If I use my portable pump, I typically use the cargo outlets.I just looked at my phone tray to make sure I'm not crazy, I don't have a light in that area. The other two sources would've been the gear selector and the G.O.A.T. Mode selector, I didn't want to touch those at all. If it turns out this way is drawing more power than the wires are able to handle, I'll figure something else out.
Deleted member 6350
Guest
Well I just popped up my shifter cover and low a behold no freakin extra wiring harness to plug in the cup holder lights. 23 OB
Last edited by a moderator:
My 12/23/21 built 2022 OBX had the wiring, but no lights in the cup holder. Got a cup holder for a hi-toot Escape & plugged it in.I think it’s been removed in the ‘22/‘23 models
- First Name
- John
- Joined
- Apr 11, 2022
- Threads
- 1
- Messages
- 22
- Reaction score
- 39
- Location
- Colorado Springs, CO
- Vehicle(s)
- '22 Bronco Sport Outer Banks, '03 F-150 7700 Pkg
Ambient Light Cup Holder Installation
This is the method I used to install the newest generation Ford Escape cup holder with built-in ambient lighting into my Outer Banks. It's a fairly simple procedure, but this is the way it should be done in the quickest and most efficient manner. This is only proven by me so far, with an existing ambient light system already in place. There may be changes in the future should this method prove to be a fire hazard or unsafe in any way. If anyone notices something that appears unsafe and needs further examination, PLEASE SAY SO.
Special thanks to Mrmike, who provided us all with the wiring diagram that inspired me to attempt this project, as well as JCampos30, who originally pioneered the idea and installed his own.
---------------------------------------------------------------------------------------
Materials needed:
4th Generation Ford Escape Ambient Light Cup Holder -- Part #: LJ6Z-7813562-FA
BNTECHGO 20 AWG Silicone Wire -- Amazon.com
Pliers
Thin, plastic pry tool or flat-head screwdriver
Electrical tape
"T" wire tap connectors (arguably optional)
---------------------------------------------------------------------------------------
First, as always, disconnect your negative battery cable. I like to cover my negative battery terminal with a rag or plastic shield to make sure the cable doesn't accidentally make contact again.
Next you'll want to remove the glove box for access to the 3-pin connector that powers the footwell ambient light. Open your glove box and press in the tabs on both sides to lower the glove box further. Now, disconnect the dampener on the right side of the glove box by using a pair of pliers to push the two ends of the male clip together, and pull off the dampener. You might have your glove box fall and spill all of its contents onto the floor (you can probably guess how I know,) so be ready for that. Now, with your glove box disconnected, simply lift the box up and out, giving you ample room to work.
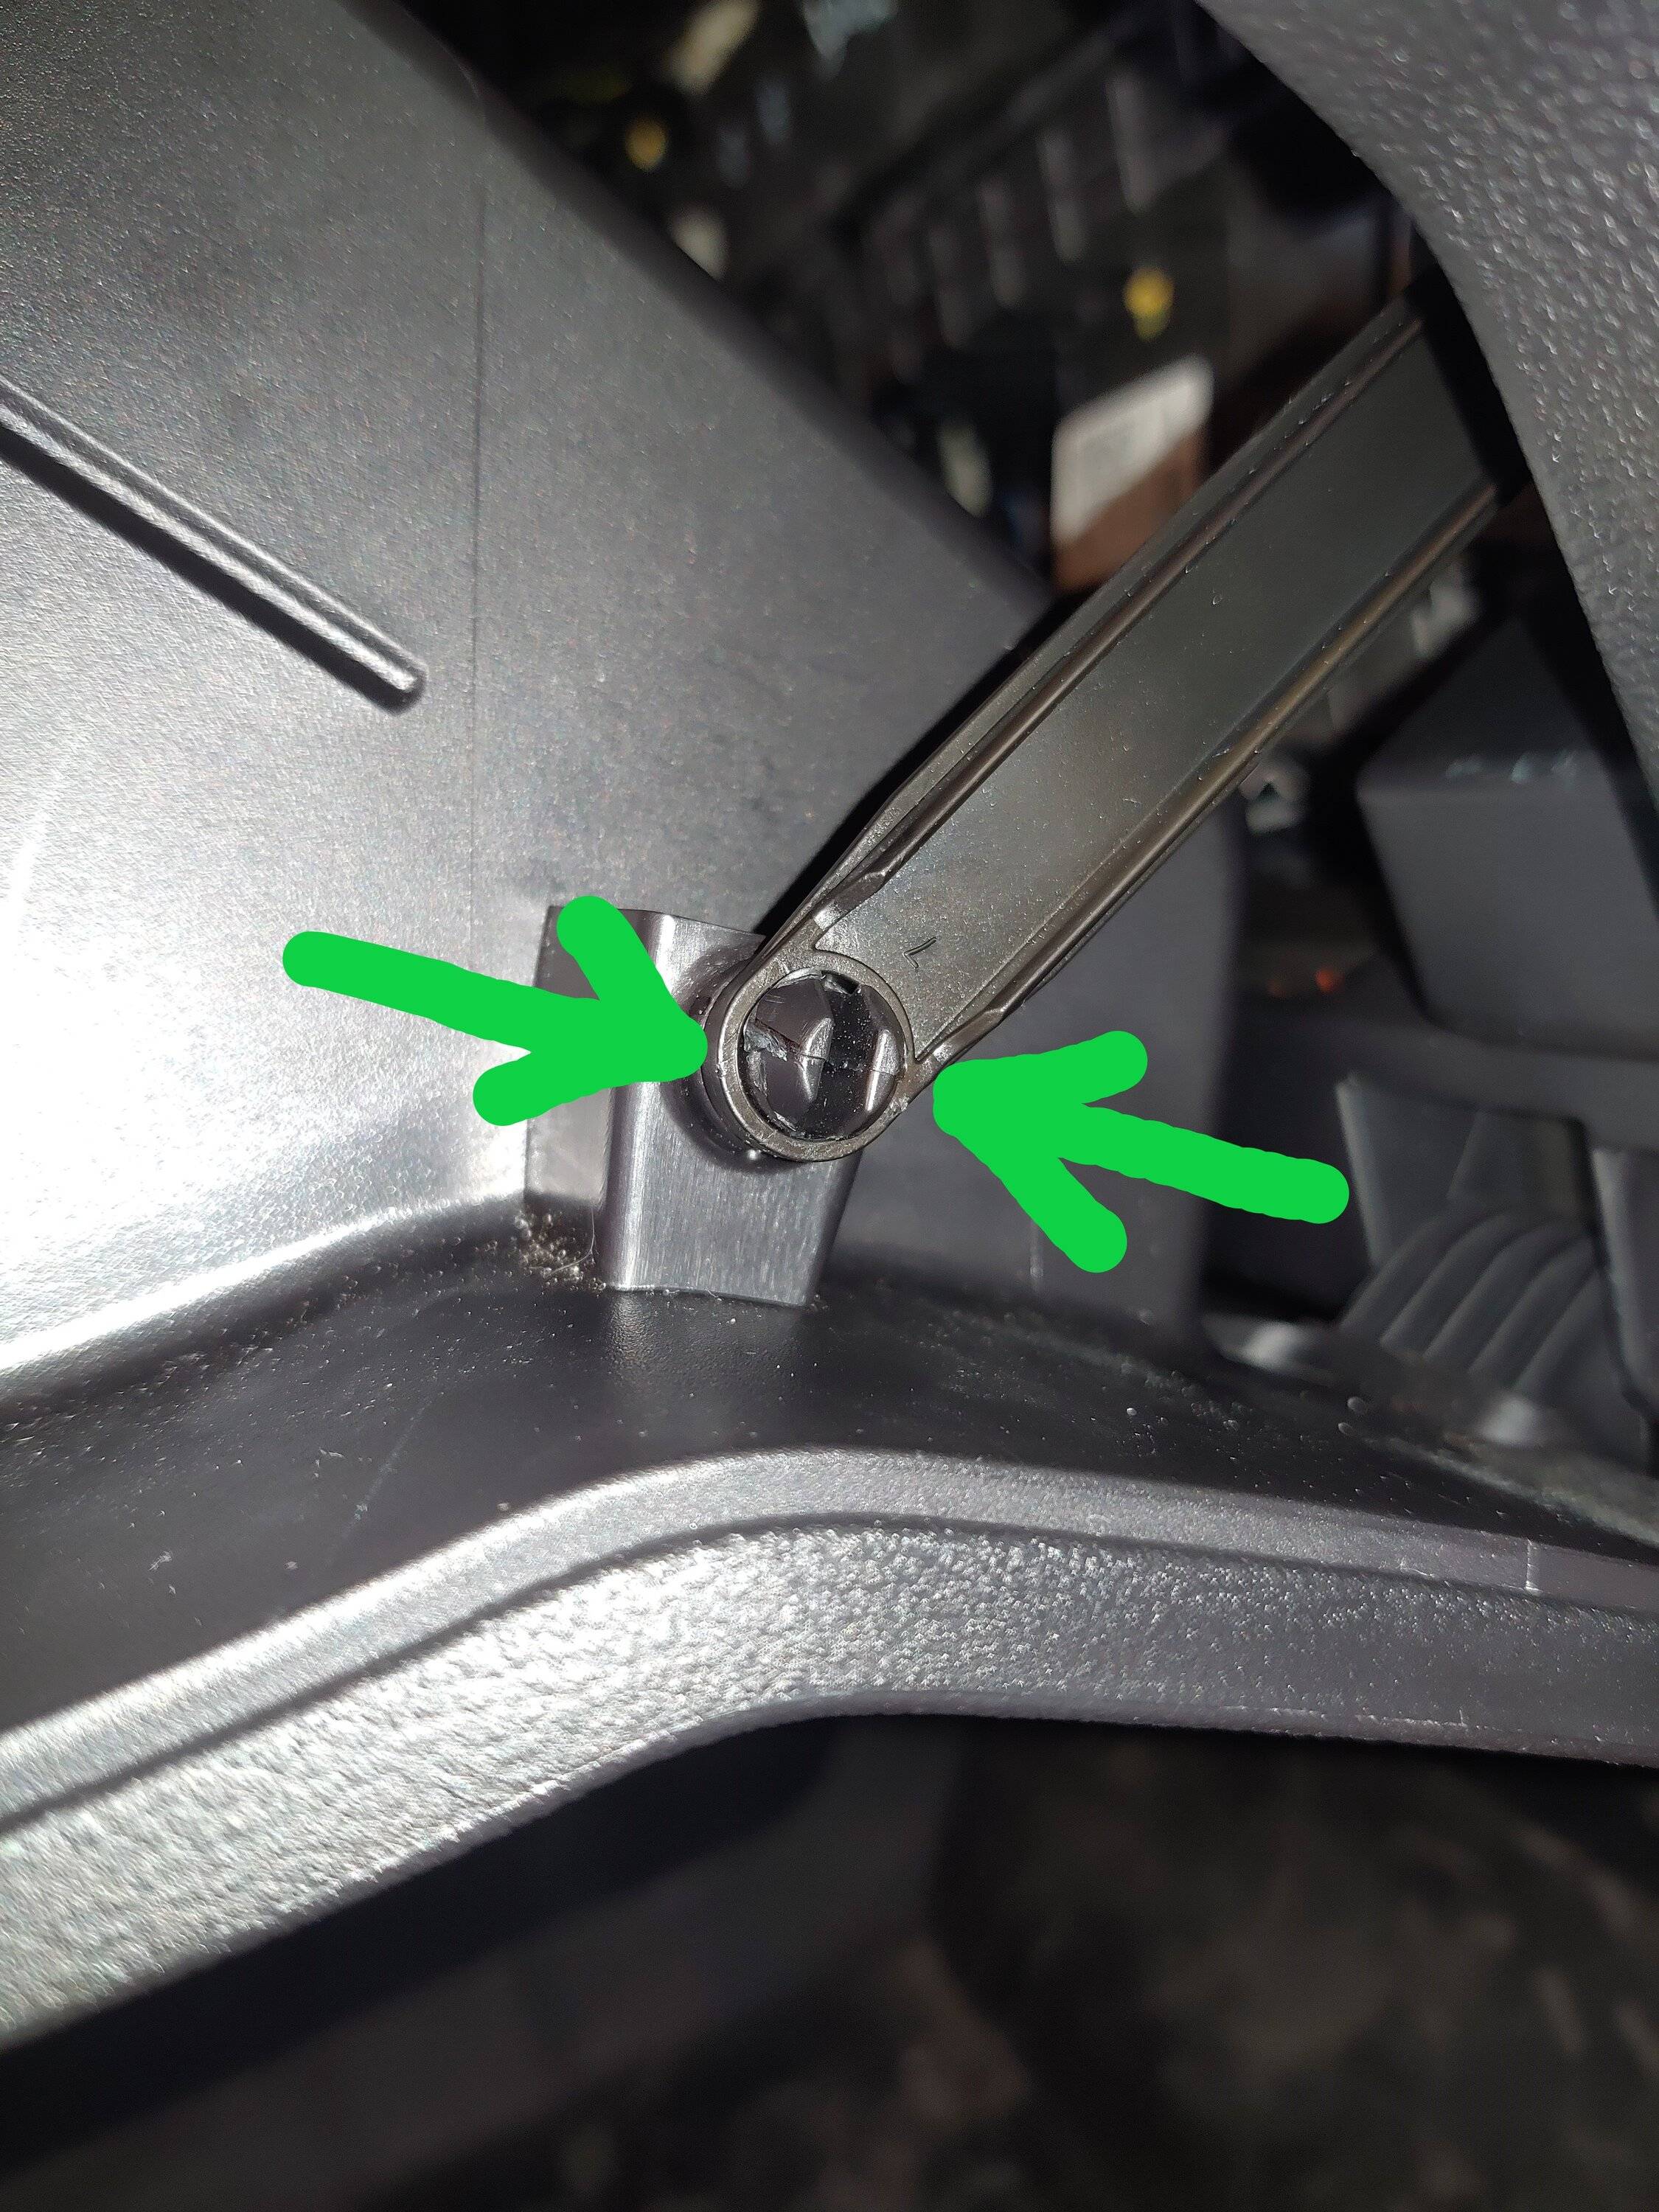
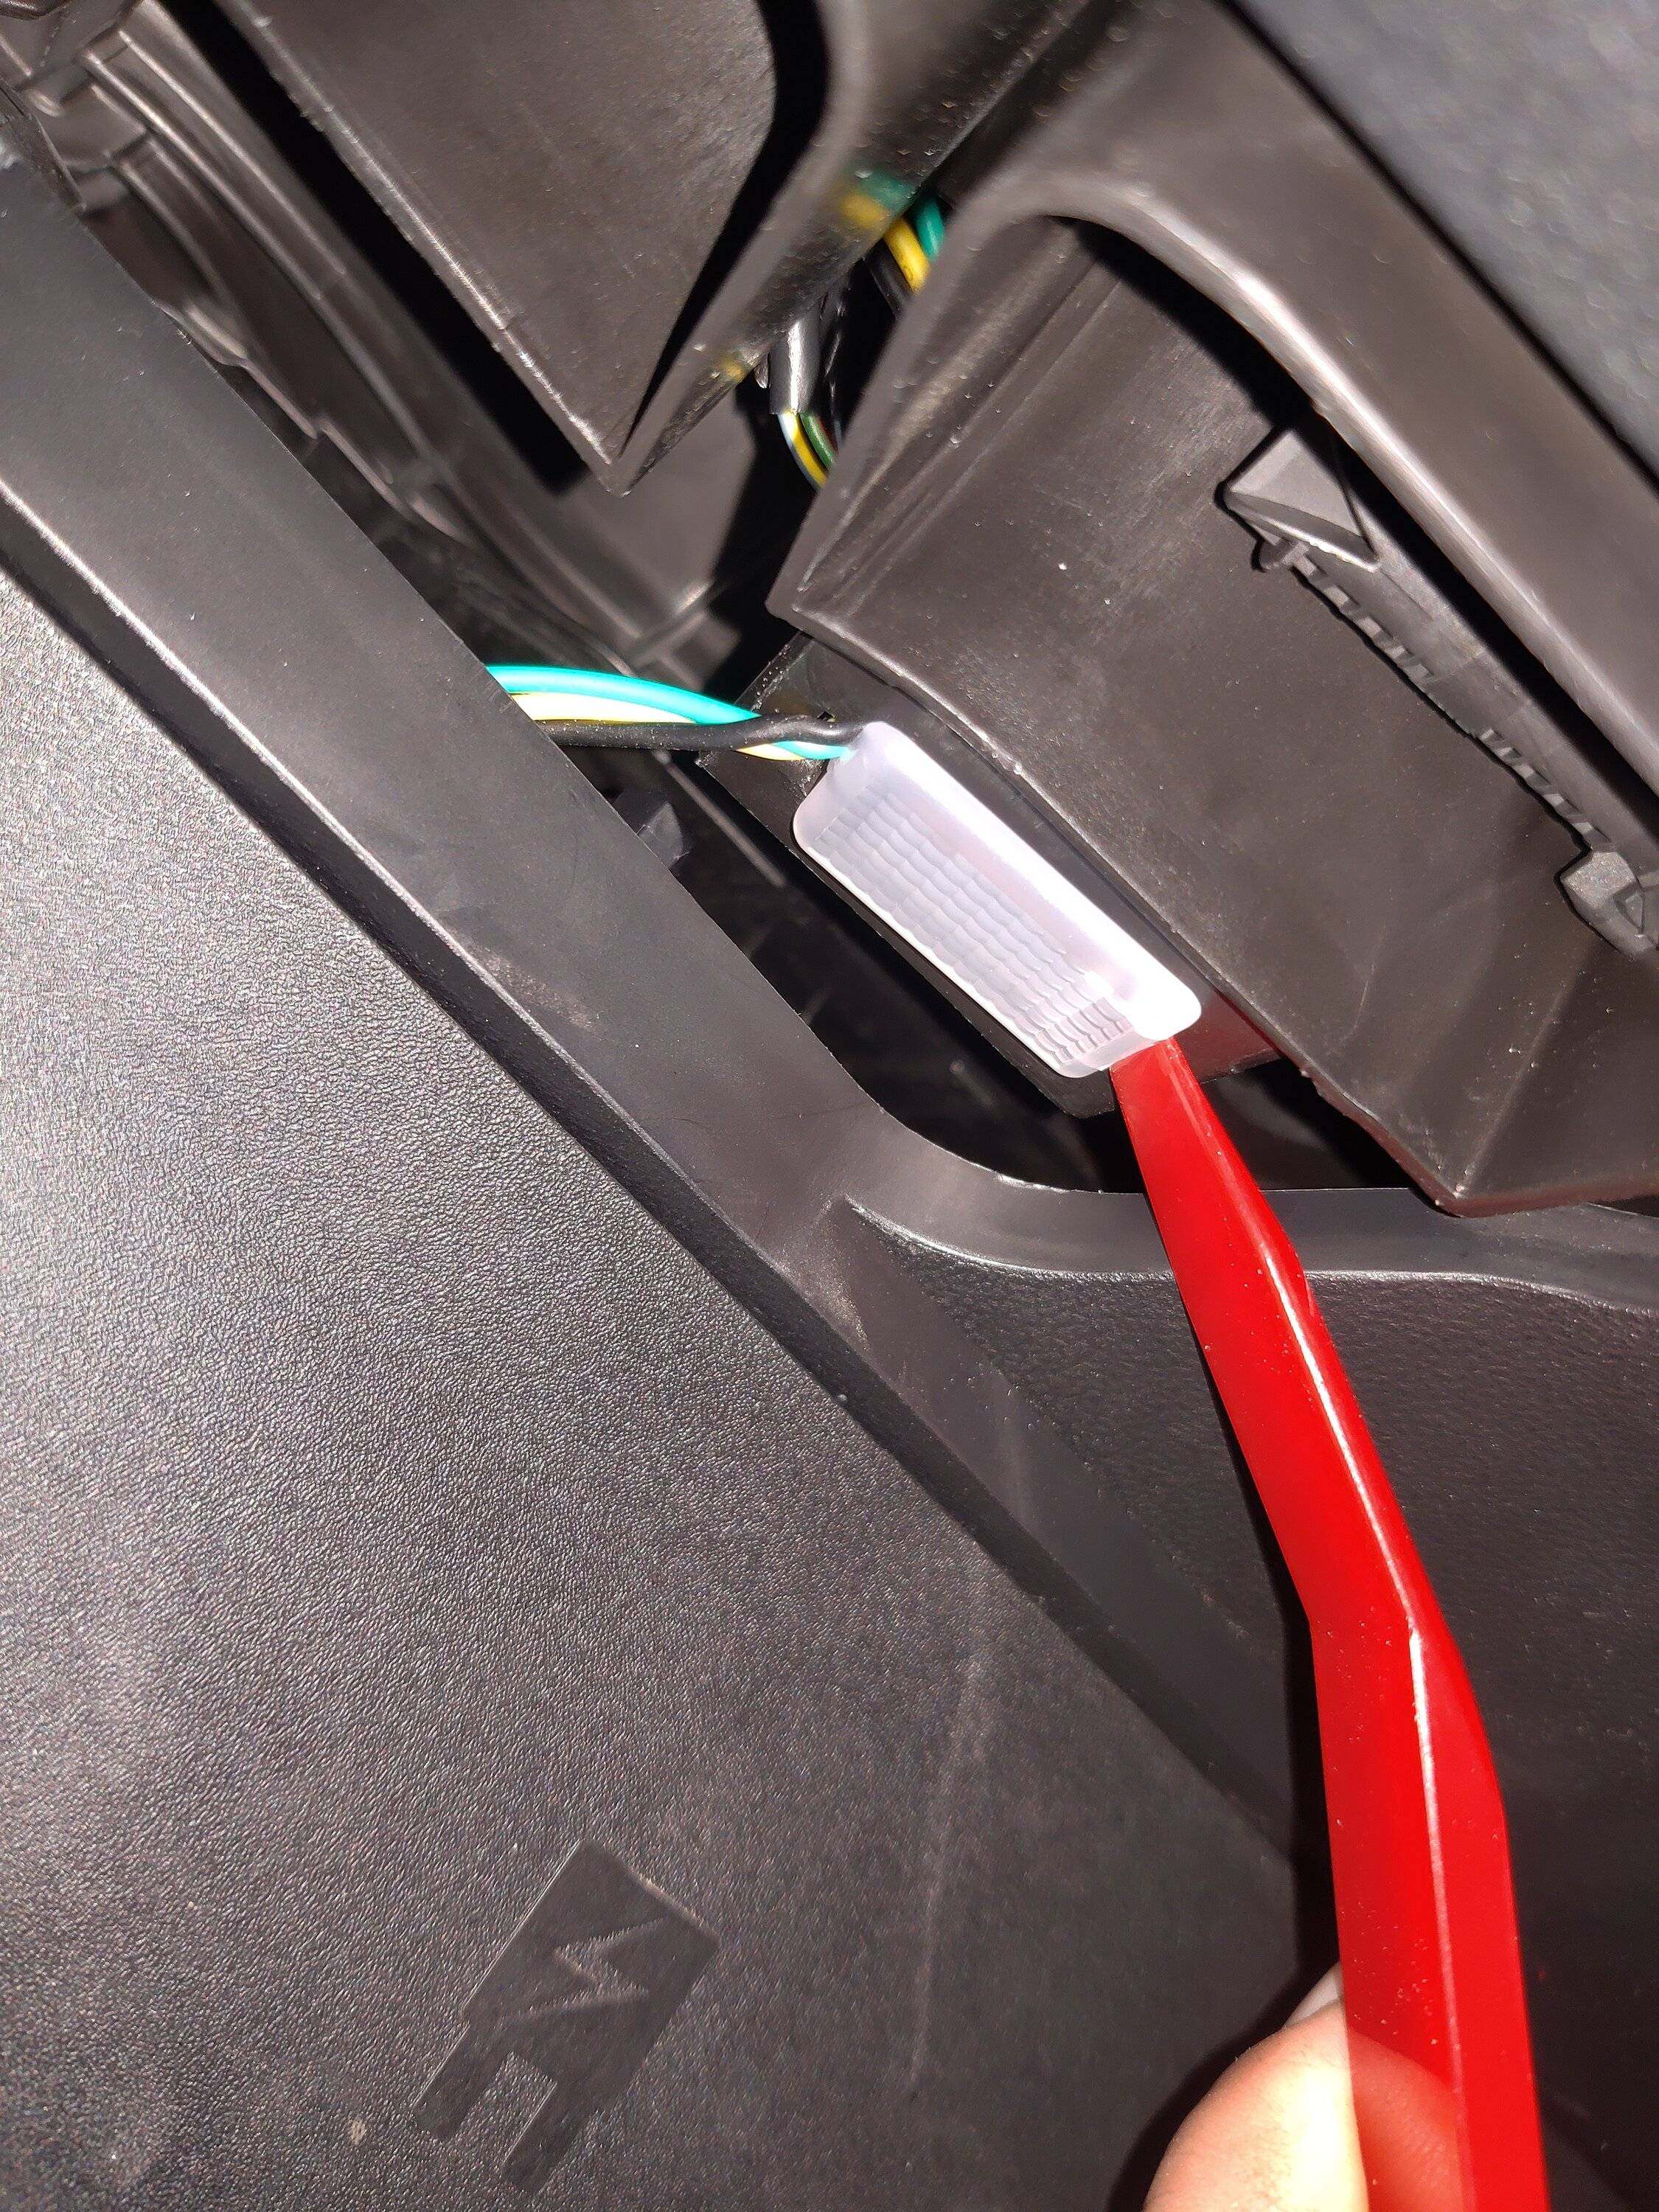
Ok, on to the footwell light. Remove the fuse panel and lower dash panel (if you have one.) *I'll edit this later to include that process with pictures, I forgot to take some for that. Once removed, you will have the remaining space needed to access everything. Use a thin plastic pry tool to remove the light assembly by pushing inward on the light cover, where the small slot is seen on the right side. There's a large tab holding the light in the socket, it should come loose and drop down enough for you to pull it through, towards the floor.
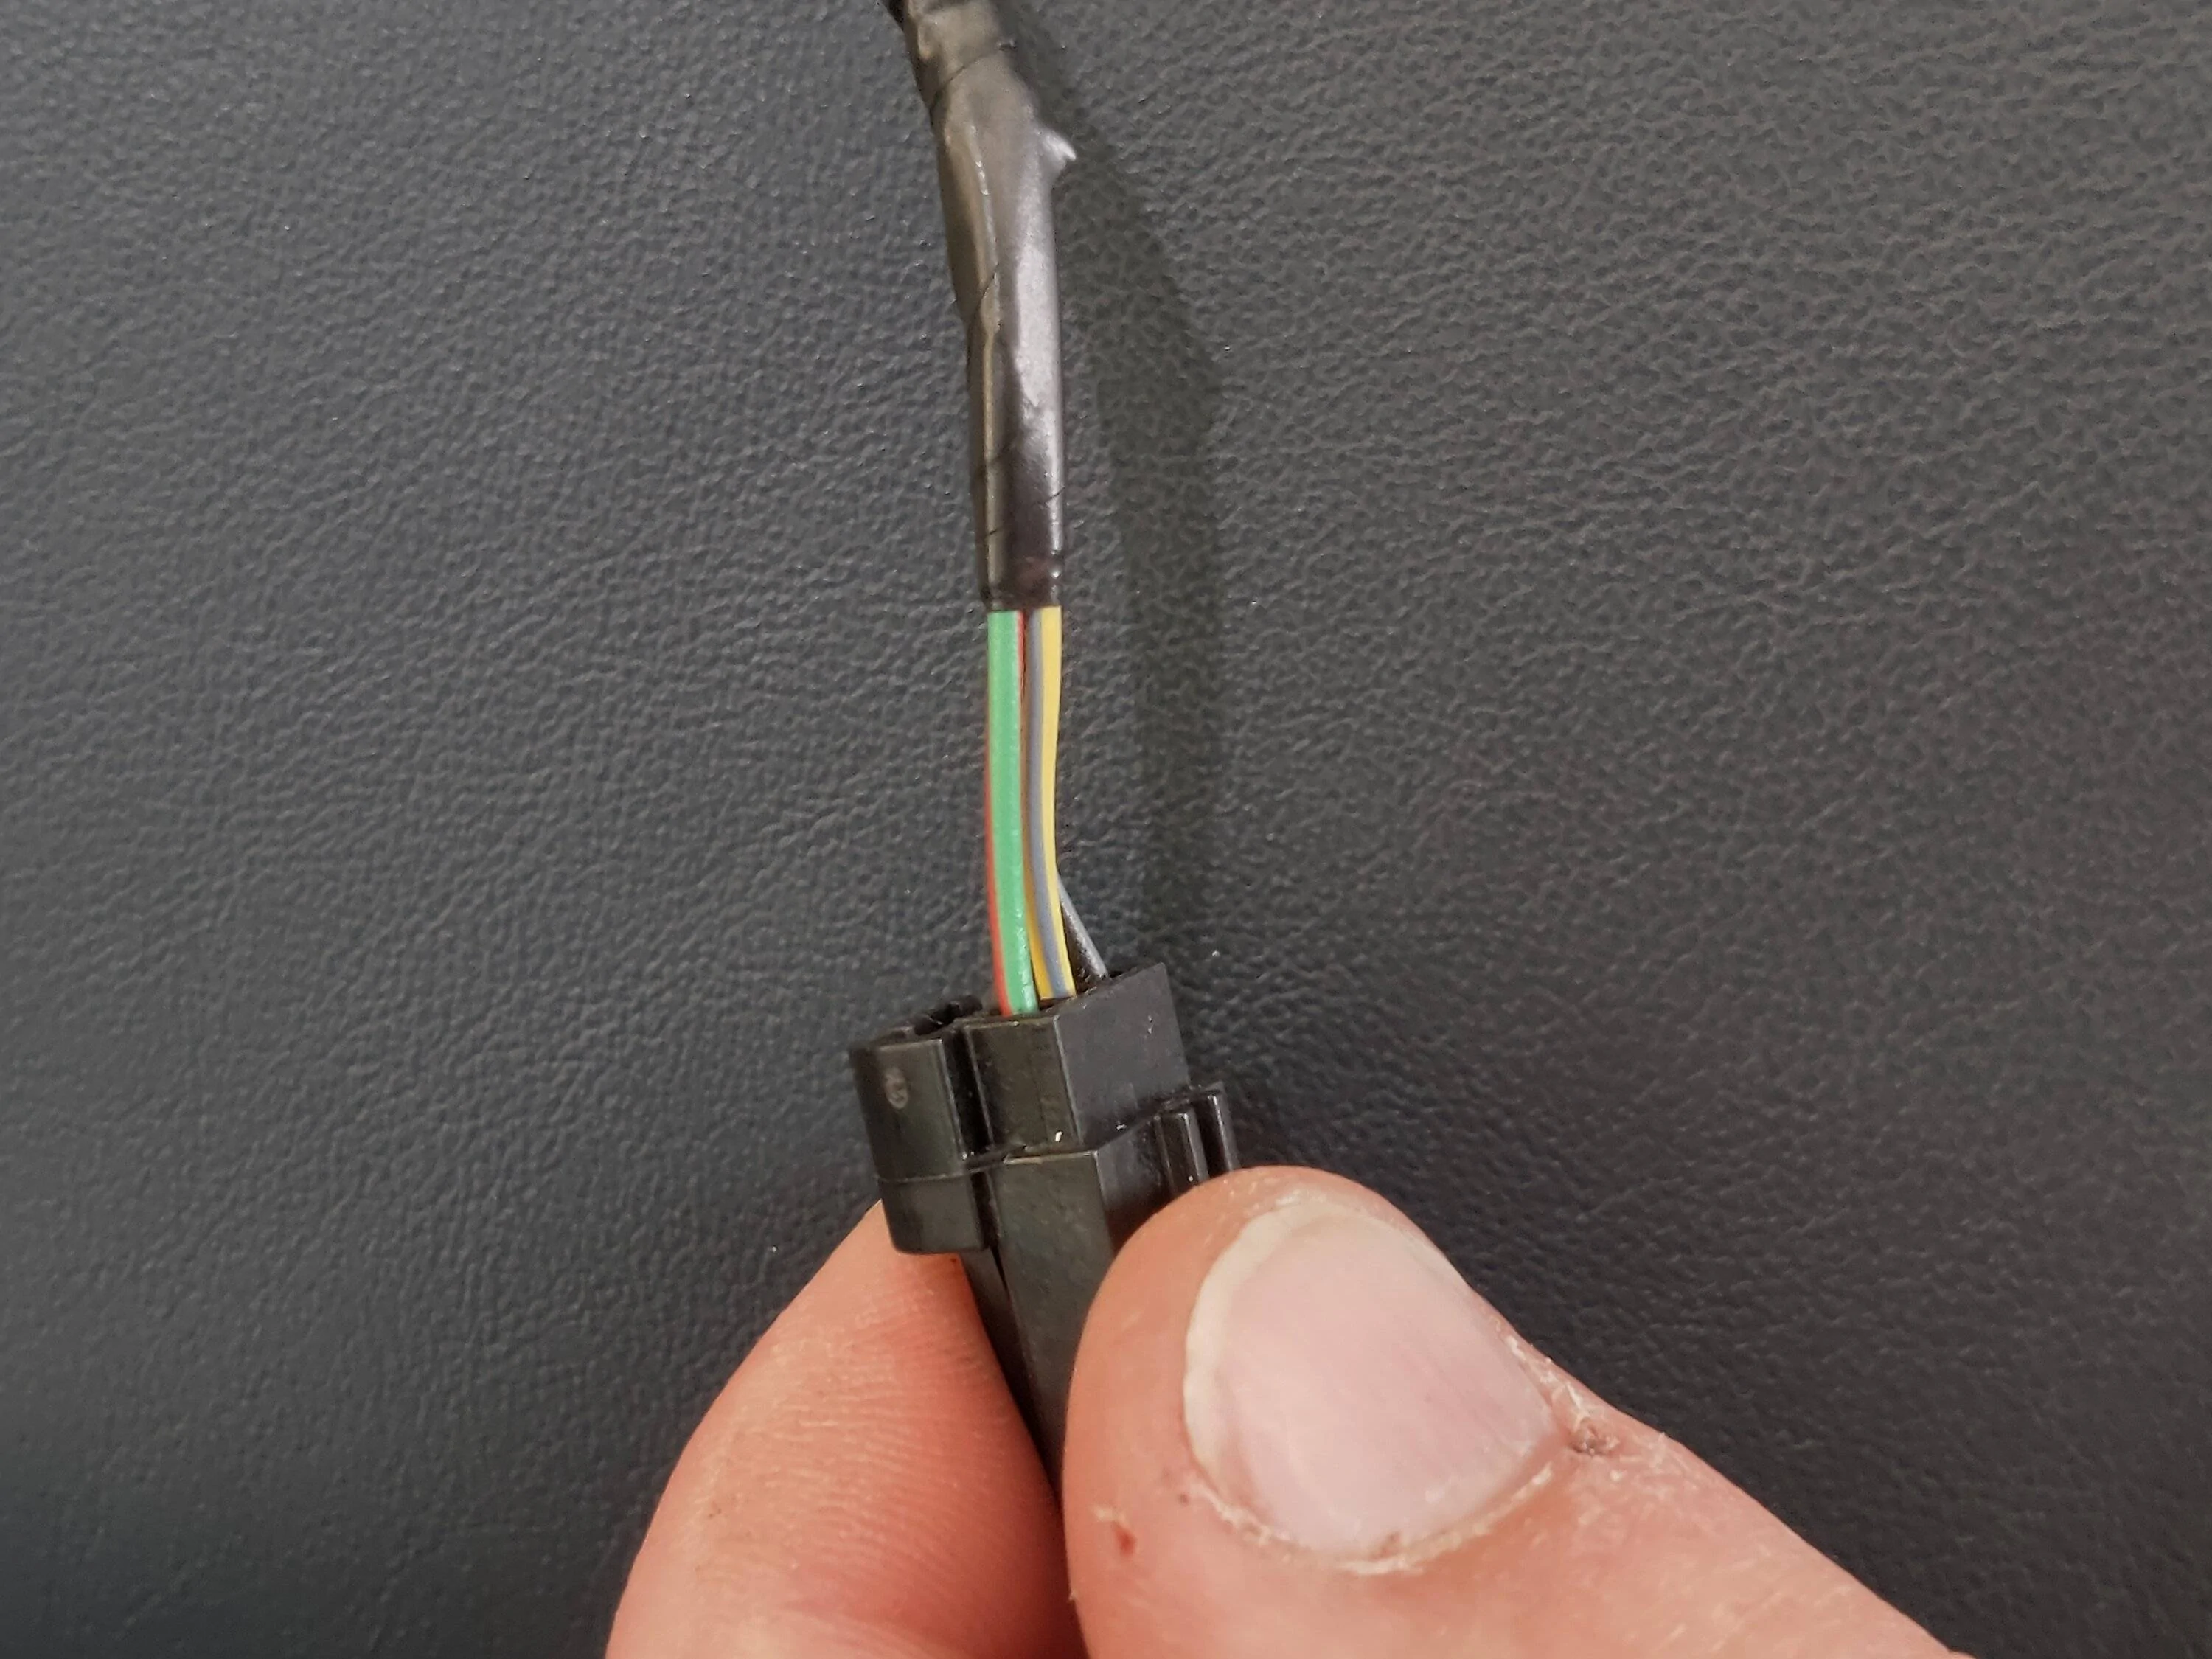
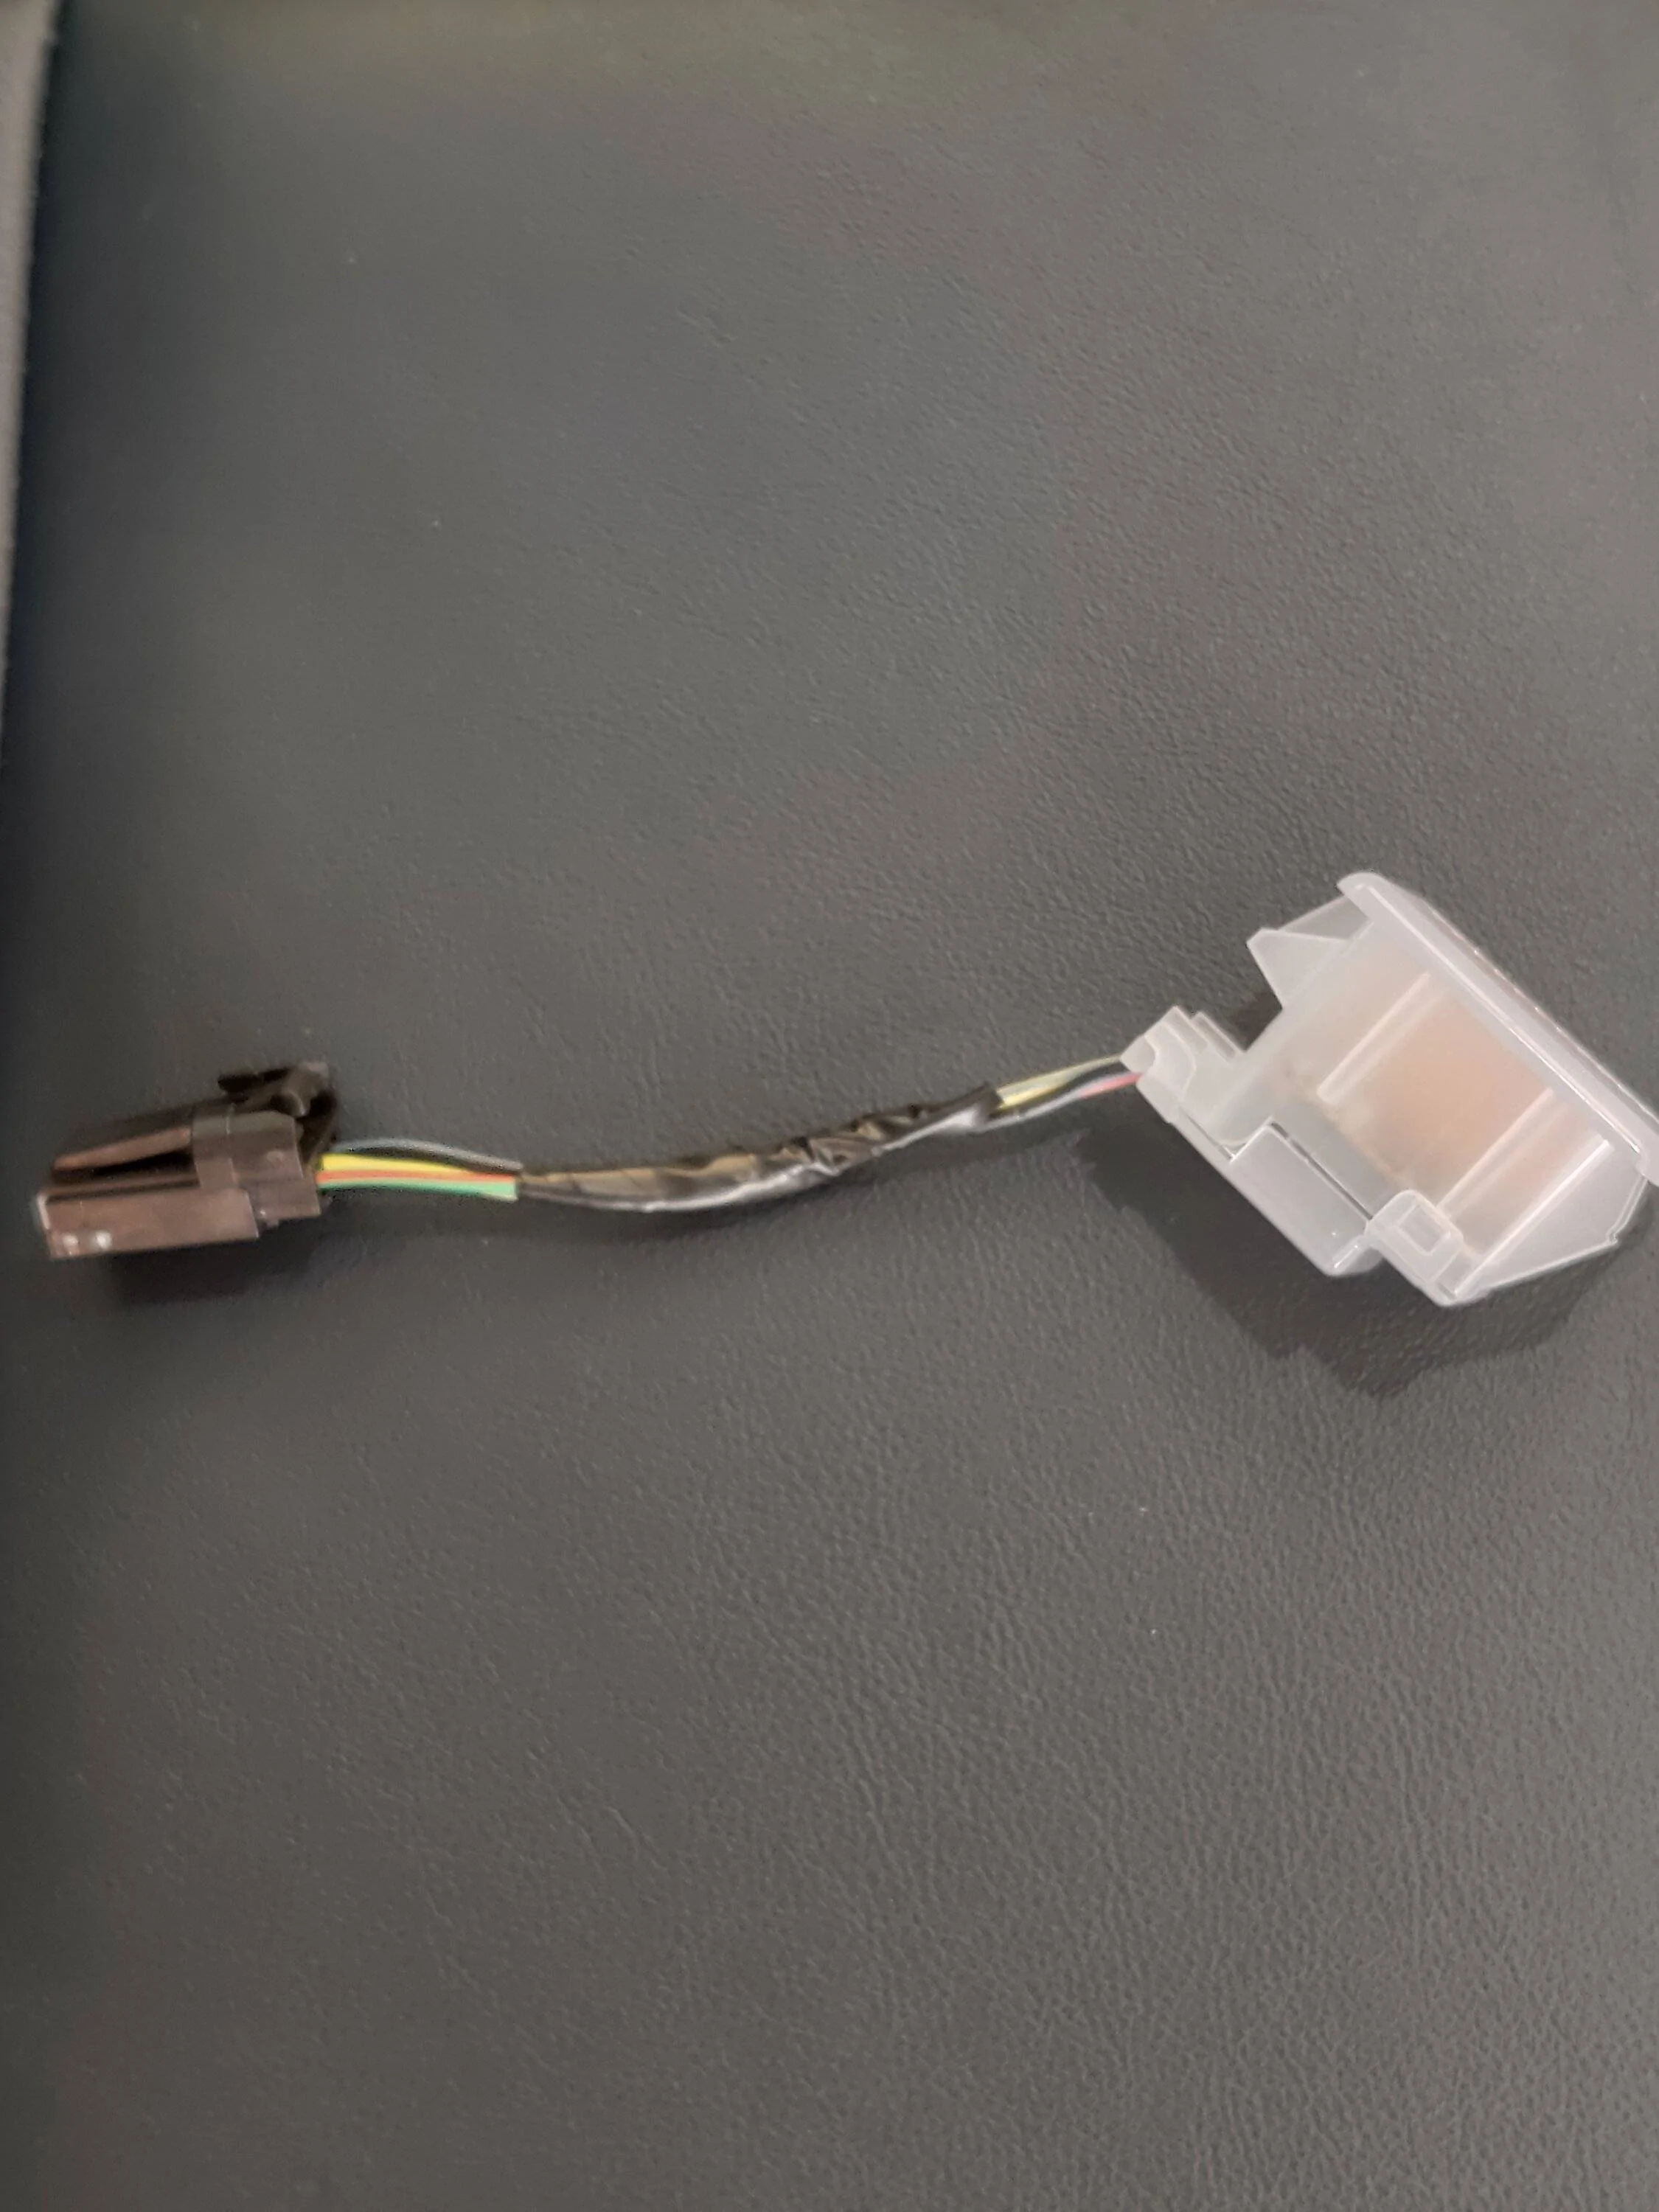
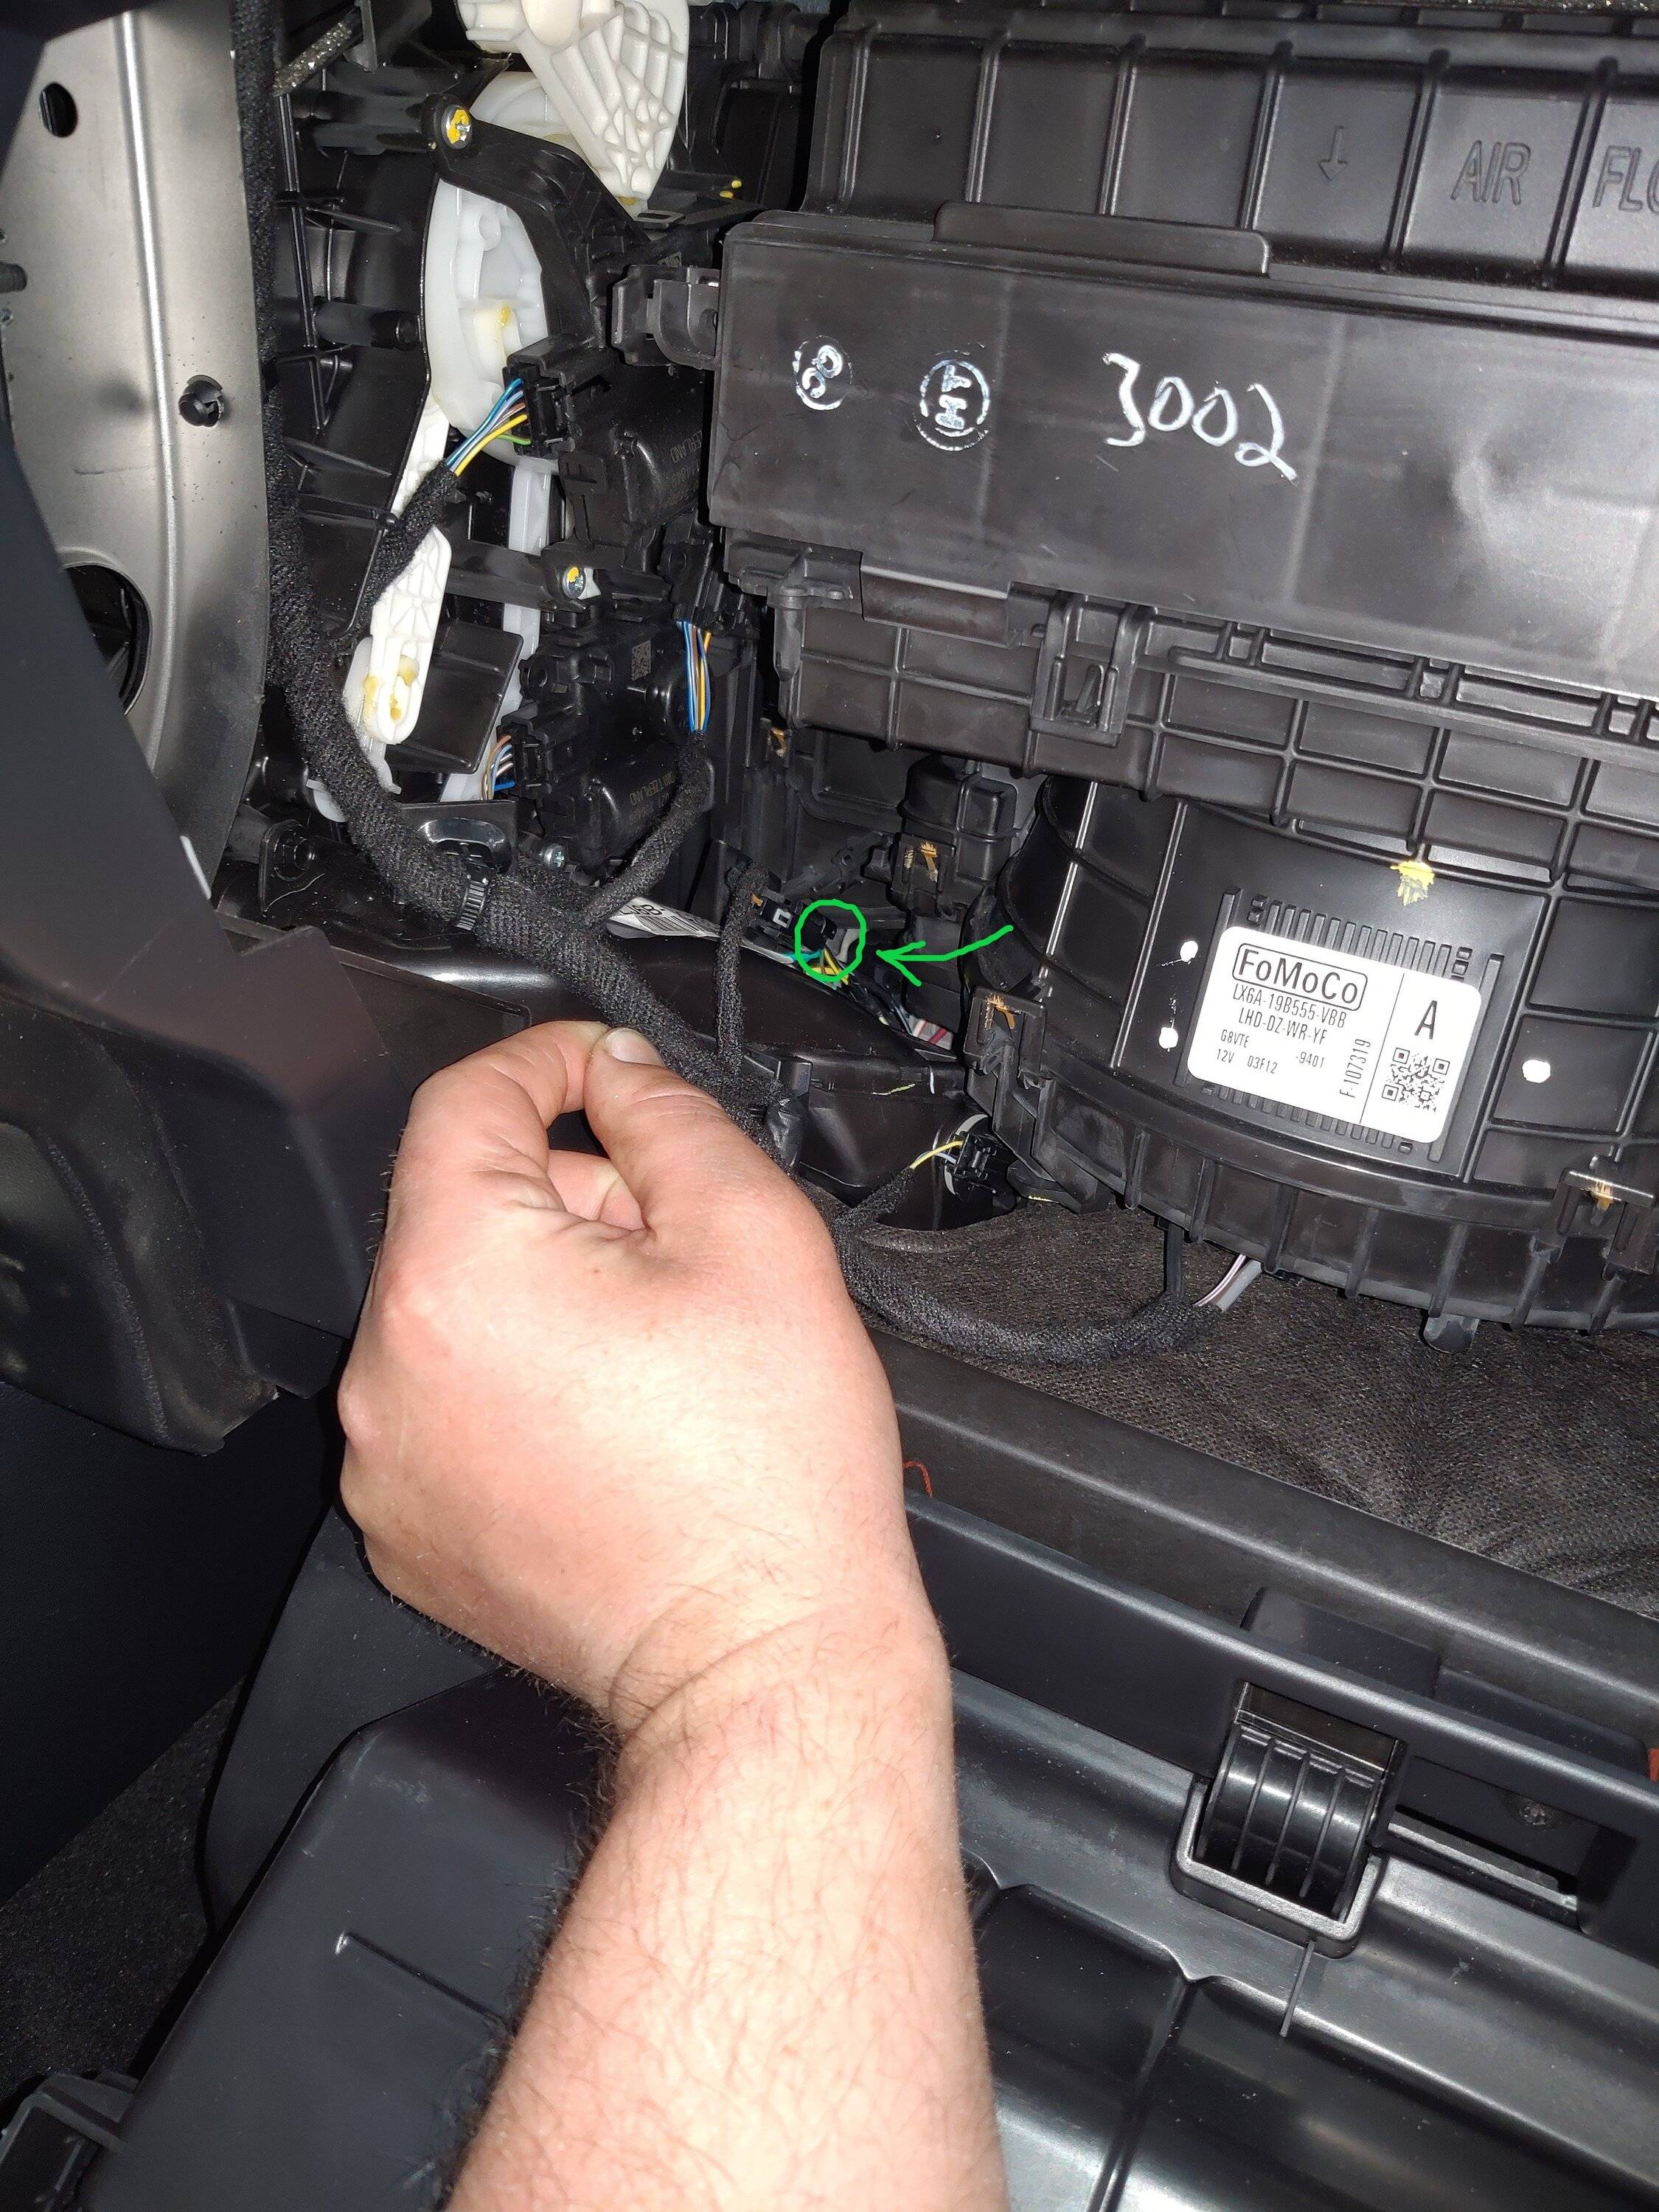
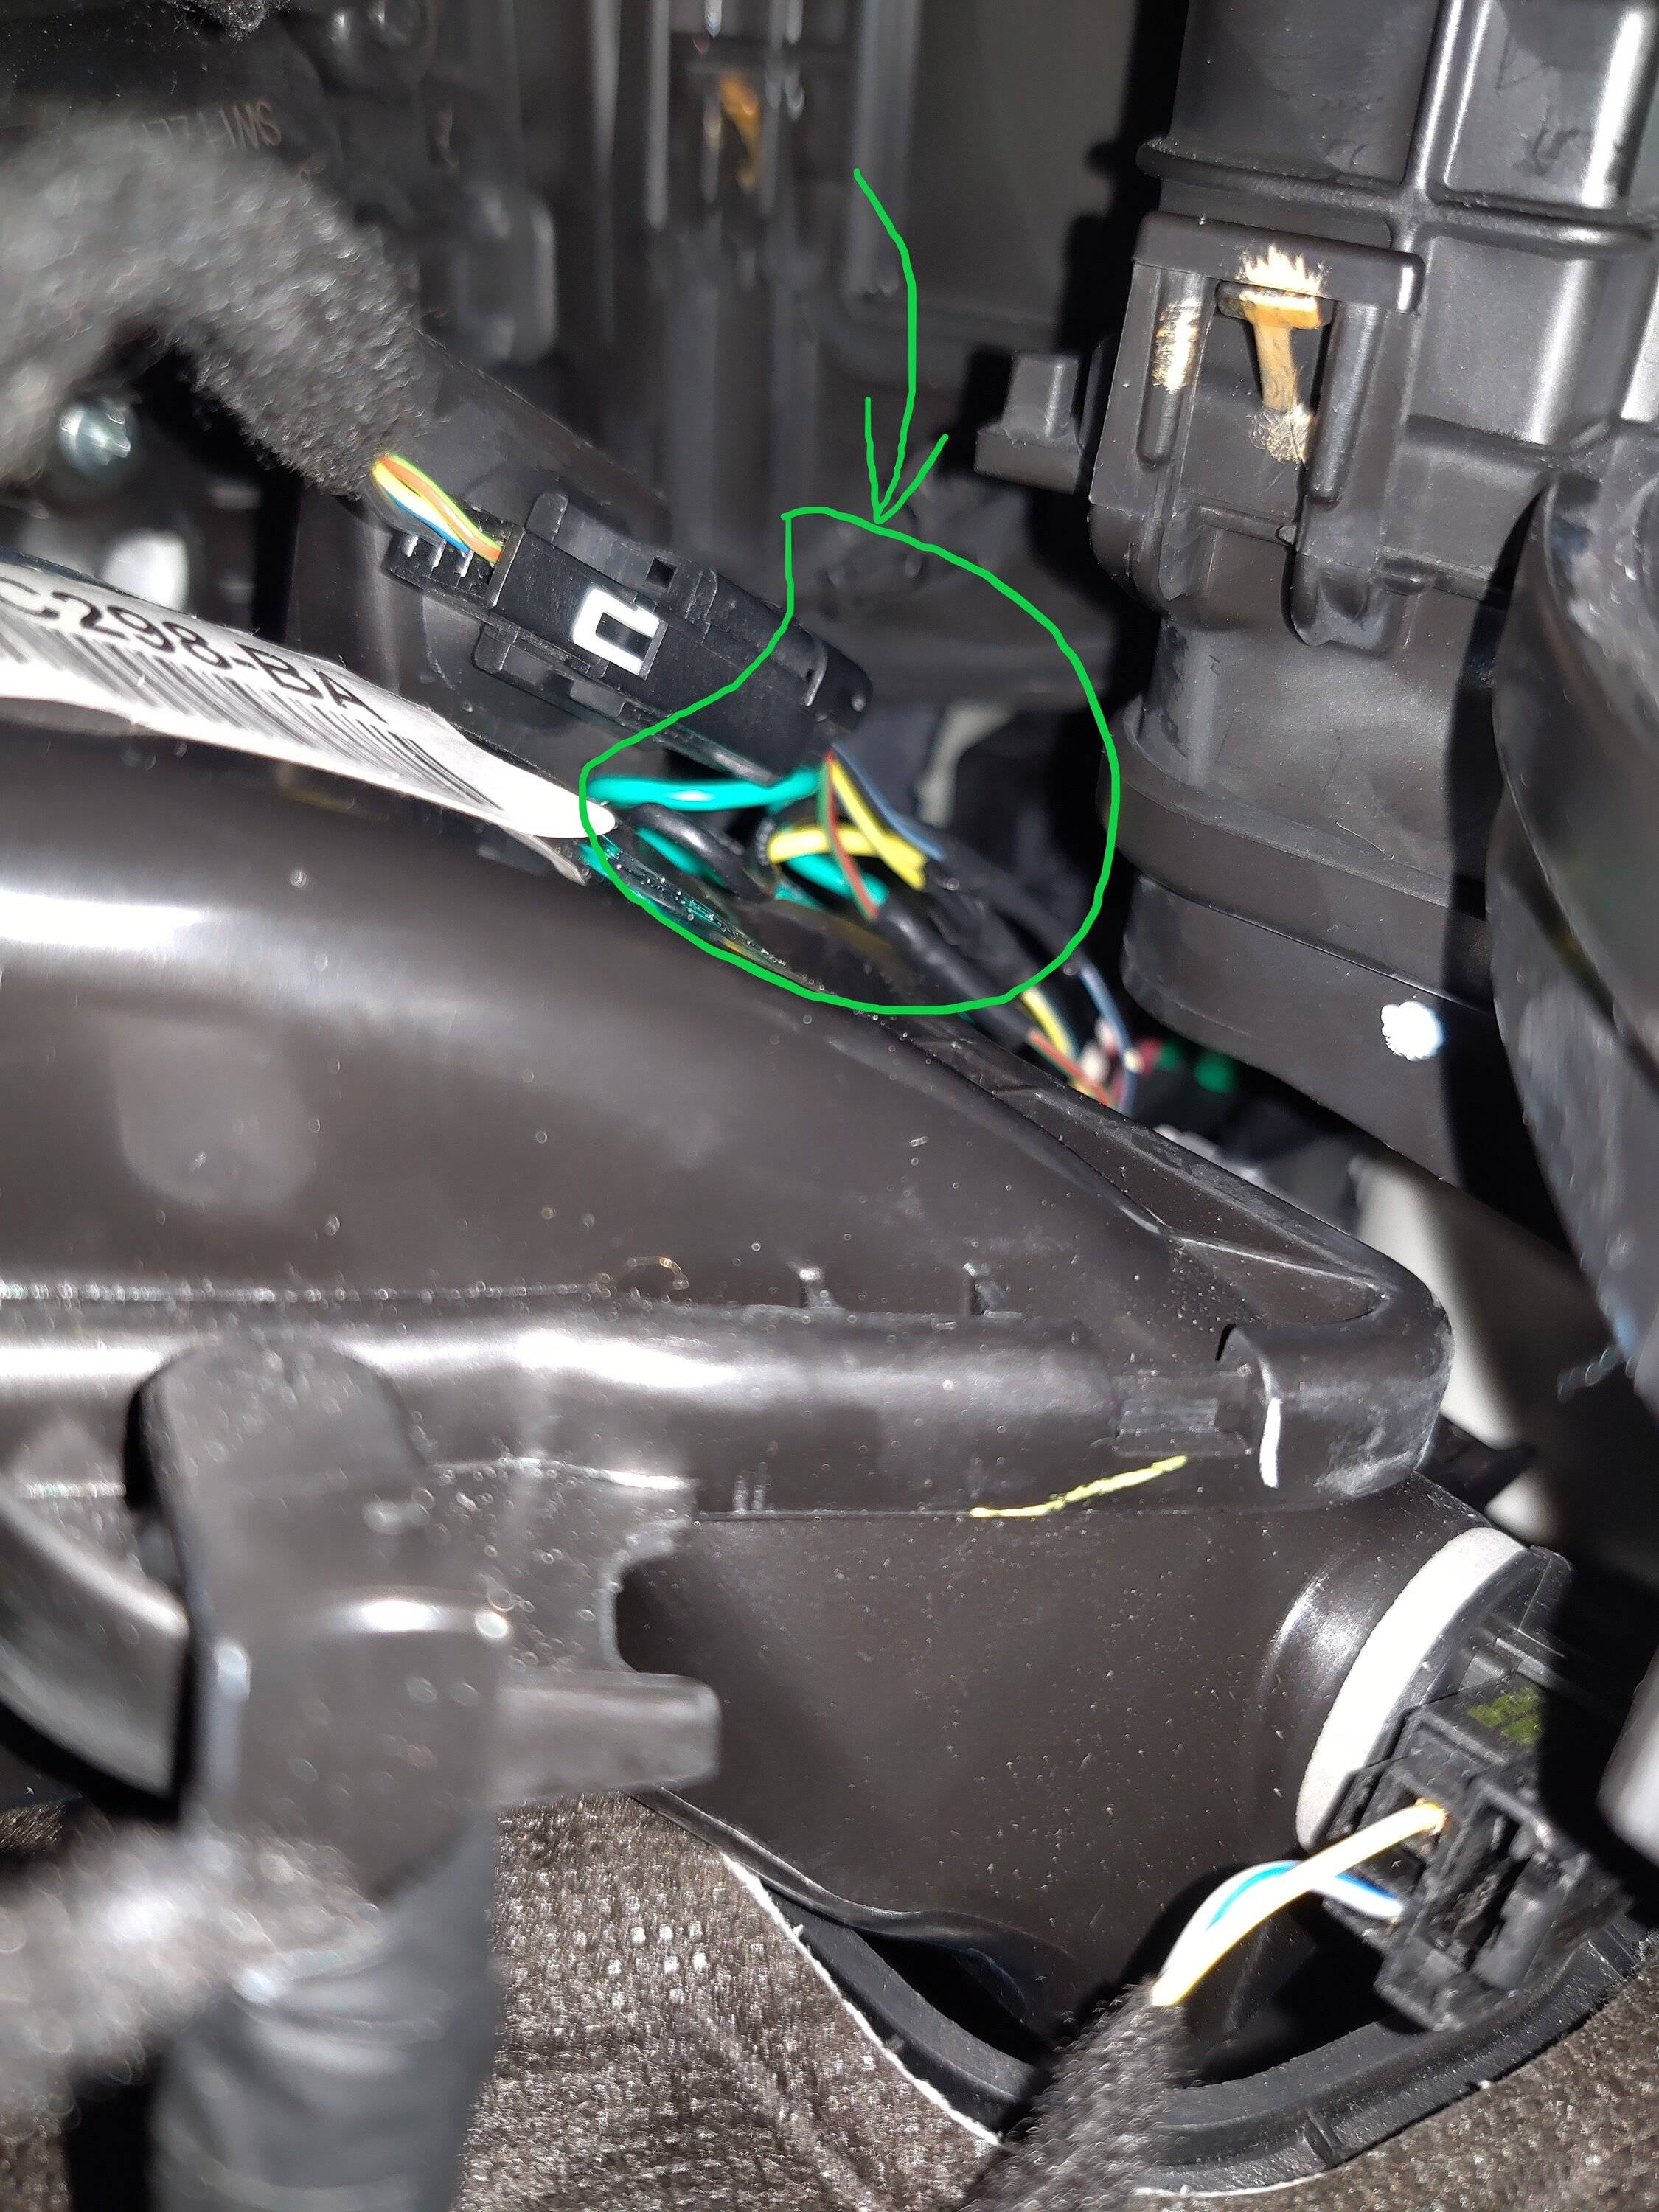
Finish disconnecting the ambient light assembly by reaching through the glove box cavity you've created. Follow the wires of the assembly to locate the end of the pigtail. Press the tab on top of the connector to disconnect. Take a mental note of where the connection is, it took me a while to relocate it because it's on the back side of another connector (pictured.)
With the assembly fully removed, now you can splice into the wires with your 20 gauge wire. There are three wires with corresponding colors to the ones on the replacement cup holder. I used three different colored wires so I wouldn't get them mixed up splicing into the cup holder. Here's a link to a short YouTube video on how to splice into a wire without connectors. I plan on reconnecting my wire splices with proper connectors in the future, but this is a very solid method. The only issue is there are not many strands in the ambient light pigtail, so I wrapped the new wires around the exposed wire several times until it was tight, then used electrical tape to tightly cover the area.
How to tap into a wire without solder or special connectors | Crutchfield
Once your three wires are securely connected to the pigtail, feed all of the working end (the other end that isn't connected to anything yet) of the new wires through the bottom of the ambient light socket in the footwell. This will allow you to reinstall the light without having to squish your wires through (like I had to do, lesson learned. I'll fix that in the next few days.) Reinstall the ambient light, the procedure is the reverse of the removal. Reconnecting the 3-pin connector is the hardest part, remember to keep the tab facing upward toward the ceiling as you feel your way around and eventually seat the connector after a lot of frustration and swearing.
Next, you'll be popping your shifter trim panel up to install the cup holder. Many of you will be familiar with this part, as you've probably already looked to see if you have a pigtail ready to connect to the cup holder. I'll leave this part alone for now and come back to it when I tidy up my work. You can find this procedure in the beginning of the thread, explained with pictures by JCampos30.
After attaching the new cup holder to the shifter trim panel, the last step is wiring the cup holder lights to the footwell ambient light. Run your wires behind the center of the lower dash and through to the void space underneath the cup holder. I ran my wires behind the panel that the passenger's left leg would touch, the same one that has the little cargo net on it. If you have a lot of unneeded extra wire length, now would be the time to cut them to an appropriate length. Using the same method you used to splice the wires into the footwell ambient light pigtail, splice the same corresponding wires to the cup holder pig tail. The cup holder wires are the same colors as the ones on the footwell light, so there's no guess work involved. Once the wires are securely connected to your cup holder pigtail, reinstall your shifter trim panel in the reverse order you removed it.
Reconnect your negative battery cable to your battery and check to make sure your lights are functioning. If your SYNC 3 is like mine, every time I disconnect the battery, I have to adjust the brightness of my ambient lights in the menu. Your cup holder should be lighting up and adjusting with the other lights as you increase or decrease the light level. Once you've confirmed everything works properly, reinstall the footwell panels and the glove box in the reverse order you took them off, and you're good to go!
This is the method I used to install the newest generation Ford Escape cup holder with built-in ambient lighting into my Outer Banks. It's a fairly simple procedure, but this is the way it should be done in the quickest and most efficient manner. This is only proven by me so far, with an existing ambient light system already in place. There may be changes in the future should this method prove to be a fire hazard or unsafe in any way. If anyone notices something that appears unsafe and needs further examination, PLEASE SAY SO.
Special thanks to Mrmike, who provided us all with the wiring diagram that inspired me to attempt this project, as well as JCampos30, who originally pioneered the idea and installed his own.
---------------------------------------------------------------------------------------
Materials needed:
4th Generation Ford Escape Ambient Light Cup Holder -- Part #: LJ6Z-7813562-FA
BNTECHGO 20 AWG Silicone Wire -- Amazon.com
Pliers
Thin, plastic pry tool or flat-head screwdriver
Electrical tape
"T" wire tap connectors (arguably optional)
---------------------------------------------------------------------------------------
First, as always, disconnect your negative battery cable. I like to cover my negative battery terminal with a rag or plastic shield to make sure the cable doesn't accidentally make contact again.
Next you'll want to remove the glove box for access to the 3-pin connector that powers the footwell ambient light. Open your glove box and press in the tabs on both sides to lower the glove box further. Now, disconnect the dampener on the right side of the glove box by using a pair of pliers to push the two ends of the male clip together, and pull off the dampener. You might have your glove box fall and spill all of its contents onto the floor (you can probably guess how I know,) so be ready for that. Now, with your glove box disconnected, simply lift the box up and out, giving you ample room to work.
Ok, on to the footwell light. Remove the fuse panel and lower dash panel (if you have one.) *I'll edit this later to include that process with pictures, I forgot to take some for that. Once removed, you will have the remaining space needed to access everything. Use a thin plastic pry tool to remove the light assembly by pushing inward on the light cover, where the small slot is seen on the right side. There's a large tab holding the light in the socket, it should come loose and drop down enough for you to pull it through, towards the floor.
Finish disconnecting the ambient light assembly by reaching through the glove box cavity you've created. Follow the wires of the assembly to locate the end of the pigtail. Press the tab on top of the connector to disconnect. Take a mental note of where the connection is, it took me a while to relocate it because it's on the back side of another connector (pictured.)
With the assembly fully removed, now you can splice into the wires with your 20 gauge wire. There are three wires with corresponding colors to the ones on the replacement cup holder. I used three different colored wires so I wouldn't get them mixed up splicing into the cup holder. Here's a link to a short YouTube video on how to splice into a wire without connectors. I plan on reconnecting my wire splices with proper connectors in the future, but this is a very solid method. The only issue is there are not many strands in the ambient light pigtail, so I wrapped the new wires around the exposed wire several times until it was tight, then used electrical tape to tightly cover the area.
How to tap into a wire without solder or special connectors | Crutchfield

Once your three wires are securely connected to the pigtail, feed all of the working end (the other end that isn't connected to anything yet) of the new wires through the bottom of the ambient light socket in the footwell. This will allow you to reinstall the light without having to squish your wires through (like I had to do, lesson learned. I'll fix that in the next few days.) Reinstall the ambient light, the procedure is the reverse of the removal. Reconnecting the 3-pin connector is the hardest part, remember to keep the tab facing upward toward the ceiling as you feel your way around and eventually seat the connector after a lot of frustration and swearing.
Next, you'll be popping your shifter trim panel up to install the cup holder. Many of you will be familiar with this part, as you've probably already looked to see if you have a pigtail ready to connect to the cup holder. I'll leave this part alone for now and come back to it when I tidy up my work. You can find this procedure in the beginning of the thread, explained with pictures by JCampos30.
After attaching the new cup holder to the shifter trim panel, the last step is wiring the cup holder lights to the footwell ambient light. Run your wires behind the center of the lower dash and through to the void space underneath the cup holder. I ran my wires behind the panel that the passenger's left leg would touch, the same one that has the little cargo net on it. If you have a lot of unneeded extra wire length, now would be the time to cut them to an appropriate length. Using the same method you used to splice the wires into the footwell ambient light pigtail, splice the same corresponding wires to the cup holder pig tail. The cup holder wires are the same colors as the ones on the footwell light, so there's no guess work involved. Once the wires are securely connected to your cup holder pigtail, reinstall your shifter trim panel in the reverse order you removed it.
Reconnect your negative battery cable to your battery and check to make sure your lights are functioning. If your SYNC 3 is like mine, every time I disconnect the battery, I have to adjust the brightness of my ambient lights in the menu. Your cup holder should be lighting up and adjusting with the other lights as you increase or decrease the light level. Once you've confirmed everything works properly, reinstall the footwell panels and the glove box in the reverse order you took them off, and you're good to go!
Last edited:
Deleted member 6350
Guest
Thanks Very Much for your Detailed Write- UpAmbient Light Cup Holder Installation
This is the method I used to install the newest generation Ford Escape cup holder with built-in ambient lighting into my Outer Banks. It's a fairly simple procedure, but this is the way it should be done in the quickest and most efficient manner. This is only proven by me so far, with an existing ambient light system already in place. There may be changes in the future should this method prove to be a fire hazard or unsafe in any way. If anyone notices something that appears unsafe and needs further examination, PLEASE SAY SO.
Special thanks to Mrmike, who provided us all with the wiring diagram that inspired me to attempt this project, as well as JCampos30, who originally pioneered the idea and installed his own.
---------------------------------------------------------------------------------------
Materials needed:
4th Generation Ford Escape Ambient Light Cup Holder -- Part #: LJ6Z-7813562-FA
BNTECHGO 20 AWG Silicone Wire -- Amazon.com
Pliers
Thin, plastic pry tool or flat-head screwdriver
Electrical tape
"T" wire tap connectors (arguably optional)
---------------------------------------------------------------------------------------
First, as always, disconnect your negative battery cable. I like to cover my negative battery terminal with a rag or plastic shield to make sure the cable doesn't accidentally make contact again.
Next you'll want to remove the glove box for access to the 3-pin connector that powers the footwell ambient light. Open your glove box and press in the tabs on both sides to lower the glove box further. Now, disconnect the dampener on the right side of the glove box by using a pair of pliers to push the two ends of the male clip together, and pull off the dampener. You might have your glove box fall and spill all of its contents onto the floor (you can probably guess how I know,) so be ready for that. Now, with your glove box disconnected, simply lift the box up and out, giving you ample room to work.
Ok, on to the footwell light. Remove the fuse panel and lower dash panel (if you have one.) *I'll edit this later to include that process with pictures, I forgot to take some for that. Once removed, you will have the remaining space needed to access everything. Use a thin plastic pry tool to remove the light assembly by pushing inward on the light cover, where the small slot is seen on the right side. There's a large tab holding the light in the socket, it should come loose and drop down enough for you to pull it through, towards the floor.
Finish disconnecting the ambient light assembly by reaching through the glove box cavity you've created. Follow the wires of the assembly to locate the end of the pigtail. Press the tab on top of the connector to disconnect. Take a mental note of where the connection is, it took me a while to relocate it because it's on the back side of another connector (pictured.)
With the assembly fully removed, now you can splice into the wires with your 20 gauge wire. There are three wires with corresponding colors to the ones on the replacement cup holder. I used three different colored wires so I wouldn't get them mixed up splicing into the cup holder. Here's a link to a short YouTube video on how to splice into a wire without connectors. I plan on reconnecting my wire splices with proper connectors in the future, but this is a very solid method. The only issue is there are not many strands in the ambient light pigtail, so I wrapped the new wires around the exposed wire several times until it was tight, then used electrical tape to tightly cover the area.
How to tap into a wire without solder or special connectors | Crutchfield
Once your three wires are securely connected to the pigtail, feed all of the working end (the other end that isn't connected to anything yet) of the new wires through the bottom of the ambient light socket in the footwell. This will allow you to reinstall the light without having to squish your wires through (like I had to do, lesson learned. I'll fix that in the next few days.) Reinstall the ambient light, the procedure is the reverse of the removal. Reconnecting the 3-pin connector is the hardest part, remember to keep the tab facing upward toward the ceiling as you feel your way around and eventually seat the connector after a lot of frustration and swearing.
Next, you'll be popping your center console panel up to install the cup holder. Many of you will be familiar with this part, as you've probably already looked to see if you have a pigtail ready to connect to the cup holder. I'll leave this part alone for now and come back to it when I tidy up my work. You can find this procedure in the beginning of the thread, explained with pictures by JCampos30.
After attaching the new cup holder to the center console panel, the last step is wiring the cup holder lights to the footwell ambient light. Run your wires behind the center of the lower dash and through to the void underneath the cup holder in the center console. I ran my wires behind the panel that the passenger's left leg would touch, the same one that has the little cargo net on it. If you have a lot of unneeded extra wire length, now would be the time cut them to an appropriate length. Using the same method you used to splice the wires into the footwell ambient light pigtail, splice the same corresponding wires to the cup holder pig tail. The cup holder wires are the same colors as the ones on the footwell light, so there's no guess work involved. Once the wires are securely connected to your cup holder pigtail, reinstall your center console in the reverse order you removed it.
Reconnect your negative battery cable to your battery and check to make sure your lights are functioning. If your SYNC 3 is like mine, every time I disconnect the battery, I have to adjust the brightness of my ambient lights in the menu. Your cup holder should be lighting up and adjusting with the other lights as you increase or decrease the light level. Once you've confirmed everything works properly, reinstall the footwell panels and the glove box in the reverse order you took them off, and you're good to go!
This is phenomenal! Thank You for doing this. I’m certain my Big Bend that’s being built the end of this month won’t have the same wiring in the footwell, but gives me an idea of what to do!Ambient Light Cup Holder Installation
This is the method I used to install the newest generation Ford Escape cup holder with built-in ambient lighting into my Outer Banks. It's a fairly simple procedure, but this is the way it should be done in the quickest and most efficient manner. This is only proven by me so far, with an existing ambient light system already in place. There may be changes in the future should this method prove to be a fire hazard or unsafe in any way. If anyone notices something that appears unsafe and needs further examination, PLEASE SAY SO.
Special thanks to Mrmike, who provided us all with the wiring diagram that inspired me to attempt this project, as well as JCampos30, who originally pioneered the idea and installed his own.
---------------------------------------------------------------------------------------
Materials needed:
4th Generation Ford Escape Ambient Light Cup Holder -- Part #: LJ6Z-7813562-FA
BNTECHGO 20 AWG Silicone Wire -- Amazon.com
Pliers
Thin, plastic pry tool or flat-head screwdriver
Electrical tape
"T" wire tap connectors (arguably optional)
---------------------------------------------------------------------------------------
First, as always, disconnect your negative battery cable. I like to cover my negative battery terminal with a rag or plastic shield to make sure the cable doesn't accidentally make contact again.
Next you'll want to remove the glove box for access to the 3-pin connector that powers the footwell ambient light. Open your glove box and press in the tabs on both sides to lower the glove box further. Now, disconnect the dampener on the right side of the glove box by using a pair of pliers to push the two ends of the male clip together, and pull off the dampener. You might have your glove box fall and spill all of its contents onto the floor (you can probably guess how I know,) so be ready for that. Now, with your glove box disconnected, simply lift the box up and out, giving you ample room to work.
Ok, on to the footwell light. Remove the fuse panel and lower dash panel (if you have one.) *I'll edit this later to include that process with pictures, I forgot to take some for that. Once removed, you will have the remaining space needed to access everything. Use a thin plastic pry tool to remove the light assembly by pushing inward on the light cover, where the small slot is seen on the right side. There's a large tab holding the light in the socket, it should come loose and drop down enough for you to pull it through, towards the floor.
Finish disconnecting the ambient light assembly by reaching through the glove box cavity you've created. Follow the wires of the assembly to locate the end of the pigtail. Press the tab on top of the connector to disconnect. Take a mental note of where the connection is, it took me a while to relocate it because it's on the back side of another connector (pictured.)
With the assembly fully removed, now you can splice into the wires with your 20 gauge wire. There are three wires with corresponding colors to the ones on the replacement cup holder. I used three different colored wires so I wouldn't get them mixed up splicing into the cup holder. Here's a link to a short YouTube video on how to splice into a wire without connectors. I plan on reconnecting my wire splices with proper connectors in the future, but this is a very solid method. The only issue is there are not many strands in the ambient light pigtail, so I wrapped the new wires around the exposed wire several times until it was tight, then used electrical tape to tightly cover the area.
How to tap into a wire without solder or special connectors | Crutchfield
Once your three wires are securely connected to the pigtail, feed all of the working end (the other end that isn't connected to anything yet) of the new wires through the bottom of the ambient light socket in the footwell. This will allow you to reinstall the light without having to squish your wires through (like I had to do, lesson learned. I'll fix that in the next few days.) Reinstall the ambient light, the procedure is the reverse of the removal. Reconnecting the 3-pin connector is the hardest part, remember to keep the tab facing upward toward the ceiling as you feel your way around and eventually seat the connector after a lot of frustration and swearing.
Next, you'll be popping your center console panel up to install the cup holder. Many of you will be familiar with this part, as you've probably already looked to see if you have a pigtail ready to connect to the cup holder. I'll leave this part alone for now and come back to it when I tidy up my work. You can find this procedure in the beginning of the thread, explained with pictures by JCampos30.
After attaching the new cup holder to the center console panel, the last step is wiring the cup holder lights to the footwell ambient light. Run your wires behind the center of the lower dash and through to the void underneath the cup holder in the center console. I ran my wires behind the panel that the passenger's left leg would touch, the same one that has the little cargo net on it. If you have a lot of unneeded extra wire length, now would be the time to cut them to an appropriate length. Using the same method you used to splice the wires into the footwell ambient light pigtail, splice the same corresponding wires to the cup holder pig tail. The cup holder wires are the same colors as the ones on the footwell light, so there's no guess work involved. Once the wires are securely connected to your cup holder pigtail, reinstall your center console in the reverse order you removed it.
Reconnect your negative battery cable to your battery and check to make sure your lights are functioning. If your SYNC 3 is like mine, every time I disconnect the battery, I have to adjust the brightness of my ambient lights in the menu. Your cup holder should be lighting up and adjusting with the other lights as you increase or decrease the light level. Once you've confirmed everything works properly, reinstall the footwell panels and the glove box in the reverse order you took them off, and you're good to go!
- First Name
- Michael
- Joined
- Sep 18, 2022
- Threads
- 60
- Messages
- 810
- Reaction score
- 995
- Location
- Syracuse, New York 13219
- Vehicle(s)
- '23 OBX, '20 Ecosport, '23 Kymco People S 150i ABS
Ambient Light Cup Holder Installation
This is the method I used to install the newest generation Ford Escape cup holder with built-in ambient lighting into my Outer Banks. It's a fairly simple procedure, but this is the way it should be done in the quickest and most efficient manner. This is only proven by me so far, with an existing ambient light system already in place. There may be changes in the future should this method prove to be a fire hazard or unsafe in any way. If anyone notices something that appears unsafe and needs further examination, PLEASE SAY SO.
Special thanks to Mrmike, who provided us all with the wiring diagram that inspired me to attempt this project, as well as JCampos30, who originally pioneered the idea and installed his own.
---------------------------------------------------------------------------------------
Materials needed:
4th Generation Ford Escape Ambient Light Cup Holder -- Part #: LJ6Z-7813562-FA
BNTECHGO 20 AWG Silicone Wire -- Amazon.com
Pliers
Thin, plastic pry tool or flat-head screwdriver
Electrical tape
"T" wire tap connectors (arguably optional)
---------------------------------------------------------------------------------------
First, as always, disconnect your negative battery cable. I like to cover my negative battery terminal with a rag or plastic shield to make sure the cable doesn't accidentally make contact again.
Next you'll want to remove the glove box for access to the 3-pin connector that powers the footwell ambient light. Open your glove box and press in the tabs on both sides to lower the glove box further. Now, disconnect the dampener on the right side of the glove box by using a pair of pliers to push the two ends of the male clip together, and pull off the dampener. You might have your glove box fall and spill all of its contents onto the floor (you can probably guess how I know,) so be ready for that. Now, with your glove box disconnected, simply lift the box up and out, giving you ample room to work.
Ok, on to the footwell light. Remove the fuse panel and lower dash panel (if you have one.) *I'll edit this later to include that process with pictures, I forgot to take some for that. Once removed, you will have the remaining space needed to access everything. Use a thin plastic pry tool to remove the light assembly by pushing inward on the light cover, where the small slot is seen on the right side. There's a large tab holding the light in the socket, it should come loose and drop down enough for you to pull it through, towards the floor.
Finish disconnecting the ambient light assembly by reaching through the glove box cavity you've created. Follow the wires of the assembly to locate the end of the pigtail. Press the tab on top of the connector to disconnect. Take a mental note of where the connection is, it took me a while to relocate it because it's on the back side of another connector (pictured.)
With the assembly fully removed, now you can splice into the wires with your 20 gauge wire. There are three wires with corresponding colors to the ones on the replacement cup holder. I used three different colored wires so I wouldn't get them mixed up splicing into the cup holder. Here's a link to a short YouTube video on how to splice into a wire without connectors. I plan on reconnecting my wire splices with proper connectors in the future, but this is a very solid method. The only issue is there are not many strands in the ambient light pigtail, so I wrapped the new wires around the exposed wire several times until it was tight, then used electrical tape to tightly cover the area.
How to tap into a wire without solder or special connectors | Crutchfield
Once your three wires are securely connected to the pigtail, feed all of the working end (the other end that isn't connected to anything yet) of the new wires through the bottom of the ambient light socket in the footwell. This will allow you to reinstall the light without having to squish your wires through (like I had to do, lesson learned. I'll fix that in the next few days.) Reinstall the ambient light, the procedure is the reverse of the removal. Reconnecting the 3-pin connector is the hardest part, remember to keep the tab facing upward toward the ceiling as you feel your way around and eventually seat the connector after a lot of frustration and swearing.
Next, you'll be popping your center console panel up to install the cup holder. Many of you will be familiar with this part, as you've probably already looked to see if you have a pigtail ready to connect to the cup holder. I'll leave this part alone for now and come back to it when I tidy up my work. You can find this procedure in the beginning of the thread, explained with pictures by JCampos30.
After attaching the new cup holder to the center console panel, the last step is wiring the cup holder lights to the footwell ambient light. Run your wires behind the center of the lower dash and through to the void underneath the cup holder in the center console. I ran my wires behind the panel that the passenger's left leg would touch, the same one that has the little cargo net on it. If you have a lot of unneeded extra wire length, now would be the time to cut them to an appropriate length. Using the same method you used to splice the wires into the footwell ambient light pigtail, splice the same corresponding wires to the cup holder pig tail. The cup holder wires are the same colors as the ones on the footwell light, so there's no guess work involved. Once the wires are securely connected to your cup holder pigtail, reinstall your center console in the reverse order you removed it.
Reconnect your negative battery cable to your battery and check to make sure your lights are functioning. If your SYNC 3 is like mine, every time I disconnect the battery, I have to adjust the brightness of my ambient lights in the menu. Your cup holder should be lighting up and adjusting with the other lights as you increase or decrease the light level. Once you've confirmed everything works properly, reinstall the footwell panels and the glove box in the reverse order you took them off, and you're good to go!
Thanks a million for this post!