- First Name
- Mark
- Joined
- Oct 30, 2021
- Threads
- 119
- Messages
- 6,725
- Reaction score
- 13,169
- Location
- St. Jacob, IL
- Vehicle(s)
- 2021 Badlands | 2020 Escape
- Thread starter
- #1
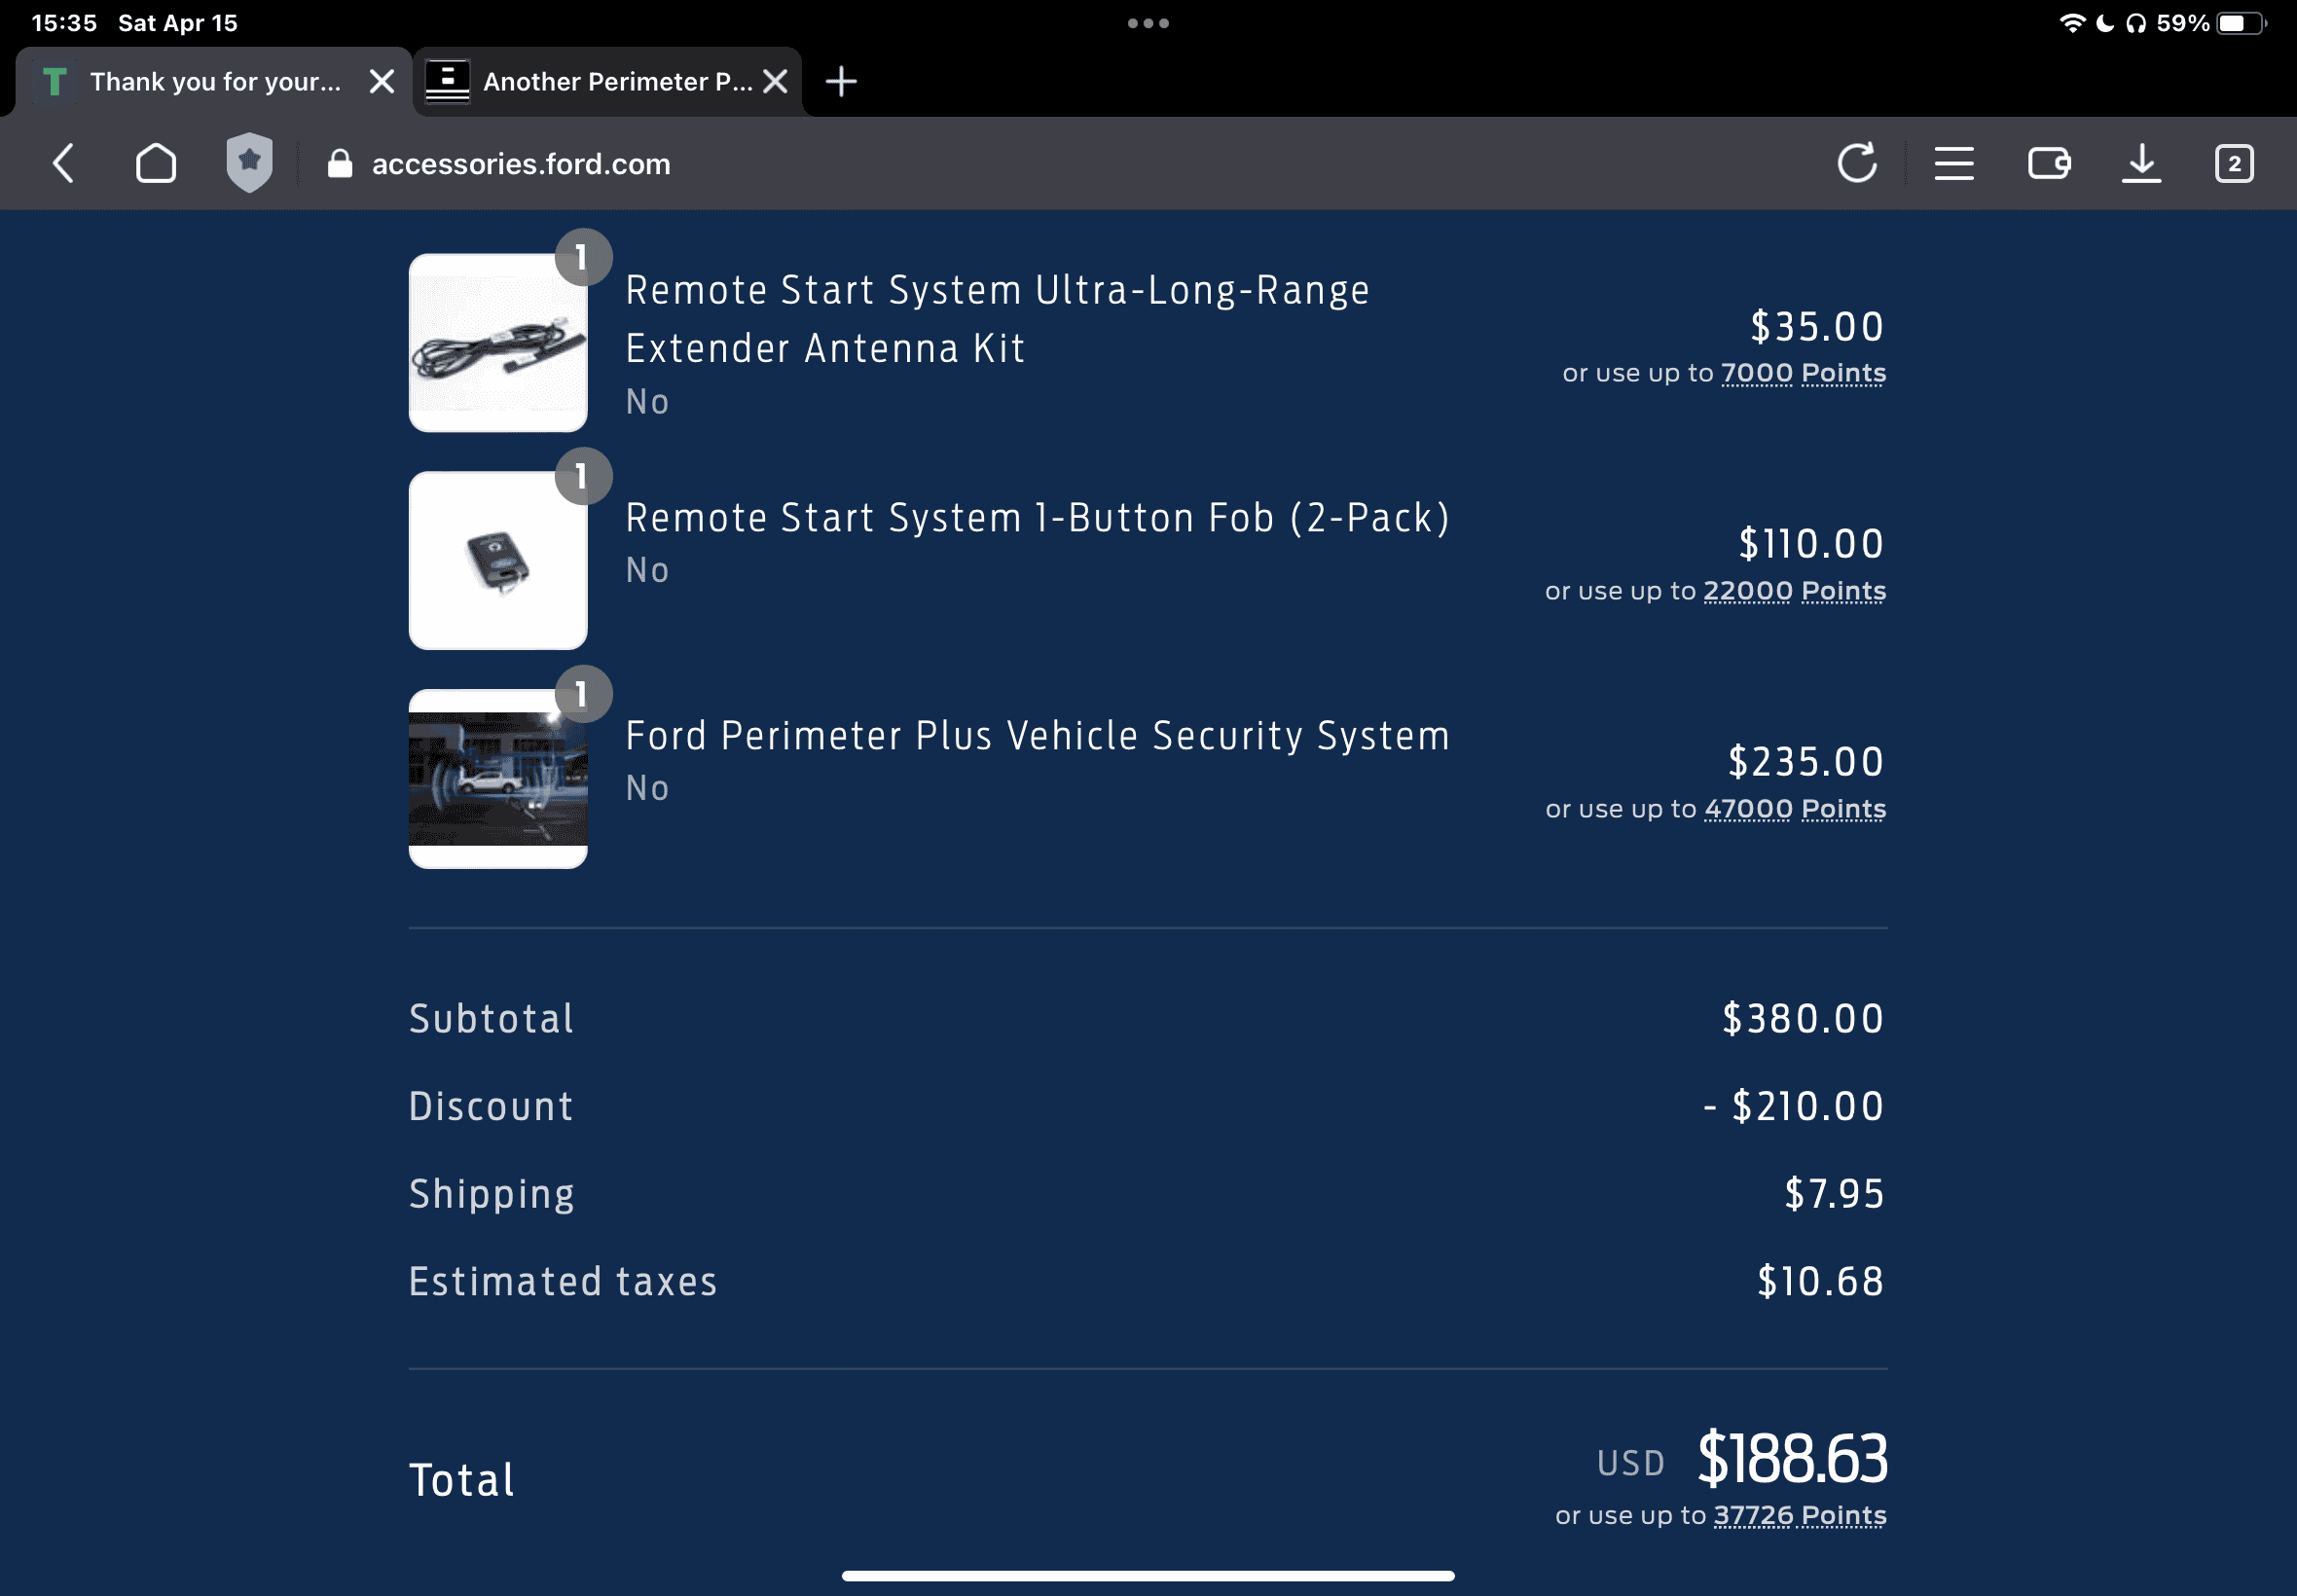
With the increase in catalytic converter theft and the ease with which it can be accomplished on a Badlands (higher ground clearance; no need to jack), I thought it prudent to install the Perimeter Plus system offered by Ford. It includes a shock sensor that fires off with a significant impact such as might be imparted to the vehicle while forcibly removing a component. The instructions supplied by others on this site were helpful, mainly because Ford does not supply them with the kit. Below are a couple of photos I took during the install, and a few gotchas you can avoid by reading through this post.
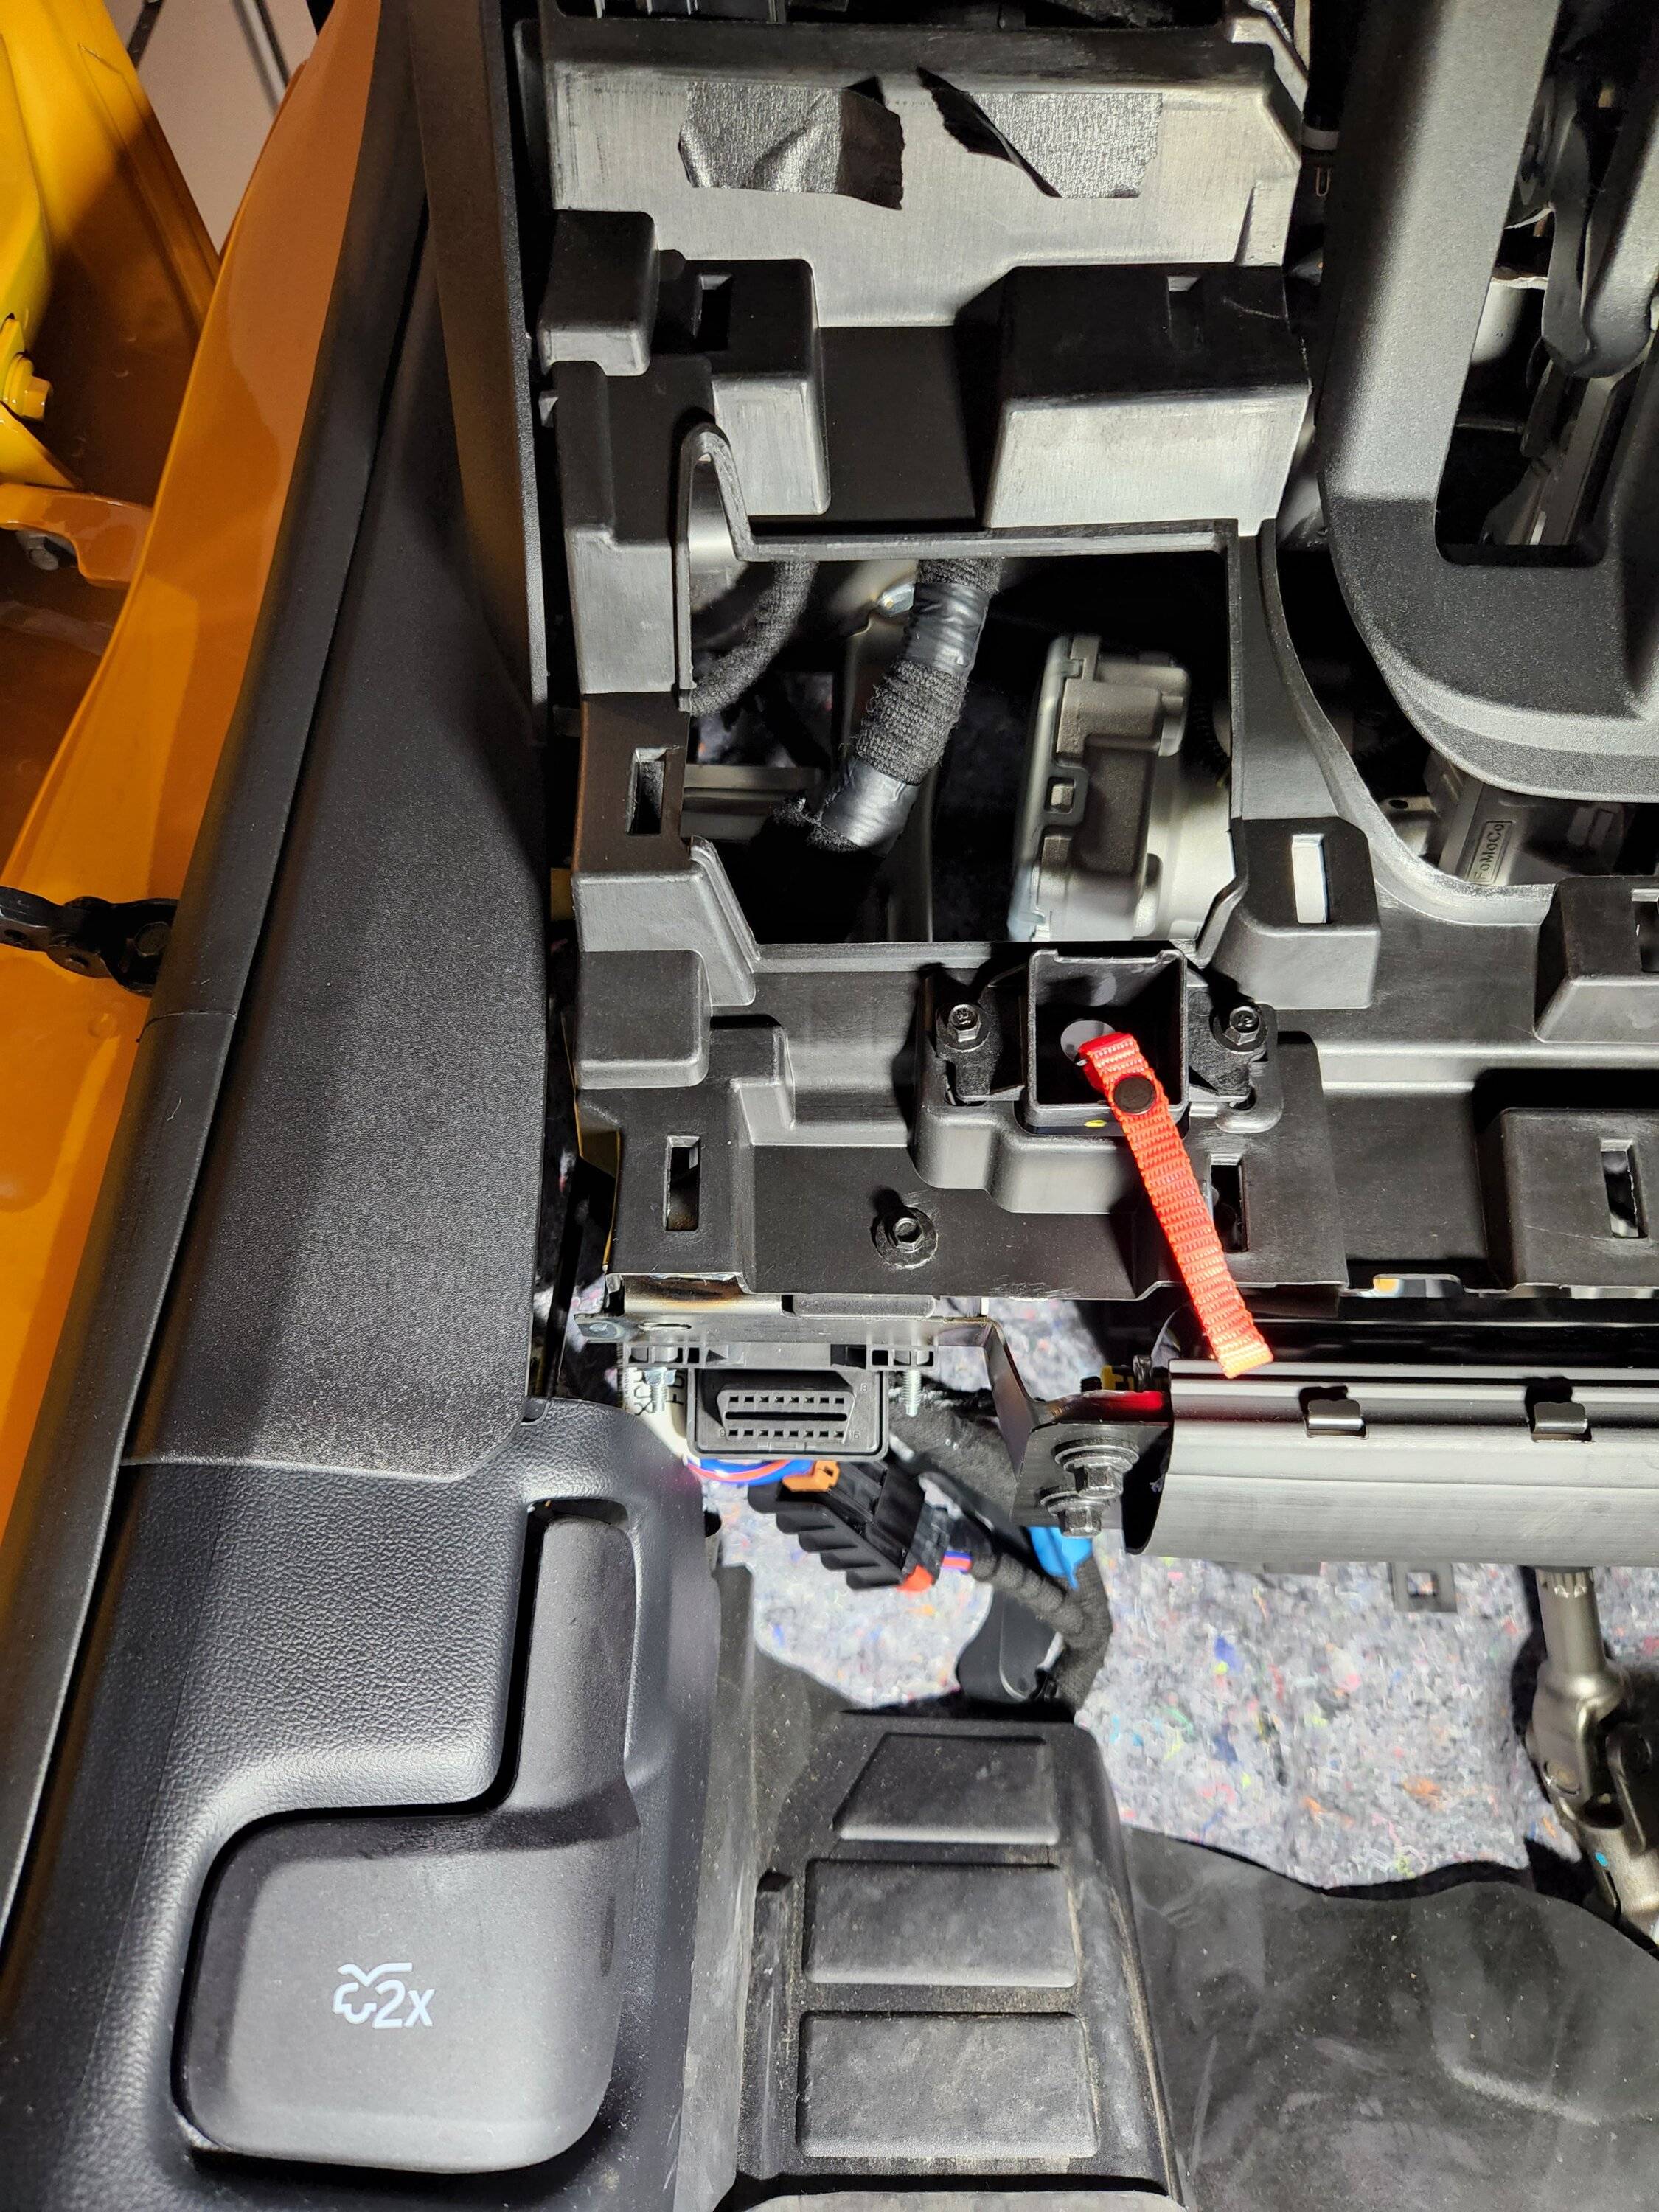
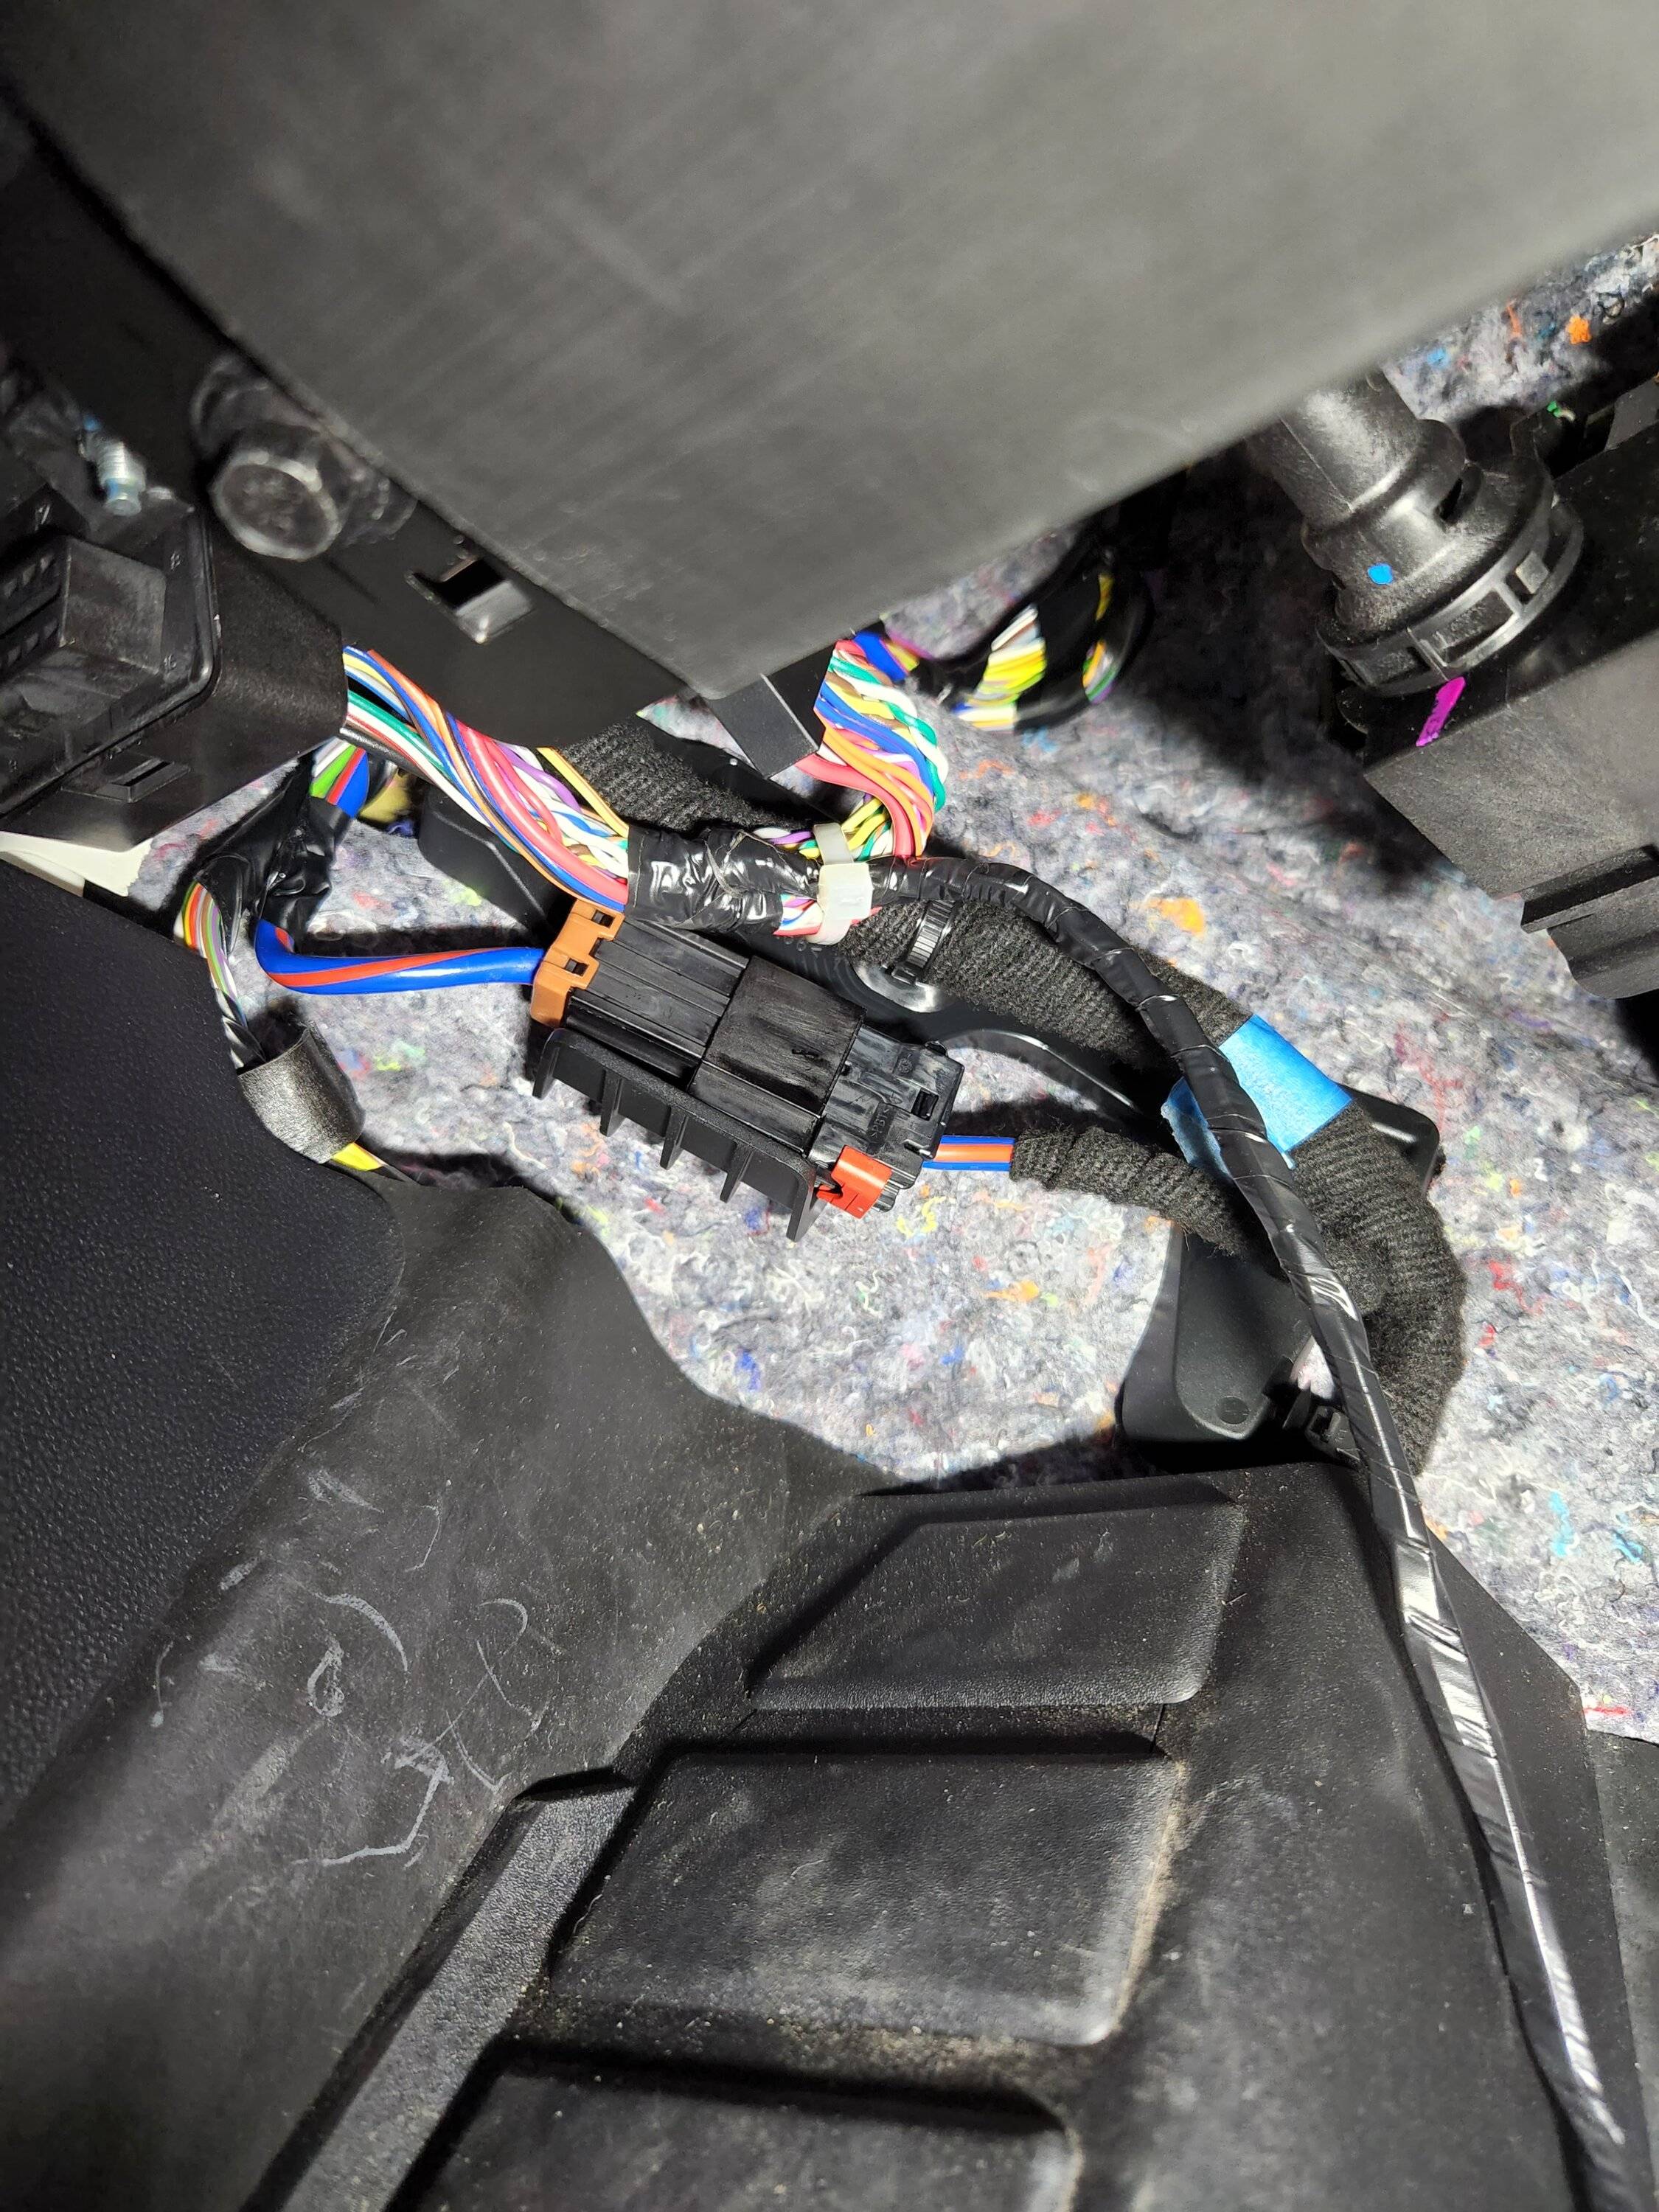
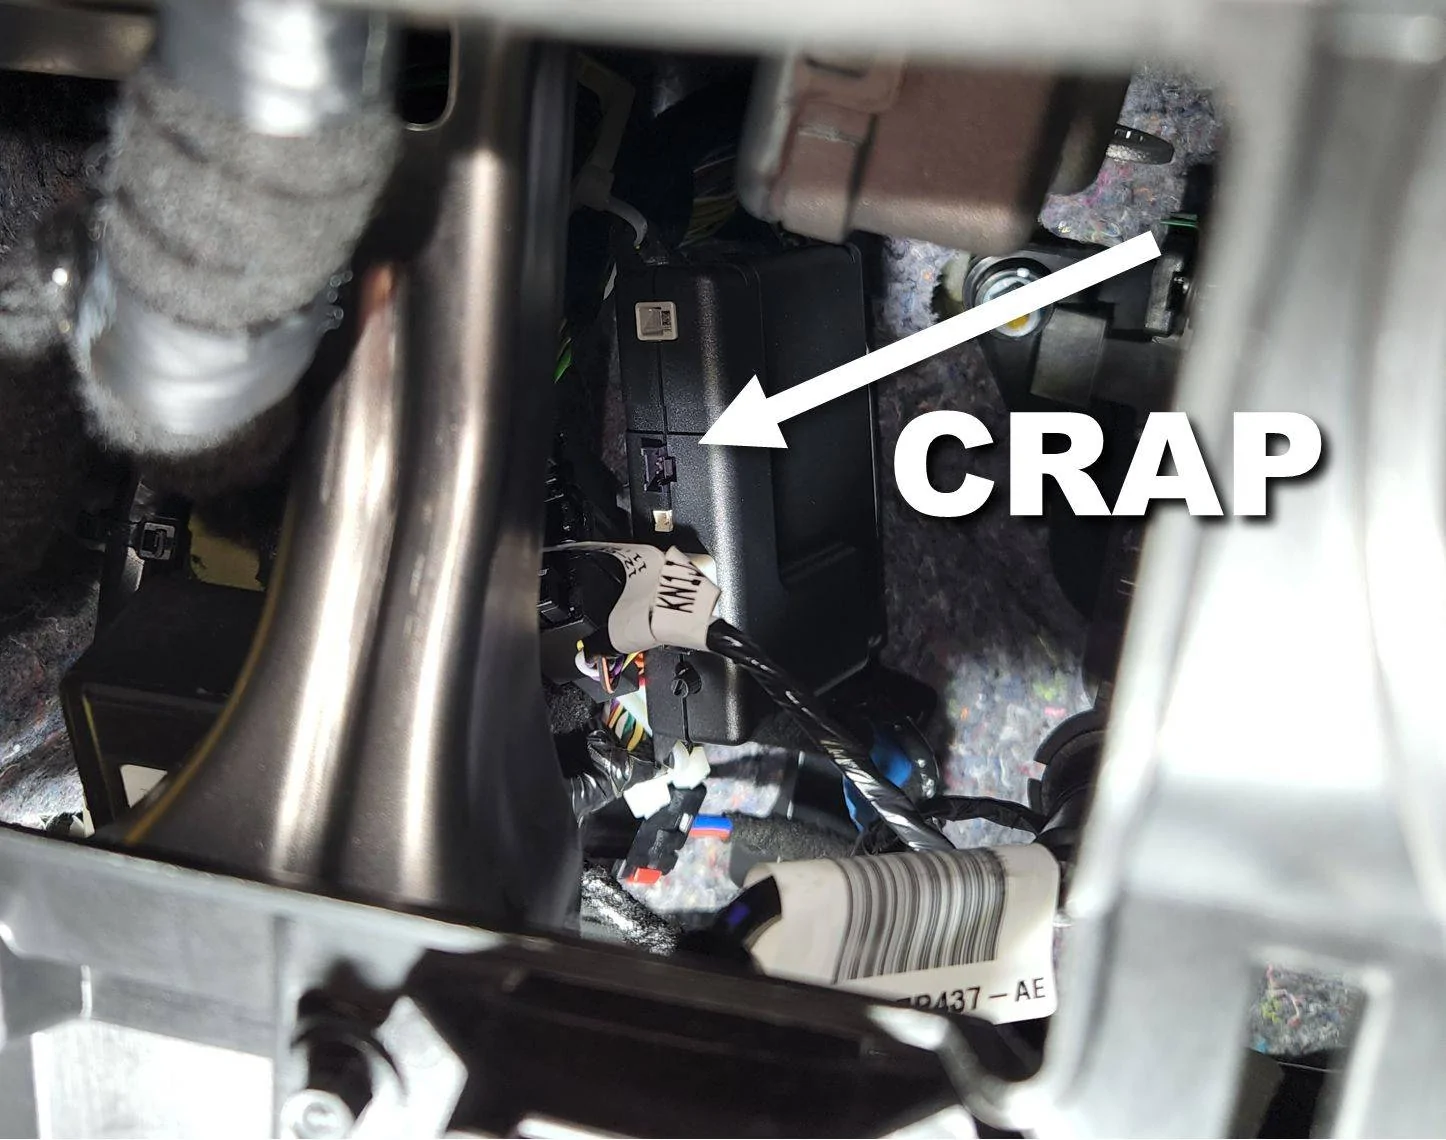
I took others' advice and removed the panel above the OBDII port. This makes accessing the area of interest much easier. In the photo below you can see the OBDII connector just below and to the left of the red pull tab. You'll have to disconnect the plug going into the back of the OBDII connector, and it's a lot easier to do if you remove the two nuts securing it to the frame—bend down and look up; you'll see them.
CAUTION: Be careful when removing the outboard nut. Once removed, it can fall behind the panel with the hood release lever.

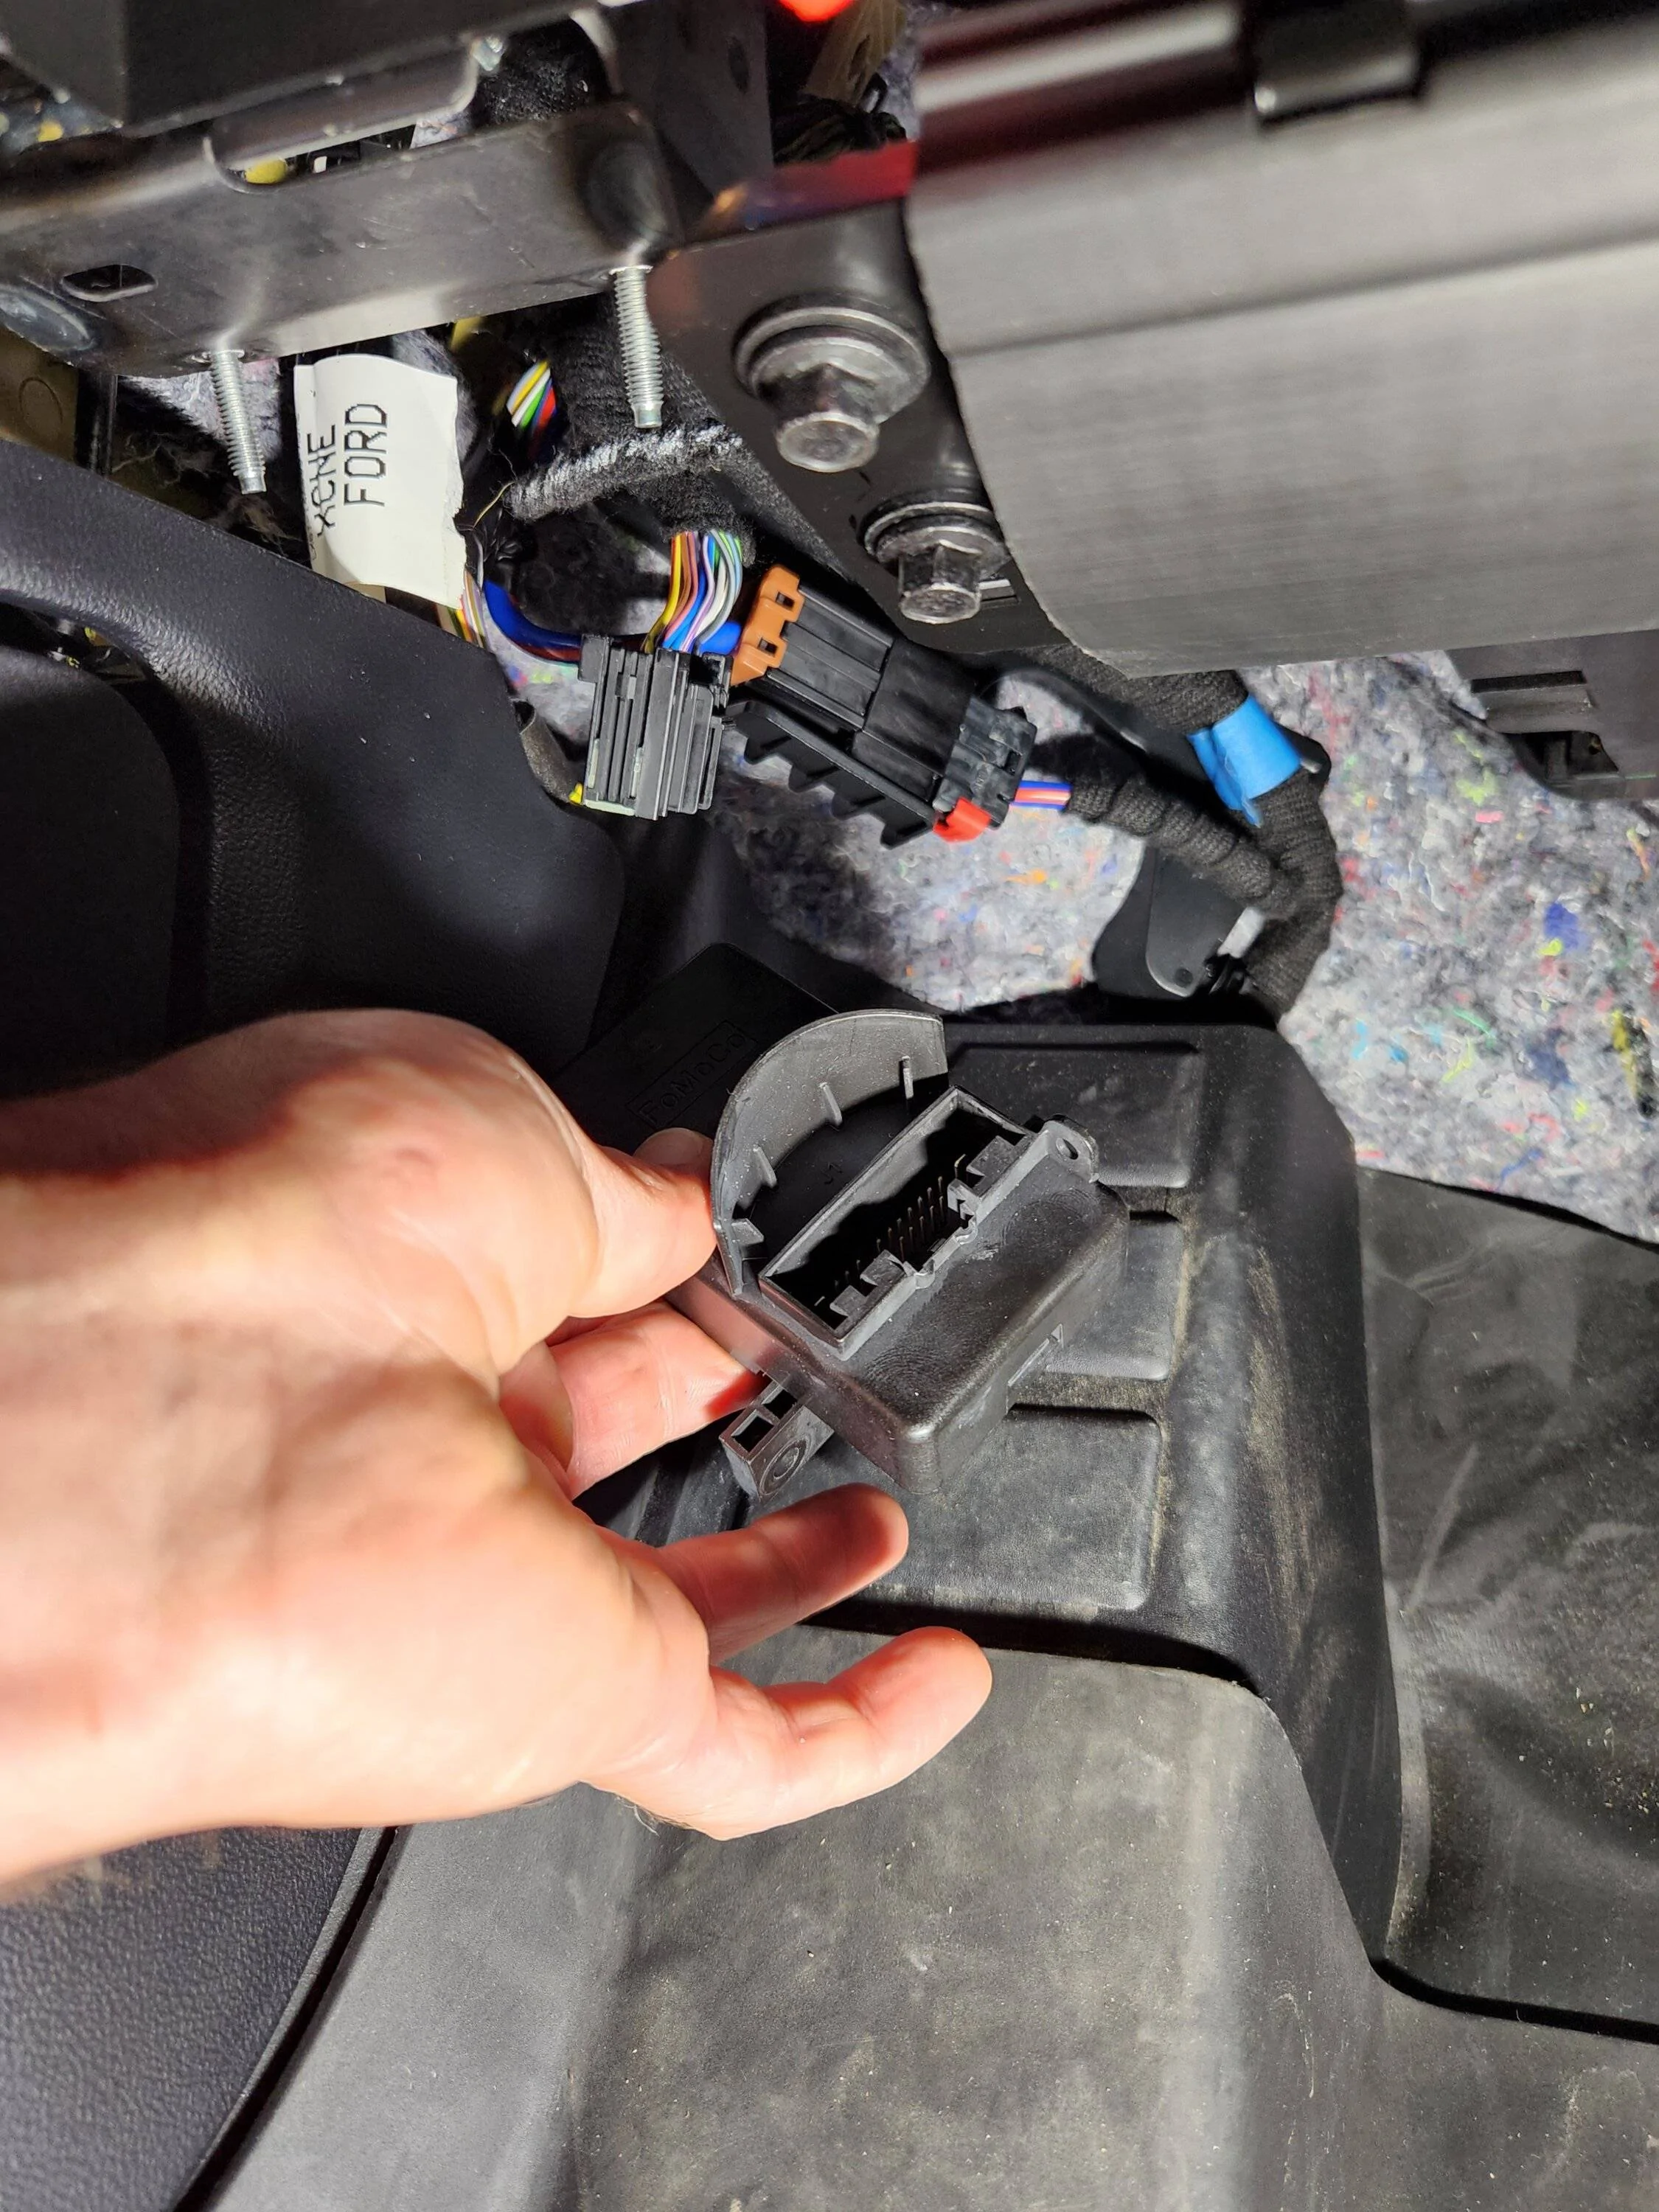
Once you remove the OBDII connector from the frame you can turn it around and disconnect the plug. In the photo below you can see the OBDII connector I'm holding in my hand and the gray plug hanging above it.
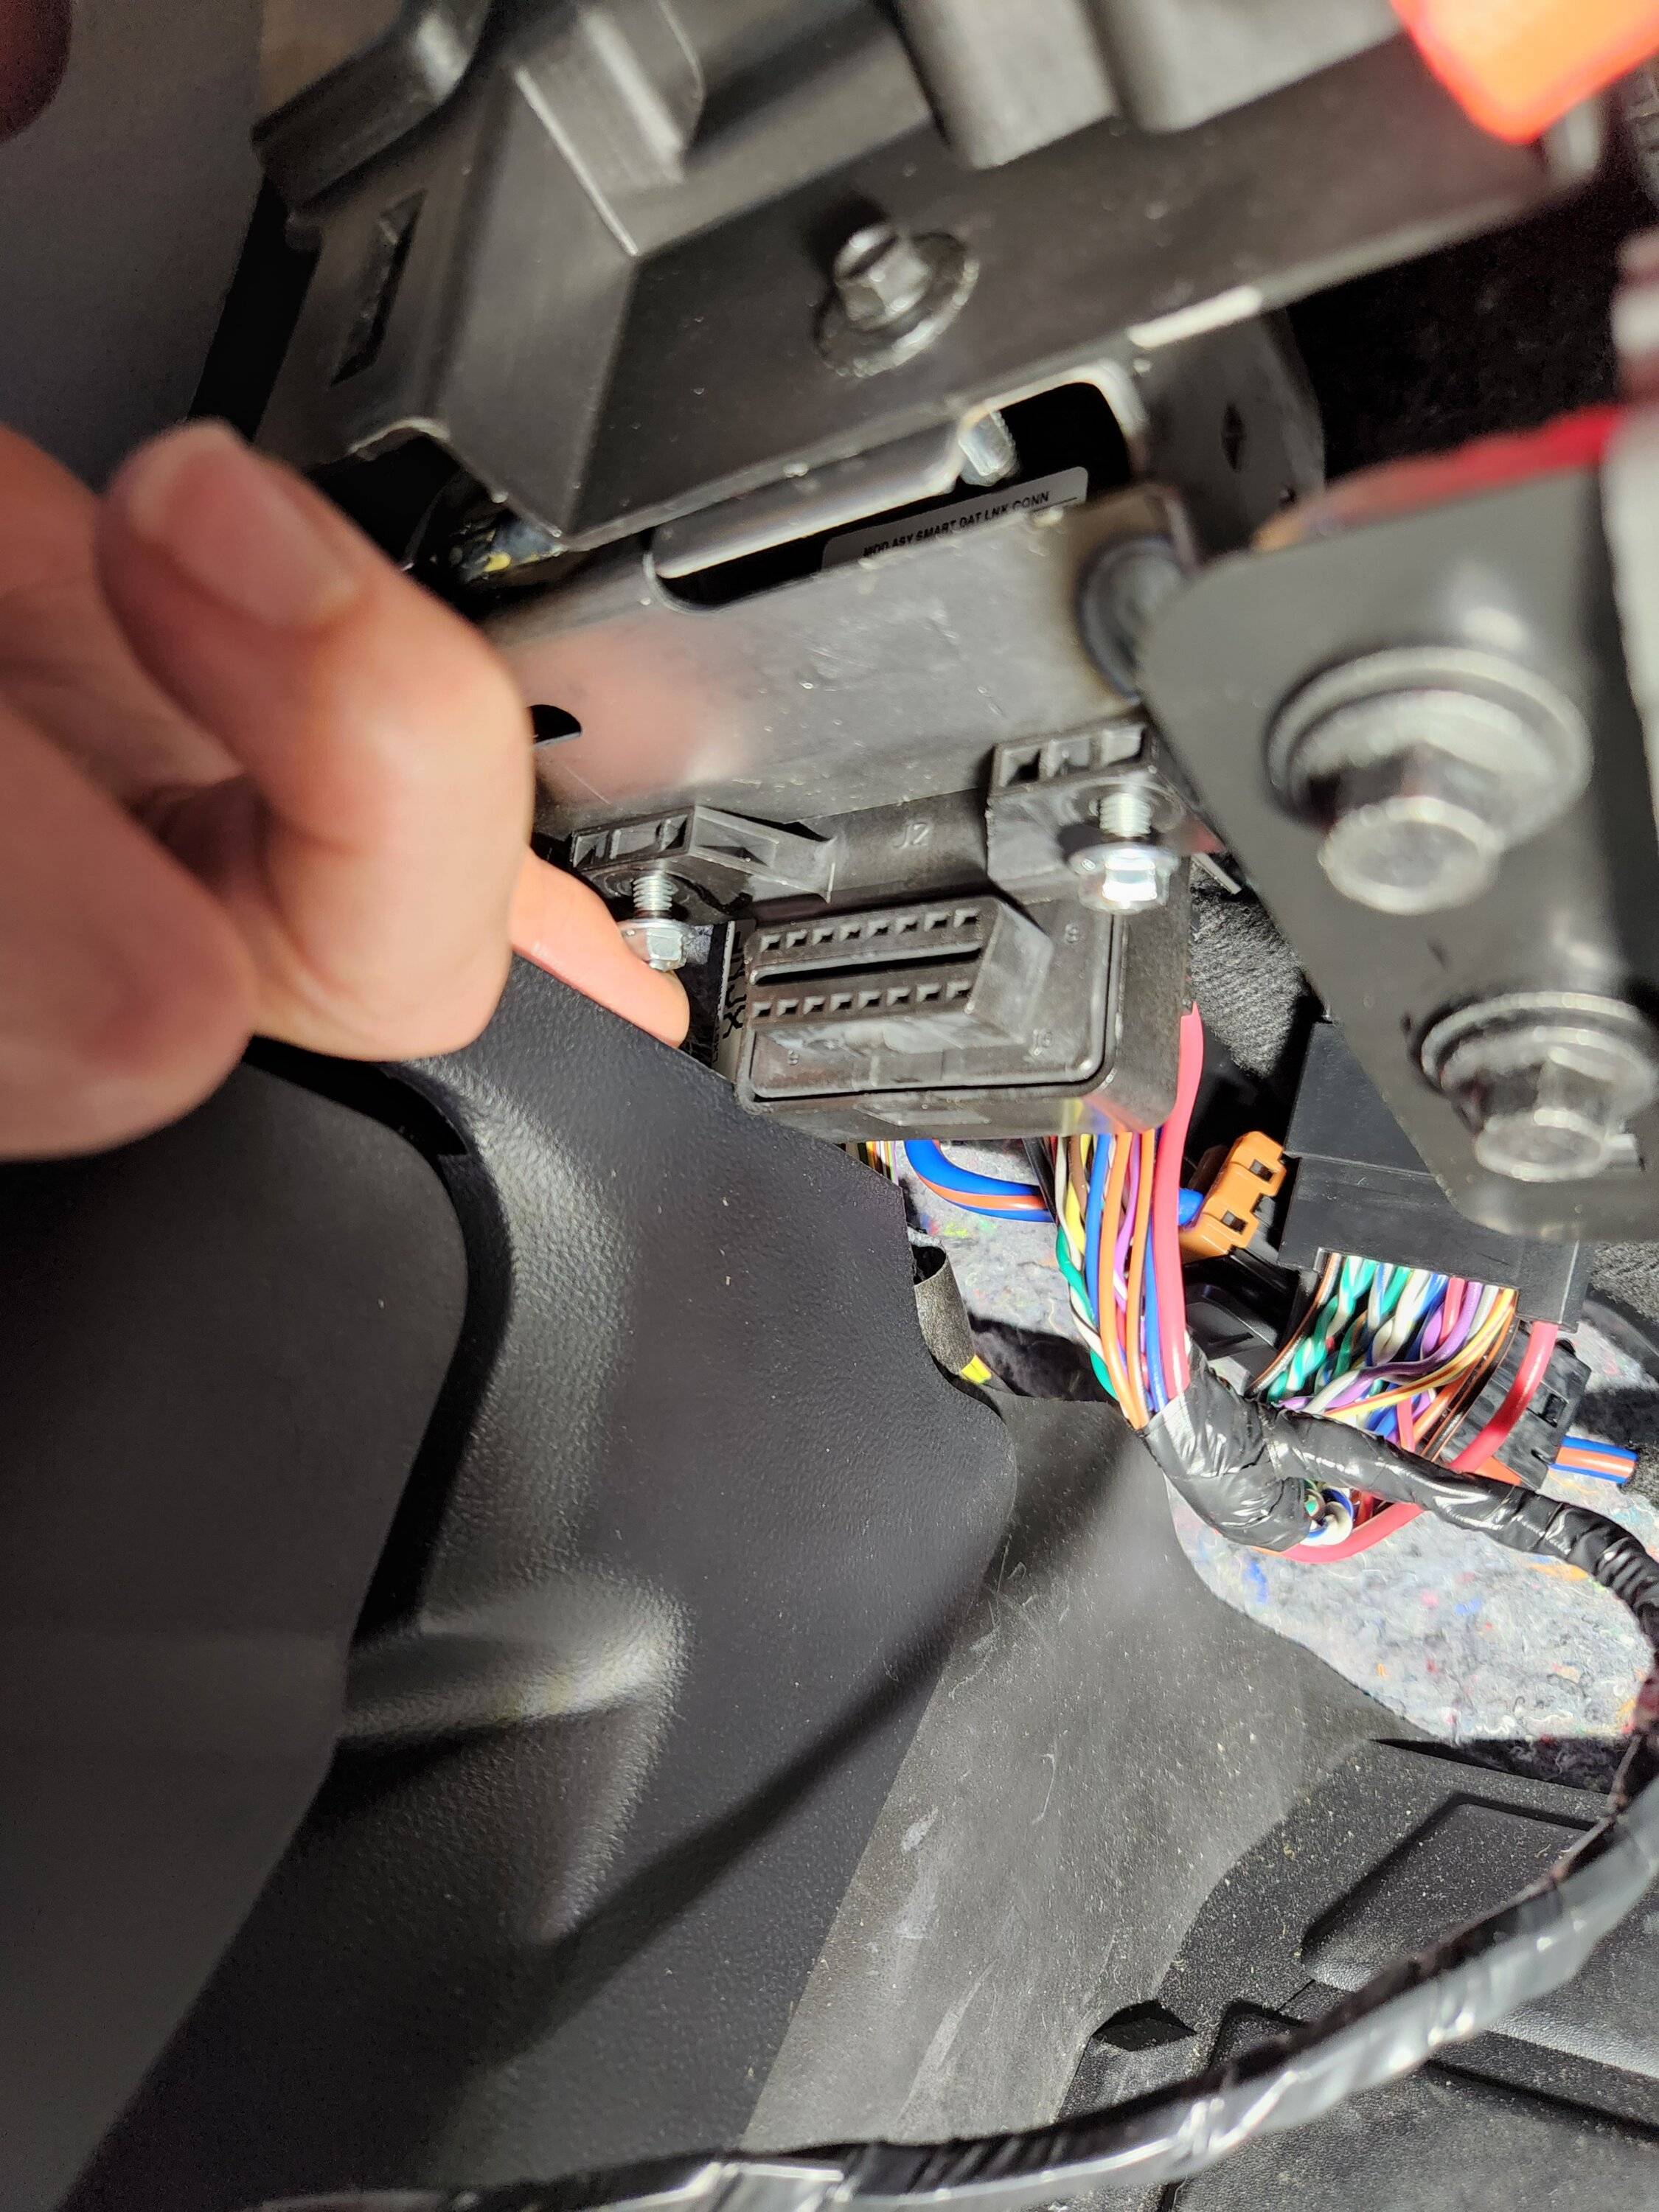
Once you've connected the harness supplied with the kit between the OBDII connector and the plug you can reattach it to the frame using the two nuts. Be sure to observe the caution above regarding the outboard nut. You can clearly see in the photo below that dropping it will result in a major PITA. I recommend holding it in place with one hand and turning with the other. If you drop it behind the panel below don't blame me!
Next, you'll want to secure the wiring. The object here is twofold: First, you want to make sure the wiring bundle doesn't rub or scrape against something else, especially something sharp. Rubbing and scraping will eventually remove the wire insulation resulting in a short. It will also likely make a noise you don't want to listen to. Second, you want to provide strain relief for the connector. In other words, you don't want to secure the wiring in such a fashion that there is constant tension between where you've tied the bundle and the connector, otherwise you will eventually pull the wires out of the connector. Luckily, there is a handy wiring bundle just behind the OBDII connector you can use as an attach point. In the photo below you can see the white zip tie I used to secure the wiring.
Next, you connect the shock sensor to the appropriate plug in the supplied wiring harness. Then secure the shock sensor to the frame or to a wiring bundle. In the next few photos you can see the shock sensor plugged in, and secured at the top and bottom to existing wiring bundles behind the dash above the OBDII connector.
This photo shows one of the supplied zip ties routed through a tab on the shock sensor and around the same wiring bundle I used to secure the kit harness.

The photo below was taken through the hole in the dash framework above the OBDII connector. You can see the white zip tie routed through a tab on the top of the shock sensor and around another existing wiring bundle. I also attached a third zip tie around the same wire bundle and through the other top tab on the shock sensor (not shown).
NOTE: Notice the orientation of the shock sensor. The plugs for the harness (white), the remote start jumper (just above the harness connector) and the sensor adjustment knob (below the harness connector—a bit hard to see in the dark) are all visible. In this orientation the sensor adjustment knob is visible and accessible, which is important during the configuration process.
After that, it's just a matter of buttoning up and going through the configuration procedure, or vice versa if you prefer.
A couple of things to keep in mind:

Feel free to ask any questions or contact me via PM. I'll help any way I can.
I took others' advice and removed the panel above the OBDII port. This makes accessing the area of interest much easier. In the photo below you can see the OBDII connector just below and to the left of the red pull tab. You'll have to disconnect the plug going into the back of the OBDII connector, and it's a lot easier to do if you remove the two nuts securing it to the frame—bend down and look up; you'll see them.
CAUTION: Be careful when removing the outboard nut. Once removed, it can fall behind the panel with the hood release lever.
Once you remove the OBDII connector from the frame you can turn it around and disconnect the plug. In the photo below you can see the OBDII connector I'm holding in my hand and the gray plug hanging above it.
Once you've connected the harness supplied with the kit between the OBDII connector and the plug you can reattach it to the frame using the two nuts. Be sure to observe the caution above regarding the outboard nut. You can clearly see in the photo below that dropping it will result in a major PITA. I recommend holding it in place with one hand and turning with the other. If you drop it behind the panel below don't blame me!
Next, you'll want to secure the wiring. The object here is twofold: First, you want to make sure the wiring bundle doesn't rub or scrape against something else, especially something sharp. Rubbing and scraping will eventually remove the wire insulation resulting in a short. It will also likely make a noise you don't want to listen to. Second, you want to provide strain relief for the connector. In other words, you don't want to secure the wiring in such a fashion that there is constant tension between where you've tied the bundle and the connector, otherwise you will eventually pull the wires out of the connector. Luckily, there is a handy wiring bundle just behind the OBDII connector you can use as an attach point. In the photo below you can see the white zip tie I used to secure the wiring.
Next, you connect the shock sensor to the appropriate plug in the supplied wiring harness. Then secure the shock sensor to the frame or to a wiring bundle. In the next few photos you can see the shock sensor plugged in, and secured at the top and bottom to existing wiring bundles behind the dash above the OBDII connector.
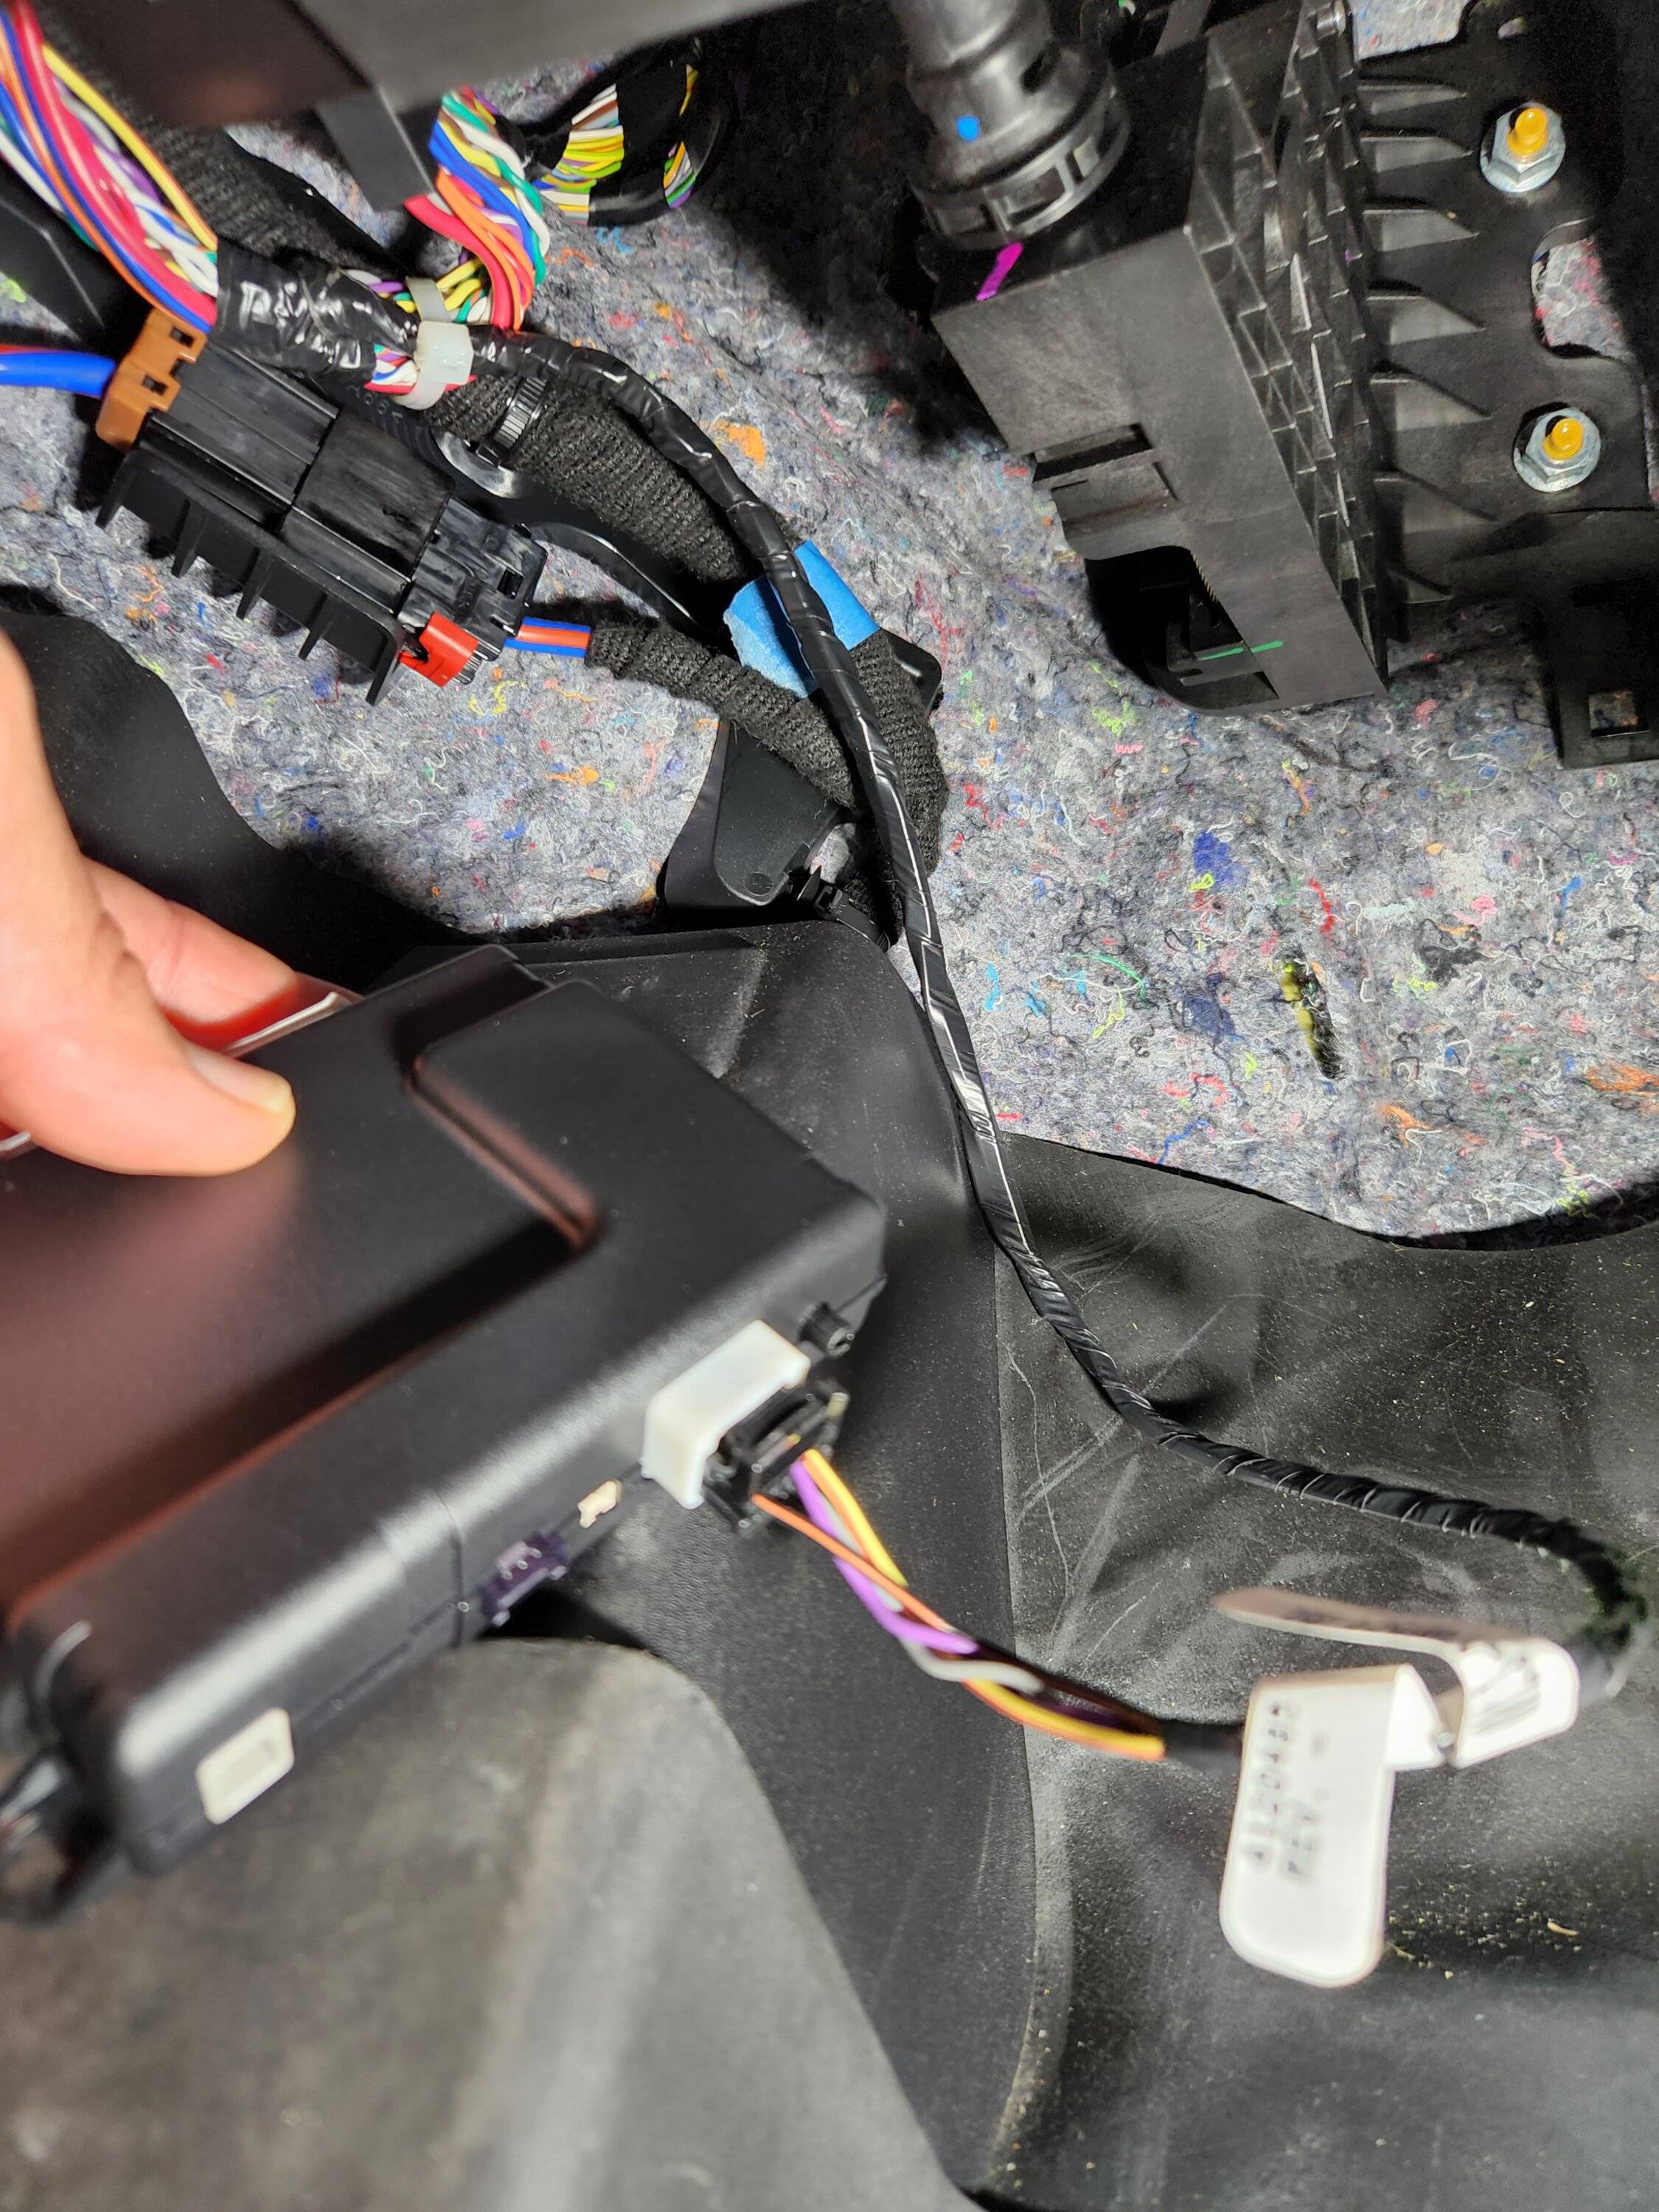
This photo shows one of the supplied zip ties routed through a tab on the shock sensor and around the same wiring bundle I used to secure the kit harness.
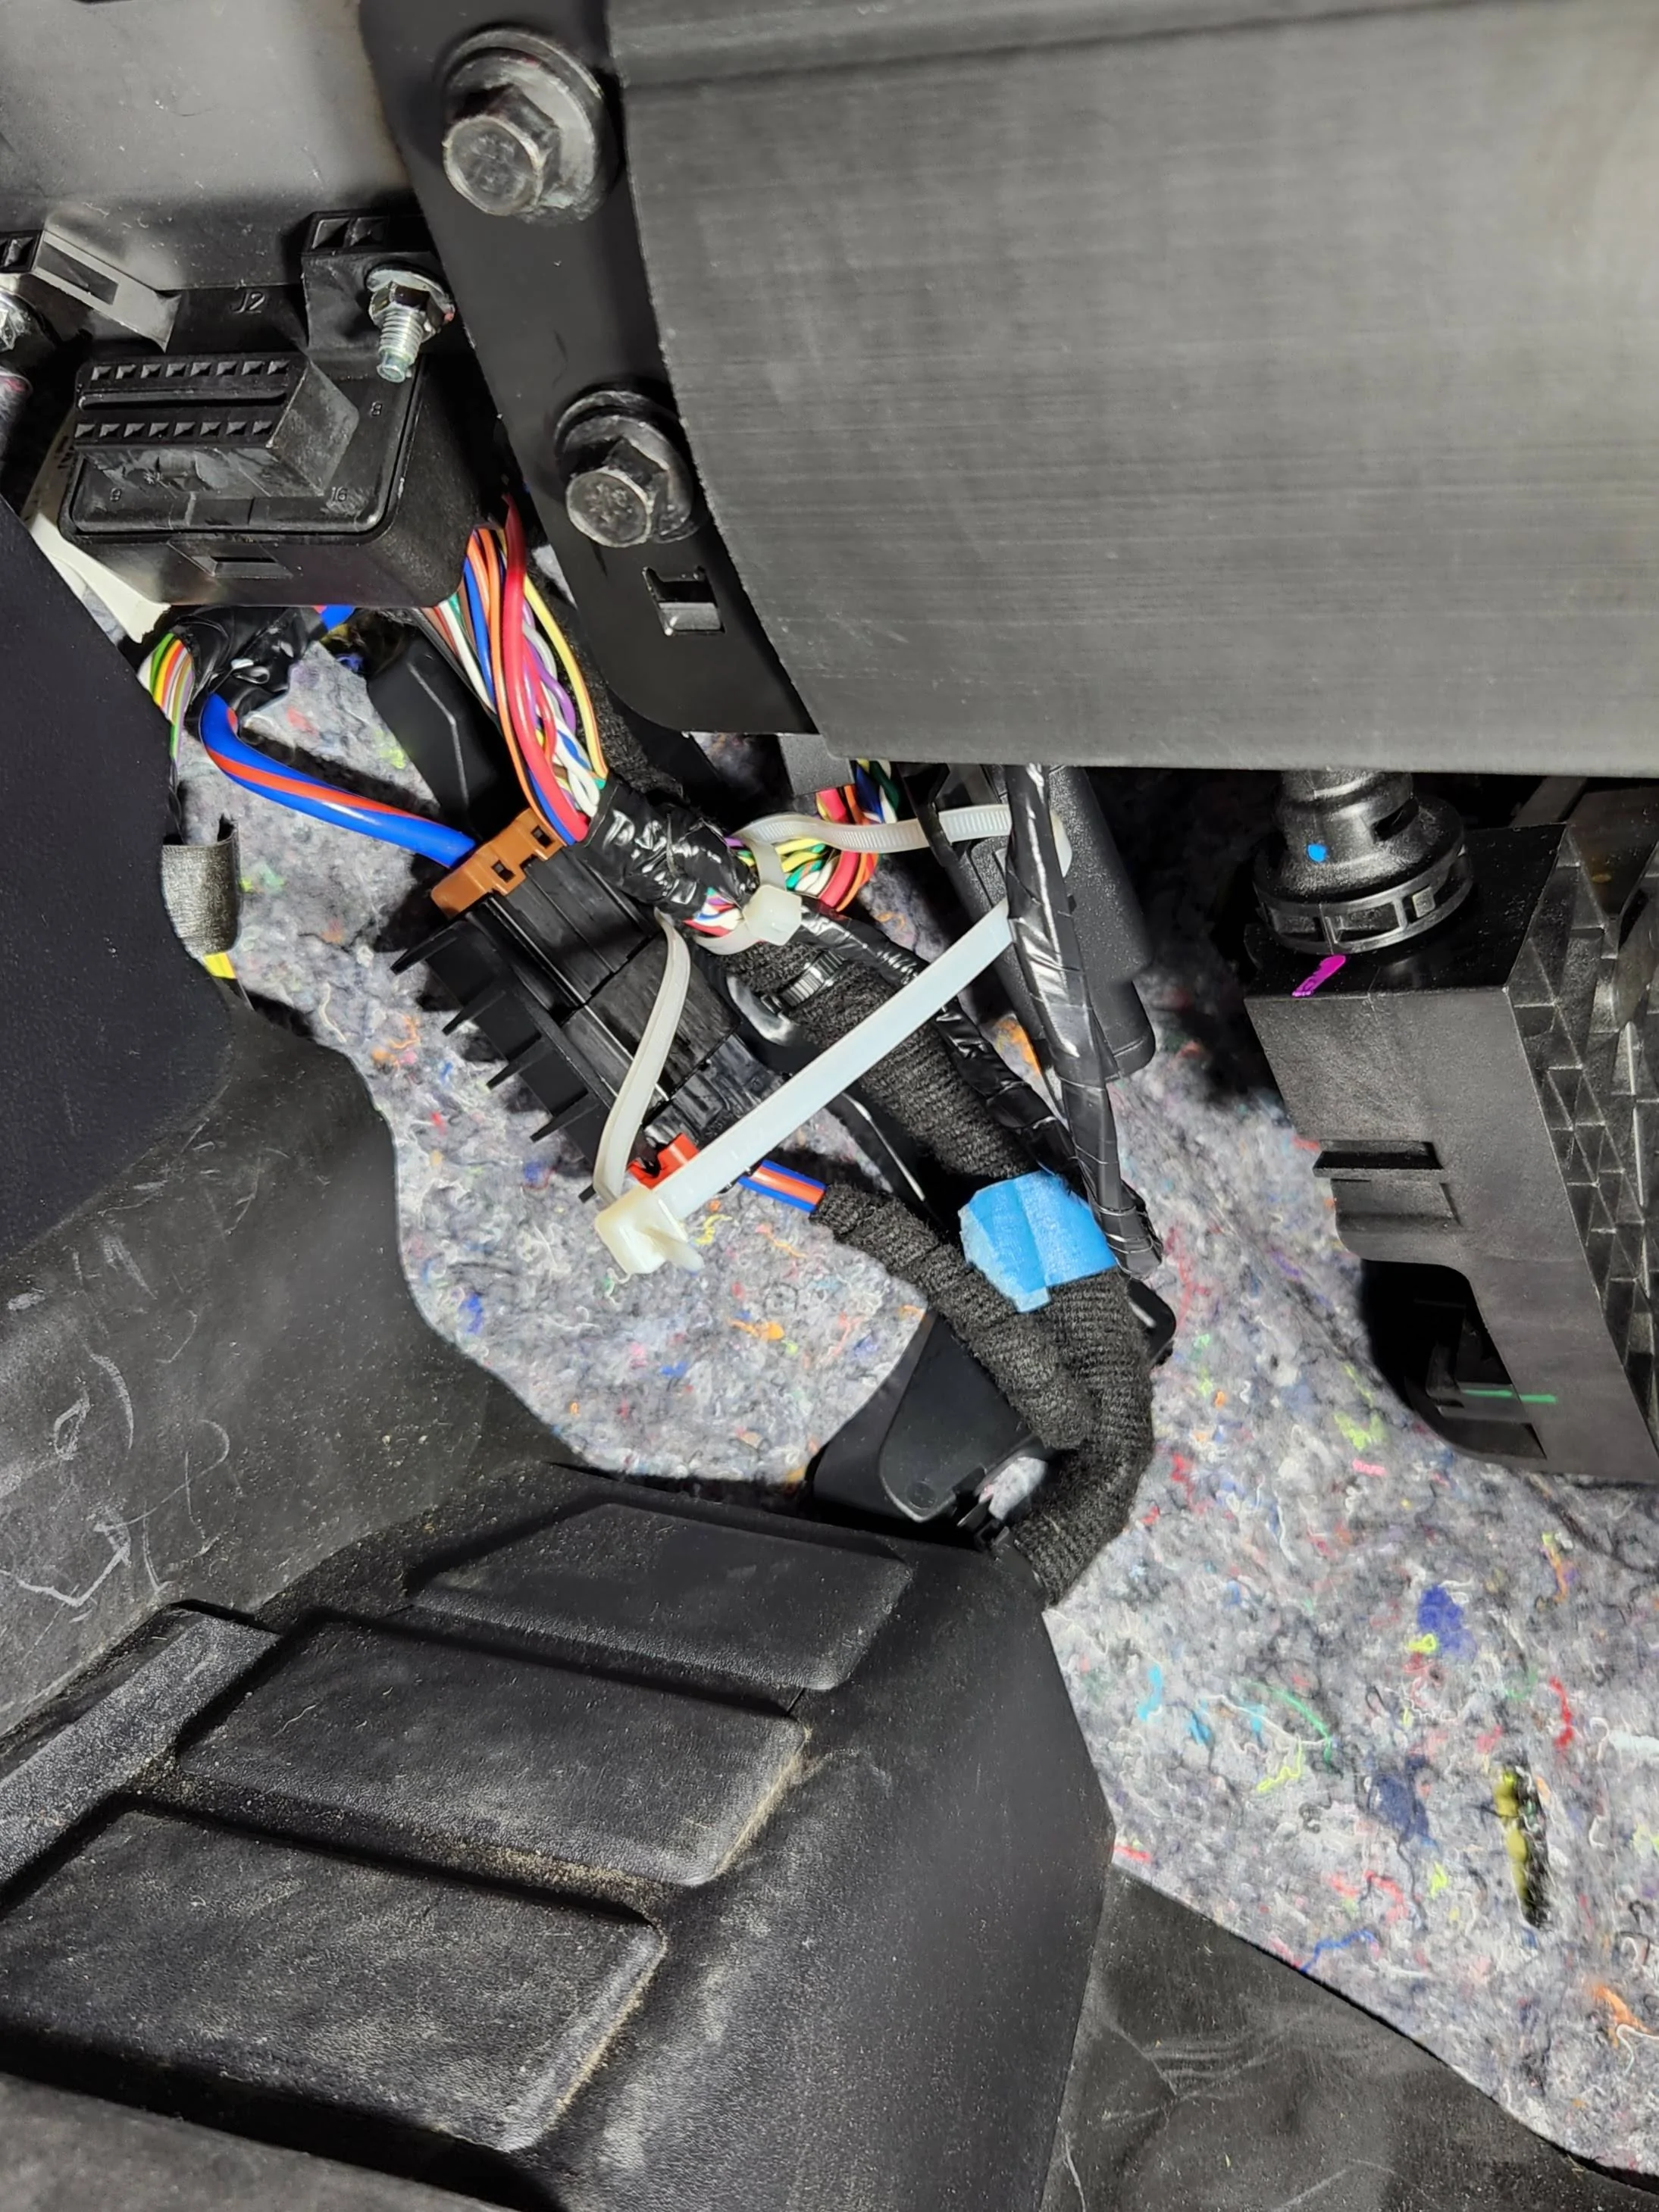
The photo below was taken through the hole in the dash framework above the OBDII connector. You can see the white zip tie routed through a tab on the top of the shock sensor and around another existing wiring bundle. I also attached a third zip tie around the same wire bundle and through the other top tab on the shock sensor (not shown).
NOTE: Notice the orientation of the shock sensor. The plugs for the harness (white), the remote start jumper (just above the harness connector) and the sensor adjustment knob (below the harness connector—a bit hard to see in the dark) are all visible. In this orientation the sensor adjustment knob is visible and accessible, which is important during the configuration process.
After that, it's just a matter of buttoning up and going through the configuration procedure, or vice versa if you prefer.
A couple of things to keep in mind:
- The first step of the configuration procedure requires you to step on the brake, turn the ignition on and off five times, then turn it on and leave it on the sixth time. If your car uses a key you can do this without starting the engine. If you have a push-button start you must have the fob inside the car, and you will be starting and stopping the engine on the first button push instead of just turning the ignition on and off. After the first on/off sequence you can take your foot off the brake and just turn the ignition on and off four more times (for a total of five ignition on/off sequences), then turn the ignition on and leave it on one more (the sixth) time. If you hear the horn sound three times you were successful in entering the perimeter alarm programming function. After that, you step on the brake pedal to enable/disable the perimeter alarm. If the horn sounds once after you step on the brake, the system is enabled. If the horn sounds twice after you step on the brake, the system is disabled. I did it a few times just to be sure I had it right. Honk; enabled. Honk, honk; disabled. Honk; enabled. Honk, honk; disabled. Honk; enabled. That's when the wife opened the door from the house to the garage and screamed that I was ANNOYING THE DOG! Party pooper.
- If you have a push-button start you must keep the fob away from the vehicle during system testing. If the fob is near enough to trigger the intelligent access sensors on either front door, or inside the car, the alarm is disabled and will not sound. This is important for anyone who likes to leave the fob in the vehicle and use the keypad on the door to lock/unlock the car. If you leave the fob in the car the alarm will not function as desired. If you want to leave the fob in the car and still have a functioning alarm you can purchase a faraday pouch like this one that renders the fob undetectable to the car.
- If you do not install the optional LED light—it's not part of the kit and must be purchased separately—then don't forget while you conduct your testing that the system requires +20 seconds after you lock the car to arm. If you attempt any of the functional tests before the system has armed the alarm will not sound.
- If you have a fob with an operable remote start button then do not connect the remote start jumper to the shock sensor, otherwise you will disable the remote start feature of your car. If you do not have fob with a remote start button then be sure to connect the remote start jumper to the shock sensor before you secure it. Installing the jumper after you have secured the shock sensor out of the way and hard to reach is...problematic. Ask me how I know.
Feel free to ask any questions or contact me via PM. I'll help any way I can.
Last edited: