gatornek

Badlands
Well-Known Member
Joined
May 5, 2023
Threads
41
Messages
779
Reaction score
917
Location
Miami
Vehicle(s)
2023 Bronco Sport; 2016 Mustang 2.3
Having now completed several multi hour interstate road trips with the roof rack and Pelican Cases I can provide the following fuel efficiency details from my experiences.

In Florida most of our interstates have a 70mph speed limit, so all of this data is from spontaneous trips to Mexico, it's also using 93 Octane gas in all of these trips.

4 hours @ 71 MPH averaged 27.9mpg
4 hours @ 75 MPH averaged 24 mpg
2 hours (2 separate trips) at 85ish MPH averaged 20.2mpg

Before adding the cases I was seeing closer to 28mpgs at 75, so there has definitely been a loss with the cases (each case also has gear in them) but it's nice to have the full trunk available for trips.

With regards to wind noise, before the cases there was no noticable increase in wind noise from the JCR Roof Rack over the stock Badlands, with the cases there is definitely more "wind against a wall" sound but no whistling I've heard from other racks and roof toppers. With the radio on its not noticable at all.

With that being said, cantilevering the solar panel off one of the cases has created some... Interesting driving mechanics during high single directional wind events when driving next to large semi trucks. Car moves around a lot like my focus use to when driving next to semis. Just wanted to put that out there Incase someone tries to do something similar
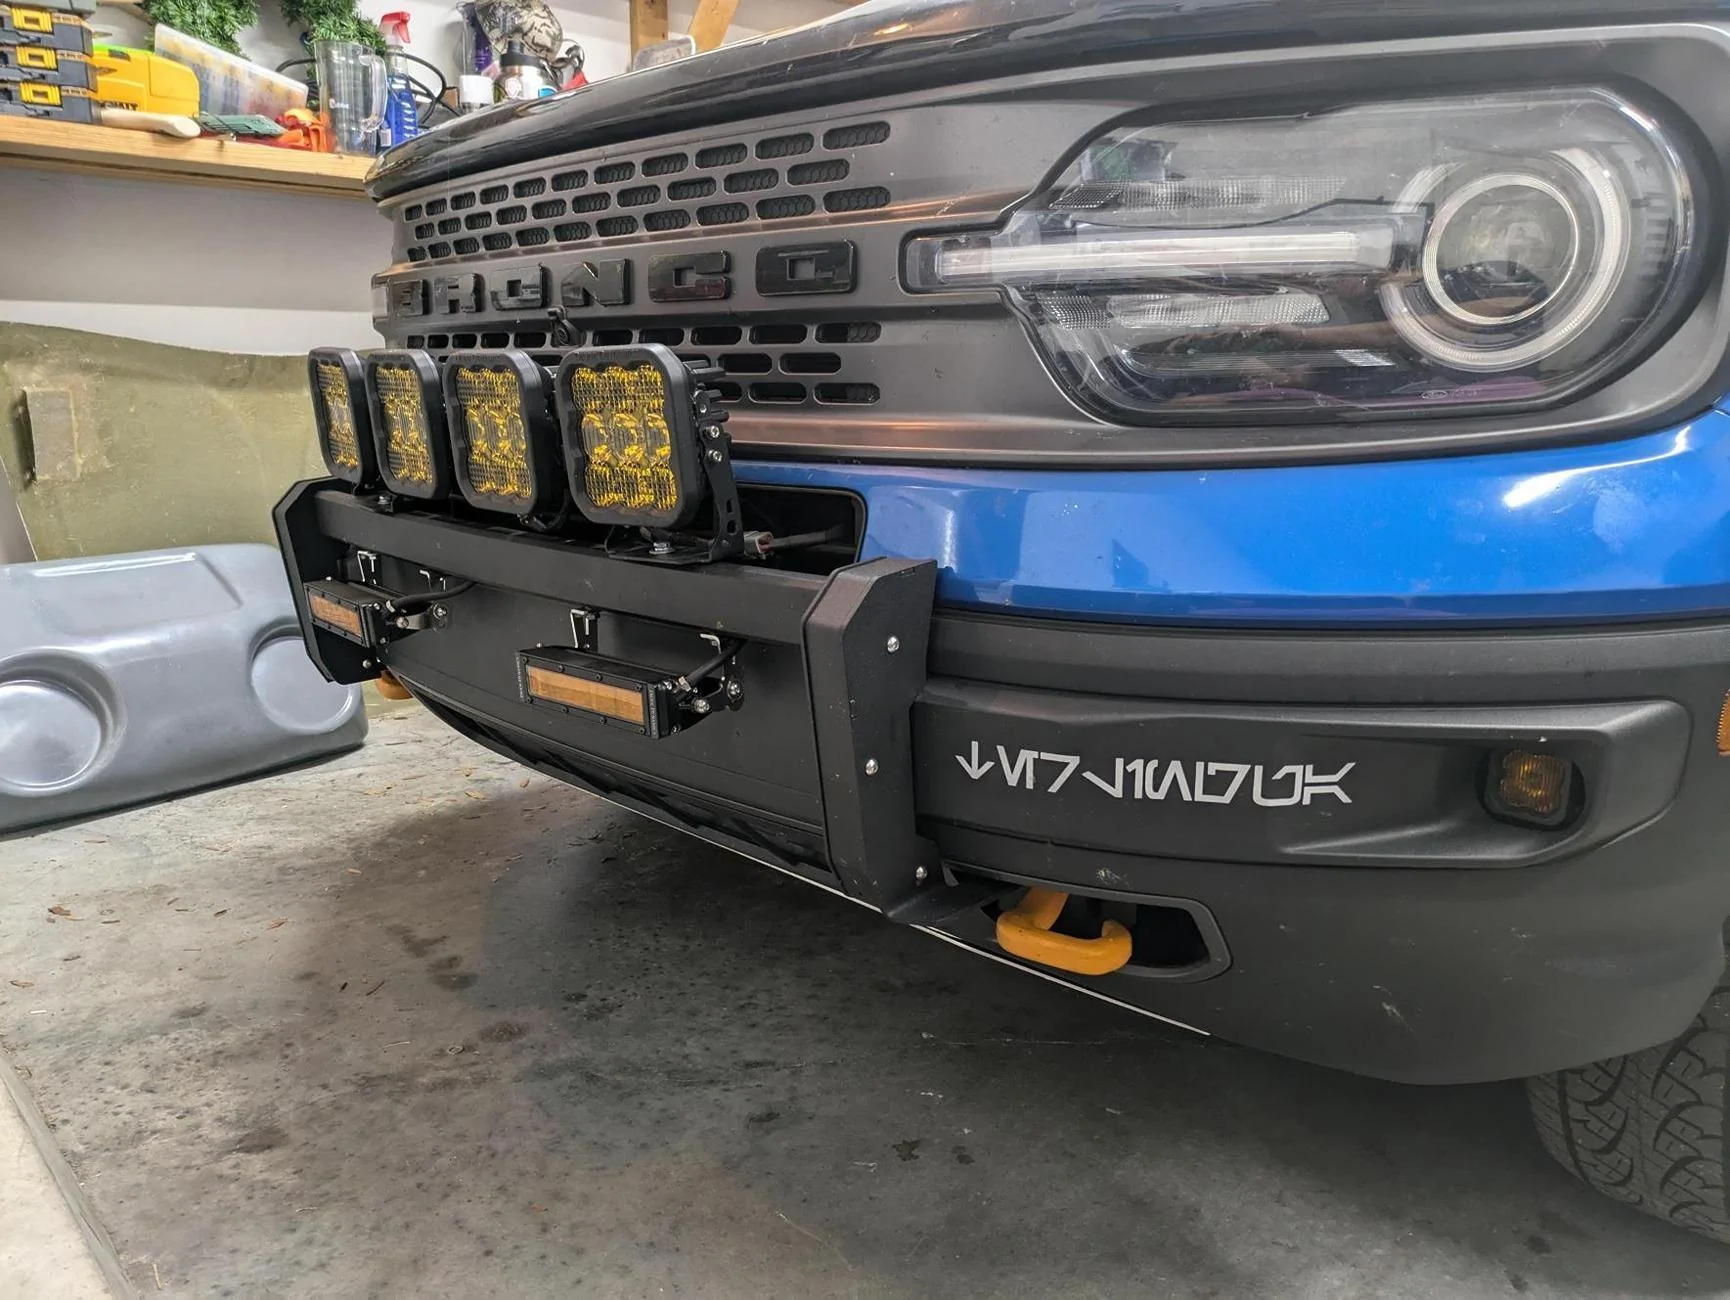
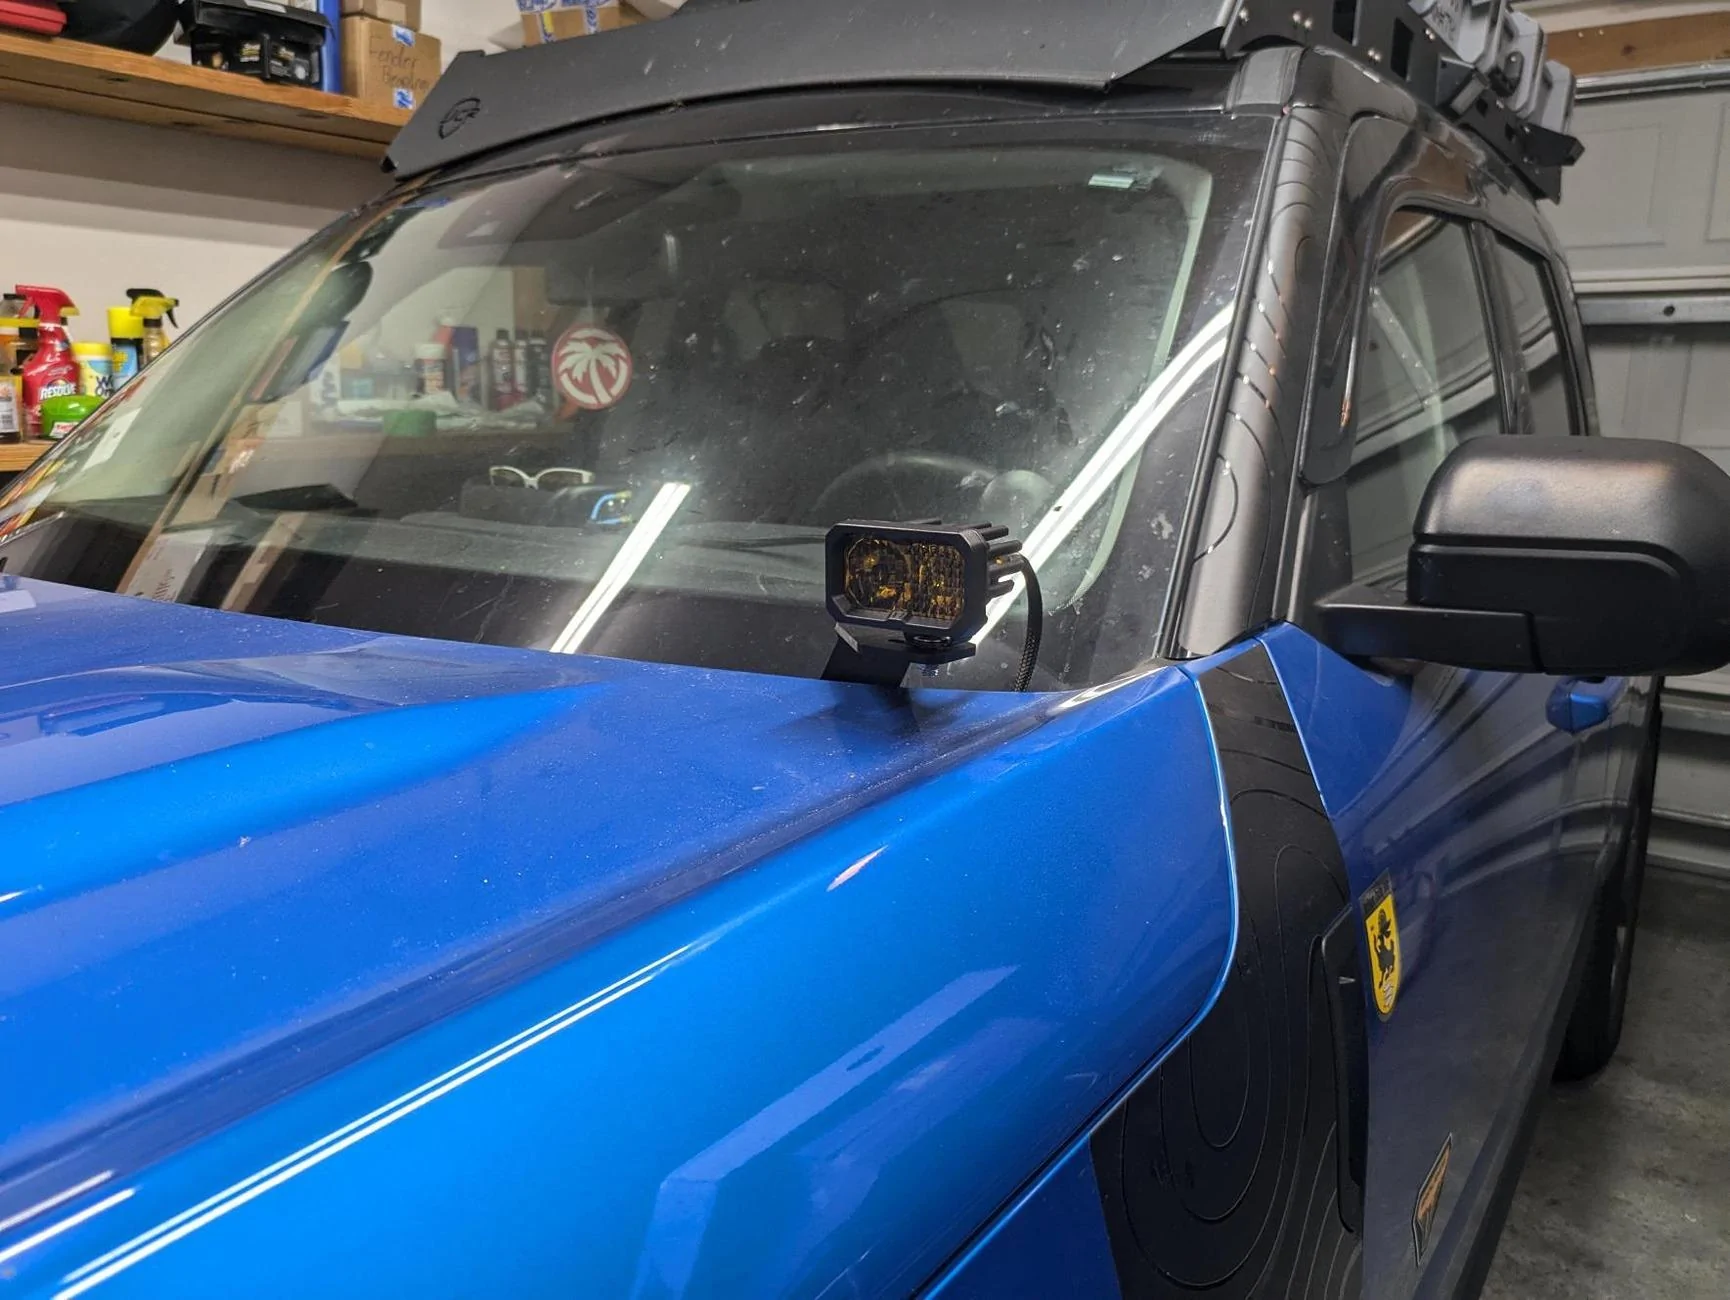
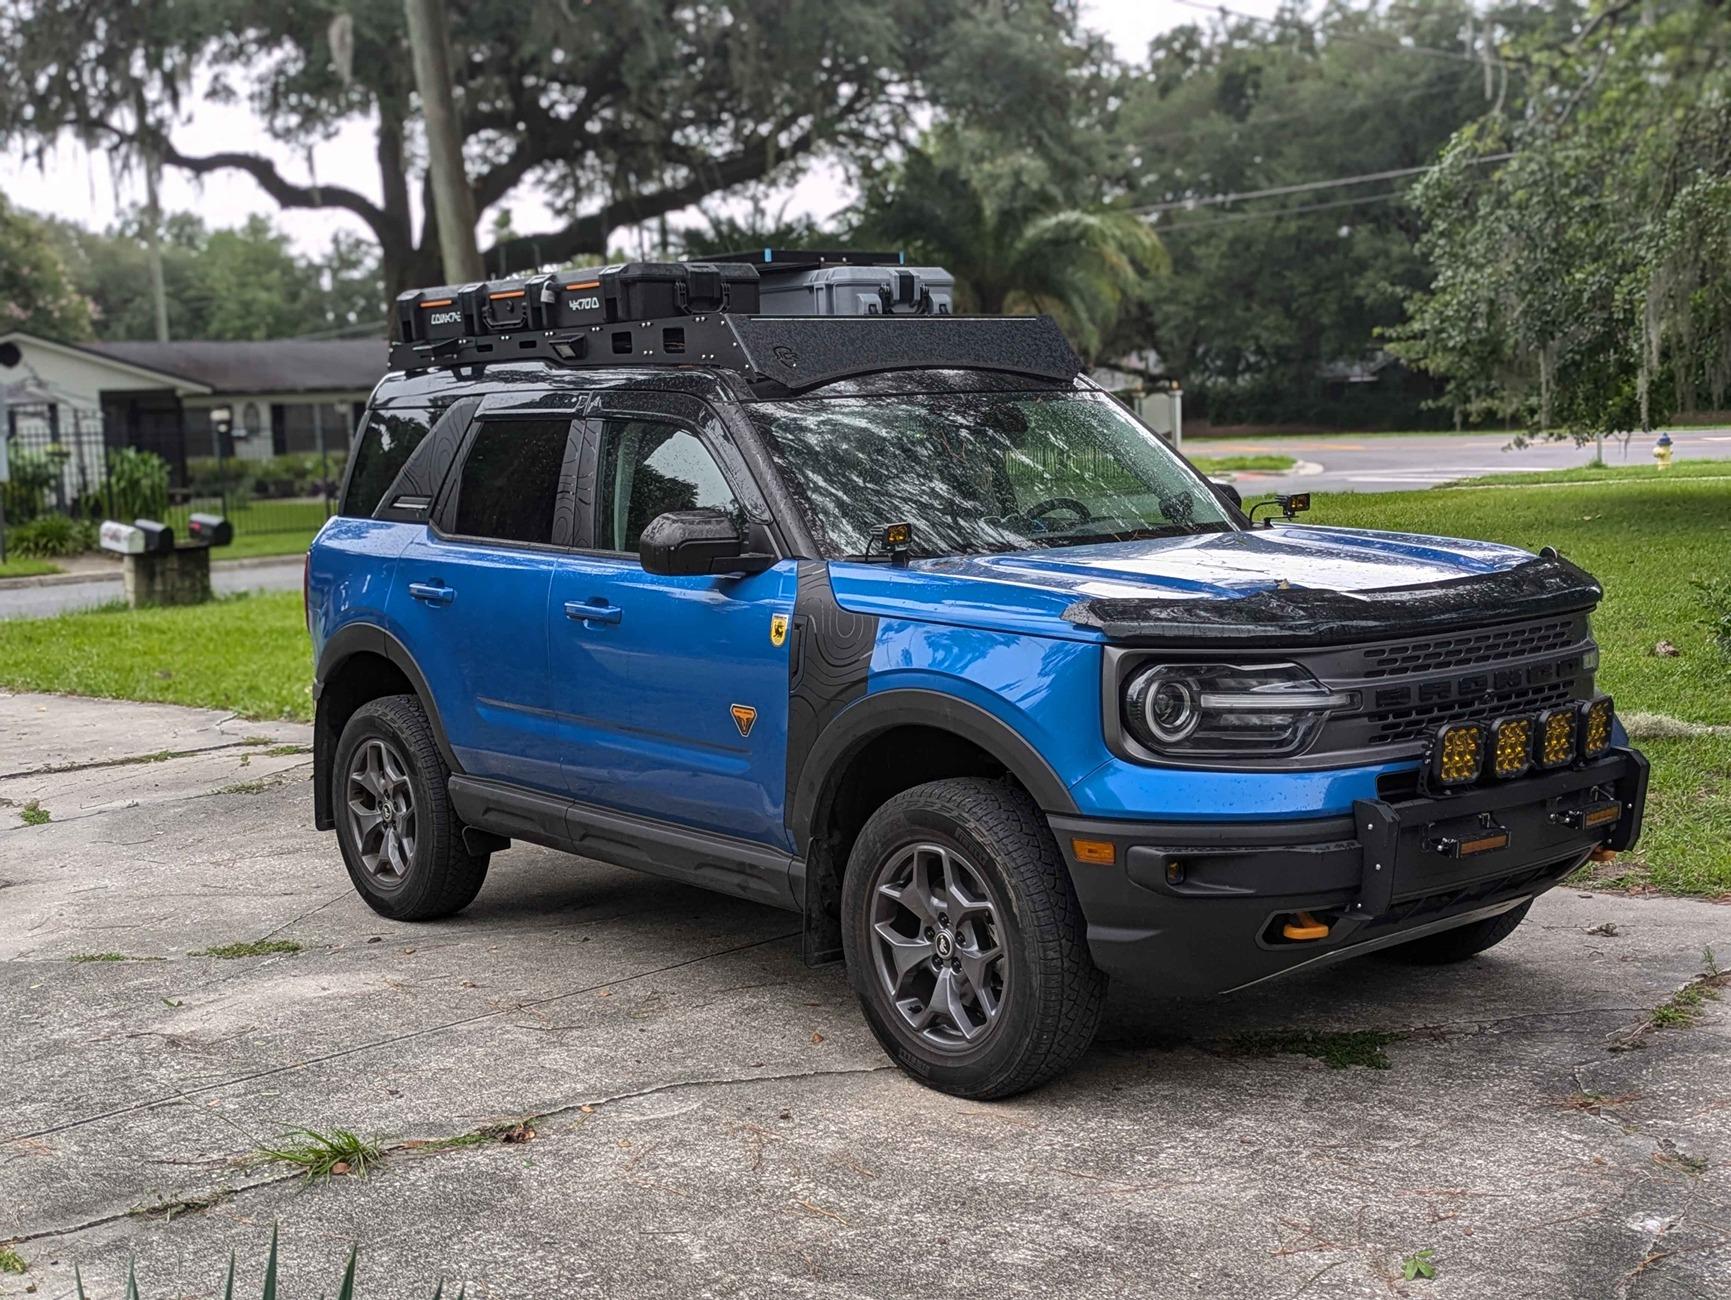
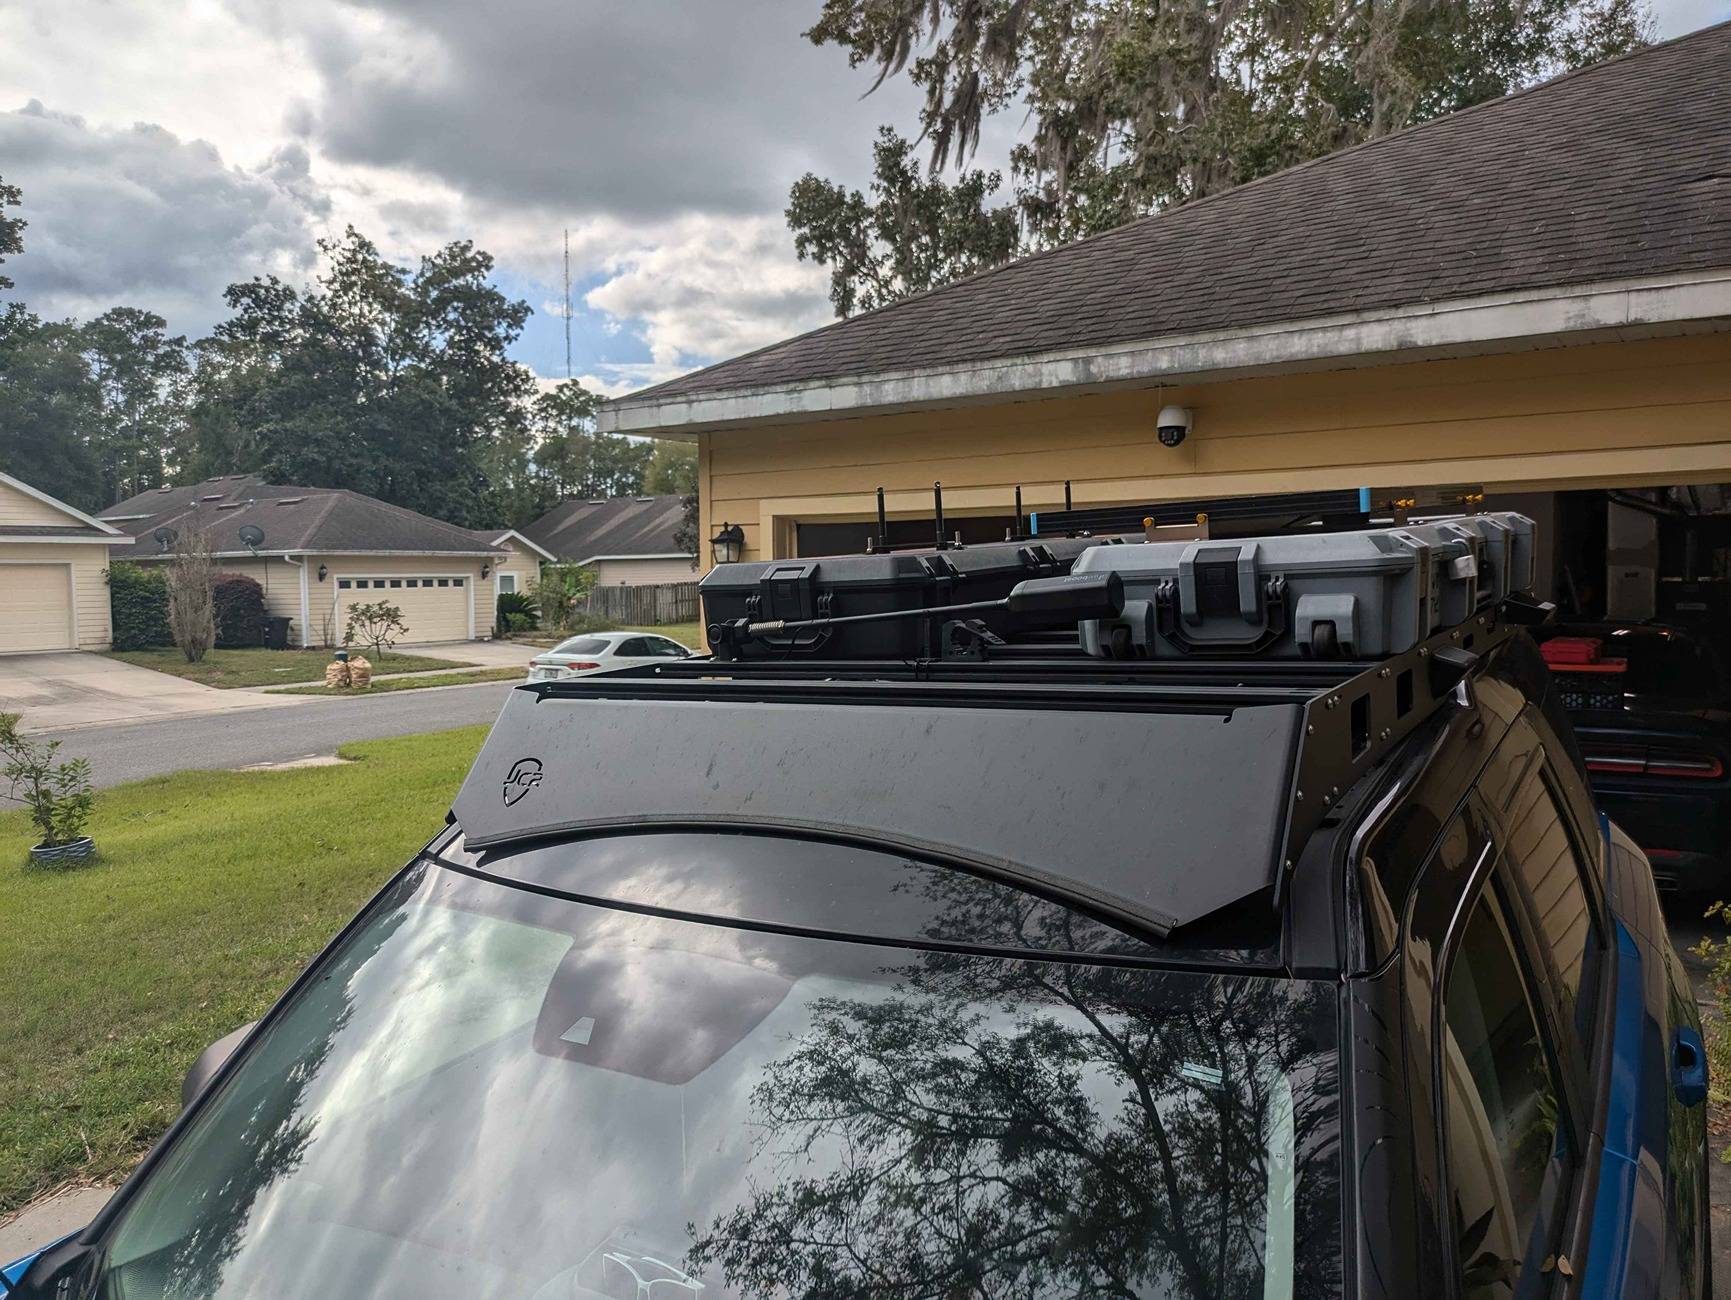
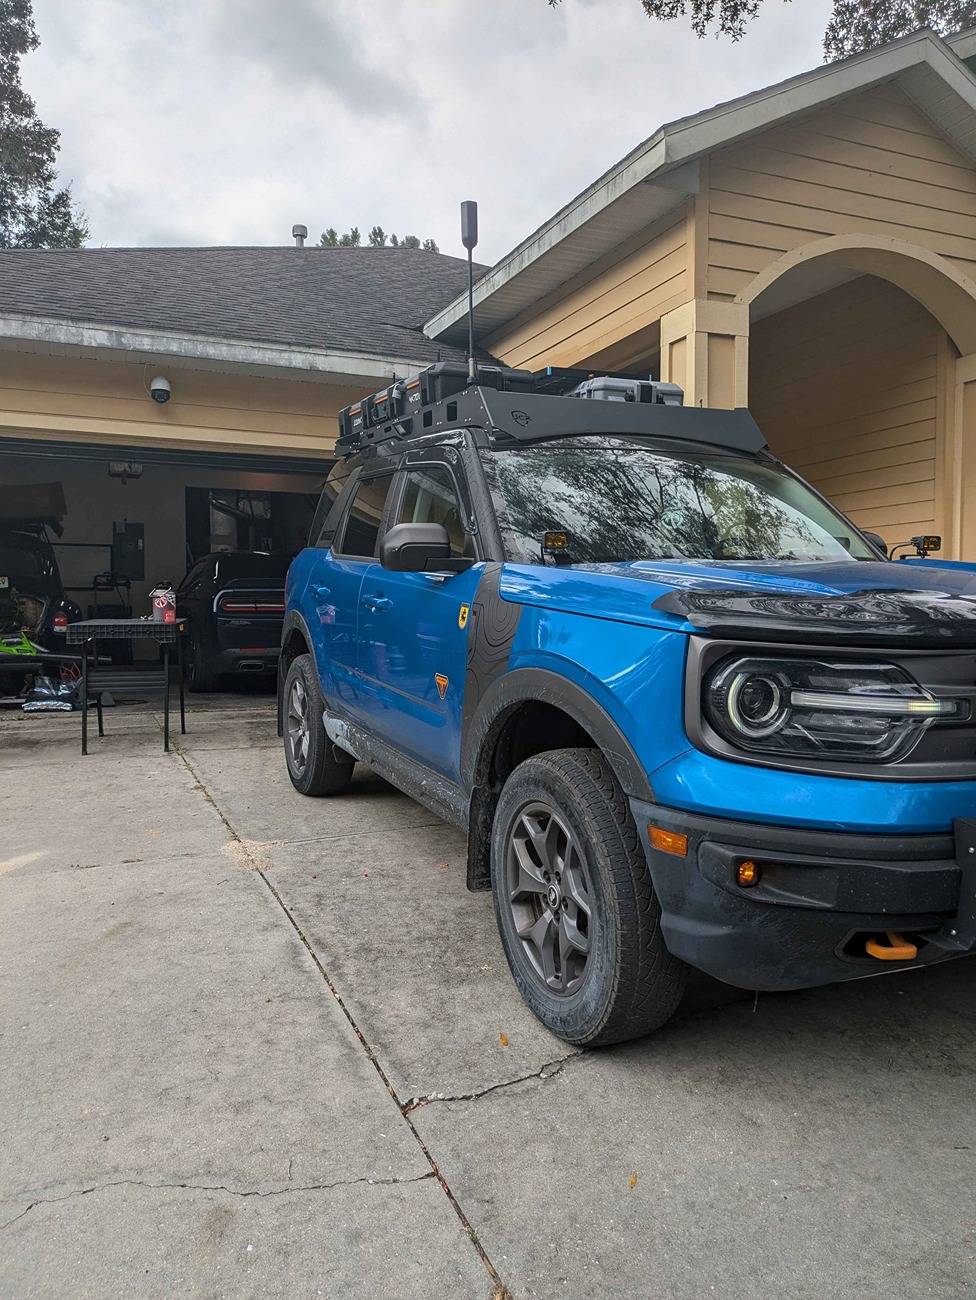
Dude, love this build. Great job! That S&B CAI looks awesome. Very rarely do I advocate for a "CAI", because it doesn't normally do anything. But you can tell that the particular design on this, where it replaces EVERYTHING from the nose to the turbo, will actually probably HELP (and I stress the word 'help') increase airflow ... in particular if you get tuned (like I plan on doing by Cobb as soon as they release the 2023 tune version). It's definitely something down the road that I'm thinking about.

That gas mileage is excellent for that roof rack. On a recent trip from Miami up to Cedar Key, I only averaged about 23 miles a gallon with 4 people in the car, fully loaded rear end, sloggin cooler tow, yakima rack, with a fully extended yakima basket, in where I probably exceeded the roof threshold and was at maybe 160. I usually had it right at 70, and rarely pushed it to 75 or higher. I could tell that the wind drag was serious.

However, I also think the fact that I recently increased my tire Diameter by a half inch without telling the PCM, might be throwing it off a bit 😅
Sponsored

 
Last edited:
OP
OP
Horse n Buggy

Horse n Buggy

Badlands
Well-Known Member
First Name
Stoge
Joined
Aug 30, 2022
Threads
4
Messages
215
Reaction score
615
Location
Florida, USA
Vehicle(s)
2022 Bronco Sport
Dude, love this build. Great job! That S&B CAI looks awesome. Very rarely, do I advocate for a "CAI", because it doesn't normally do anything; but you can tell that the particular design on this, where it replaces EVERYTHING from the nose to the turbo, will actually probably HELP (and I stress the word 'help') increase airflow ... in particular if you get tuned (like I plan on doing by Cobb as soon as they release the 2023 tune version). It's definitely something down the road that I'm thinking about.

That gas mileage is excellent for that roof rack. On a recent trip from Miami up to Cedar Key, I only averaged about 23 miles a gallon with 4 people in the car, fully loaded rear end, sloggin cooler tow, yakima rack, with a fully extended yakima basket, in where I probably exceeded the roof threshold and was at maybe 160. I usually had it right at 70, and rarely pushed it to 75 or higher. I could tell that the wind drag was serious.

However, I also think the fact that I recently increased my tire Diameter by a half inch without telling the PCM, might be throwing it off a bit 😅
Rims, Tires and a mild lift are all inevitable and will definitely also effect efficiency, but the game is pay to play so it's expected.

I am patiently waiting for @Fast Mavericks to finish their testing on the BS 2.0L downpipe and exhaust because Intake, downpipe, exhaust and tune are probably as far as I want to go bolt on wise for the engine for a good long while
 

gatornek

Badlands
Well-Known Member
Joined
May 5, 2023
Threads
41
Messages
779
Reaction score
917
Location
Miami
Vehicle(s)
2023 Bronco Sport; 2016 Mustang 2.3
Rims, Tires and a mild lift are all inevitable and will definitely also effect efficiency, but the game is pay to play so it's expected.

I am patiently waiting for @Fast Mavericks to finish their testing on the BS 2.0L downpipe and exhaust because Intake, downpipe, exhaust and tune are probably as far as I want to go bolt on wise for the engine for a good long while
No performance intercooler? I haven't done enough data logging to see how 'heat soaky' the stock IC is (I use OBDFusion on my iphone), but trying to cool that air down 'as much as possible' post turbo, is helpful when you tune. I think @Fast Mavericks was looking for test subjects but I haven't seen anything else in terms of aftermarket. There's another company called CVFab that has also hinted at possibly fabricating for the BS. But it would take a bunch of us to have genuine interest to really spur them, I imagine.
 
OP
OP
Horse n Buggy

Horse n Buggy

Badlands
Well-Known Member
First Name
Stoge
Joined
Aug 30, 2022
Threads
4
Messages
215
Reaction score
615
Location
Florida, USA
Vehicle(s)
2022 Bronco Sport
No performance intercooler? I haven't done enough data logging to see how 'heat soaky' the stock IC is (I use OBDFusion on my iphone), but trying to cool that air down 'as much as possible' post turbo, is helpful when you tune. I think @Fast Mavericks was looking for test subjects but I haven't seen anything else in terms of aftermarket. There's another company called CVFab that has also hinted at possibly fabricating for the BS. But it would take a bunch of us to have genuine interest to really spur them, I imagine.
Forgot about intercooler lol, I know Fast Mavericks makes one for the Maverick, I just honestly don't know if anyone will ever make a kit for the 2.0 in the sport. Fast Mavericks has a test subject I think, but they certainly are no where near Florida for me to volunteer.

Kinda disappointing that the Maverick gets a ton of love and the Full sized gets a ton of love but the Sport is kinda the redheaded stepchild that gets table scraps. I find myself messaging a ton of different suppliers asking for dimensions and info because I'm going to have to Frankenstein my rig together to get close to my vision.


OP
OP
Horse n Buggy

Horse n Buggy

Badlands
Well-Known Member
First Name
Stoge
Joined
Aug 30, 2022
Threads
4
Messages
215
Reaction score
615
Location
Florida, USA
Vehicle(s)
2022 Bronco Sport
This weekend I decided to try to solve a very particular problem in the most complicated way possible. On my last visit to Virginia, driving through the rural highways at 2am after 11 hours of driving, I noticed a moderate inadequacy with the high beams. See, when my regular headlights are on, the fog-lights illuminated the sides of the road and would reveal scheming deer at roadside, however, whenever the auto High Beams came on, I had significantly less coverage on the road sides. The highs do an amazing job of throwing light forward, but they just don’t cover the side zones like the fogs do, and I really wanted to keep tabs on those walking insurance claims.


So the plan became to find out how to tie “Driving Lights” to the high beams to cover the road sides. Doing some research, both on here, on the Bronco6G forums and the Maverick forums, I learned about the Headlight CANBUS system on our cars, and the options others have taken to accomplish similar tasks. As users here will inform you, using FORSCAN you can enable “Bambi Mode” which would let your Fogs stay on with high beams, or as Rhel discovered, you can use an OBD2 CANBUS reader and pair it to the High Beam signal. My only issue with these (in additional to the cost of the XBB Power Unit) is that I wanted my lights to be controlled with both the High Beams and a toggle switch, incase my discretion was to not run driving lights. So I entered the world of Relays, despite the fact I hate doing wiring and electronics (but I hate doing that less than playing with programming, looking at you FORSCAN).

Ford Bronco Sport Vorpal - Horse N Buggys BS Badlands Build 1.White Board

Ford Bronco Sport Vorpal - Horse N Buggys BS Badlands Build 2. Relay

To cut to the chase, I wanted to use a 5-pin relay to detect when the foglights turned off to engage the “Super Fogs” (Diode Dynamics 6” SAE Stage Series Light Bars) through a toggle switch. I mapped out my wiring plan, leaving 87 open because I want this to function “Normally Closed” which means, when the relay detects power to the fog lights, it disengages power to the Super Fogs. 87A is from relay to Lights, 86 is from relay to T-Clamp on Fog Power, 85 is Ground and 30 is from battery through inline fuse into switch into Relay. Once its all written down it isn’t terrible so assemble, but it took me a while to be 100% on it so I used wirenuts to temporarily connect to the relay pig-tails in case I need to redo anything, and ill come back later to finalize the wiring. So with the relay mounted on a random bolt at the hoodline I moved to the switch.

Ford Bronco Sport Vorpal - Horse N Buggys BS Badlands Build 3. Swittch Mounted

Ford Bronco Sport Vorpal - Horse N Buggys BS Badlands Build 4. Switch Closed

Ford Bronco Sport Vorpal - Horse N Buggys BS Badlands Build 5. Switch On

Because I’m still not entirely committed to my Aux-light controller (The Blazer wireless hasn’t given out yet), anything I set up I want to be able to un-do without much effort and little to no damage to the car, so when deciding where to put my toggle switch I figured the aftermarket sunglass holder behind the infotainment screen was the best thing to drill and screw into. I’m still not properly running anything through the firewall so I’m continuing to enter through the drivers door jamb which is easy enough, a little wire cover and it significantly reduces how much it looks like I’ve wired an car-bomb on my dash. It’s not pretty, but its easily un-doable, and that’s the current goal. And the toggle switch I went for has the aircraft style safety cover (because it looks cool) and an LED power indicator because my memory is trash and I tend to leave lights on.

Ford Bronco Sport Vorpal - Horse N Buggys BS Badlands Build 6. Fogs Mounted

To Mount the Lights, I decided to reuse the original provided holes on the Rally Innovations Light bar which were upside down. Now this leaves very little room behind the lights but that’s fine and I have a history of using Diode Dynamics mounts incorrectly anyways, so I simply installed the mounts backwords and mirrored so they would clear. I just needed to drill two more holes, sprinkle in some ¼-20 Rivnuts and I was there. Ran the wires similar to the big lights, disassembled the fan shroud, dropped the wires down in-front of the radiator and out through the grill.

Ford Bronco Sport Vorpal - Horse N Buggys BS Badlands Build 8. Ditch Lights

Also I installed Diode Dynamics SSC2 Pro Combo Pattern Ditch Lights, this took far less imagination and effort, use tape to “frame” where you hinger are, unbolt hinges (one side only at a time) put on bracket. Run wires to Blazer (backlights and mains) and viola, I did all the hard part months ago when I set up the Blazer.

Ford Bronco Sport Vorpal - Horse N Buggys BS Badlands Build 7. Backlights

Surprisingly everything works. These 6” Lights are SAE DOT legal fog lights, and are aimed low and wide to avoid anyones eyes incase the Auto-High beams fail to shut off. But otherwise, it all works. With the toggle switch turned on, every time the high beams turn on, the Super Fogs turn on and they do amazing at illuminating the road side. I’m very happy and now I just need to clean up my wiring.


I always need to clean up my wiring.
Ford Bronco Sport Vorpal - Horse N Buggys BS Badlands Build 9. Full kit
 

supaDean

Big Bend
Well-Known Member
Joined
Nov 7, 2023
Threads
9
Messages
55
Reaction score
159
Location
Ontario, Canada
Vehicle(s)
2023 Ford Bronco Sport
Enjoy seeing creative solutions. BTW, there's a Save-a-Deer Whistle that can be mounted to the front of your vehicle which emits a high frequency sound that deer can hear, and freezes them in their tracks. Apparently it works when driving over 35mph, and is 90% effective. Costs approx USD $15 on Amazon. I just installed one on mine, but haven't yet tested it.
 
OP
OP
Horse n Buggy

Horse n Buggy

Badlands
Well-Known Member
First Name
Stoge
Joined
Aug 30, 2022
Threads
4
Messages
215
Reaction score
615
Location
Florida, USA
Vehicle(s)
2022 Bronco Sport
Enjoy seeing creative solutions. BTW, there's a Save-a-Deer Whistle that can be mounted to the front of your vehicle which emits a high frequency sound that deer can hear, and freezes them in their tracks. Apparently it works when driving over 35mph, and is 90% effective. Costs approx USD $15 on Amazon. I just installed one on mine, but haven't yet tested it.
While certainly an inexpensive option, I’ve not seen enough credible research, outside of anecdotal evidence, to trust them with my safety. And the lights have use outside of just deer incident prevention, both on and off road
 

supaDean

Big Bend
Well-Known Member
Joined
Nov 7, 2023
Threads
9
Messages
55
Reaction score
159
Location
Ontario, Canada
Vehicle(s)
2023 Ford Bronco Sport
While certainly an inexpensive option, I’ve not seen enough credible research, outside of anecdotal evidence, to trust them with my safety. And the lights have use outside of just deer incident prevention, both on and off road
My note wasn't meant to offend (in the event it did). I was clear I enjoy creative solutions. Though I hope the whistle may be an option to others that weren't aware such an option exists. I'm not affiliated with the Save-a-Deer whistle. I drive in areas where there is a lot of deer and was happy to have stumbled onto the whistle as an option.
 
OP
OP
Horse n Buggy

Horse n Buggy

Badlands
Well-Known Member
First Name
Stoge
Joined
Aug 30, 2022
Threads
4
Messages
215
Reaction score
615
Location
Florida, USA
Vehicle(s)
2022 Bronco Sport
My note wasn't meant to offend (in the event it did). I was clear I enjoy creative solutions. Though I hope the whistle may be an option to others that weren't aware such an option exists. I'm not affiliated with the Save-a-Deer whistle. I drive in areas where there is a lot of deer and was happy to have stumbled onto the whistle as an option.
I was not offended in any way lol. Those deer whistles have been around a long time and I don't think they cause any harm installing them


OP
OP
Horse n Buggy

Horse n Buggy

Badlands
Well-Known Member
First Name
Stoge
Joined
Aug 30, 2022
Threads
4
Messages
215
Reaction score
615
Location
Florida, USA
Vehicle(s)
2022 Bronco Sport
I've tried to thoroughly document a lot of the odd projects I've done on my Bronco Sport, and imma be honest, i did a very poor job with this latest one. Over the course of about 9 hours Thursday and Friday i installed the Fordrangerlifts 1.75" Badlands / First Edition lift.

Now i would be lying if i said i hadn't tried to install this about a month ago, but i got stuck on several things (i didn't have a wide enough variety of deep sockets to remove all necessary bolts, and i didn't have a good method for removing the CV Nut) and ended up wasting about 5 hours just trying to put it back together again. Since then, i obtained a much larger impact gun and a larger group of deep sockets.

I primarily used Fordrangerlifts youtube instructions for this install, the video was for their 1.25" lift, so this was mostly similar, however one particular part differed. The written instructions and the video instruct you to use the stock shock bolts to connect the spacer to the top of the struts. What wasn't mentioned was in the package i received, there were replacement bolts with smaller washers comparted to the stock captive washers. Which was depressive to discover the day following when i was unpackaging the spacers for the rear, because i was tearing through my garage trying to figure how to seat those stock bolts. With the 1.75" lift, the bolts are just long enough to get a little purchase, but you can kinda only seat two of the three bolts, the third wont reach the threads. Two hours later i had caveman'd enough to remove one of the captive washers off the bolt so i could use thinner washers. THIS WAS NOT NECESSARY, THERE WERE LONGER BOLTS IN THE PACKAGE, IM JUST DUMB AND DIDNT LOOK. That was also midnight to 2am and i had already been rewiring my 69 Beetle for about 6 hours before hand so i wasnt in my right mind.

The other hangups i ran into were trying to get the tire rod out of the spindle (the simply hammer smacking really didn't work for me, i might need a bigger hammer) Rotating the strut cap 180 didn't seem to work for me (i had to make significant adjustments afterwards and kinda just had to figure out the alignment based off top stud spacing) the video doesn't mention the wiring held up by the exhaust hanger on the passenger side so i didn't know what to do with it loose (the written instructions mention it but not how to secure it afterwards as the new bolts are too large for the connector, i just zip tied it to the exhaust hanger, it already didnt move much so its probably fine loose, but when it doubt just zip it). The last issue i had was, my old Craftsman floor jack doe not lift the car high enough to put the wheels back on the front of the car, i had to use the standard scissor lift from the spare tire well to lift the car enough for the front wheels. Easy simple and free solution, but not the new fresh hell i was anticipating at 2am just trying to finish one side.

Muiltiple hands, a bigger hammer, and checking the included hardware, i probably could have reduced the time it took me from 9 hours down to 4-5 honestly, the video is very detailed and helpful, but I'm kinda slow, have limited tools and tend to be more ambitious then i am capable, but a couple short test drives showed me that i didn't tighten the Driver side sway bar enough, nor the passenger side Tie Rod. Took care of those and everyting is spectacular now. Now i need to schedule an alignment.

Oh, and fun fact, because these spacers change the tops of the front struts to have built in studs instead of bolting holes, this lift is not compatible with the Steeda Strut Tower brace. I will need to figure out some soliton to that or i will be selling the Strut Tower Brace.

Here is a picture of the BS with the lift installed, i might take some comparative measurements when i have a chance, but i got a hiking trip this weekend before preparing for a tropical storm so, who knows.
Ford Bronco Sport Vorpal - Horse N Buggys BS Badlands Build PXL_20240802_202208172.PORTRAIT
 

Ford Motor Company

First Edition
Well-Known Member
First Name
Ford
Joined
May 26, 2021
Threads
12
Messages
1,514
Reaction score
978
Location
Dearborn
Vehicle(s)
Bronco, Bronco Sport
I've tried to thoroughly document a lot of the odd projects I've done on my Bronco Sport, and imma be honest, i did a very poor job with this latest one. Over the course of about 9 hours Thursday and Friday i installed the Fordrangerlifts 1.75" Badlands / First Edition lift.

Now i would be lying if i said i hadn't tried to install this about a month ago, but i got stuck on several things (i didn't have a wide enough variety of deep sockets to remove all necessary bolts, and i didn't have a good method for removing the CV Nut) and ended up wasting about 5 hours just trying to put it back together again. Since then, i obtained a much larger impact gun and a larger group of deep sockets.

I primarily used Fordrangerlifts youtube instructions for this install, the video was for their 1.25" lift, so this was mostly similar, however one particular part differed. The written instructions and the video instruct you to use the stock shock bolts to connect the spacer to the top of the struts. What wasn't mentioned was in the package i received, there were replacement bolts with smaller washers comparted to the stock captive washers. Which was depressive to discover the day following when i was unpackaging the spacers for the rear, because i was tearing through my garage trying to figure how to seat those stock bolts. With the 1.75" lift, the bolts are just long enough to get a little purchase, but you can kinda only seat two of the three bolts, the third wont reach the threads. Two hours later i had caveman'd enough to remove one of the captive washers off the bolt so i could use thinner washers. THIS WAS NOT NECESSARY, THERE WERE LONGER BOLTS IN THE PACKAGE, IM JUST DUMB AND DIDNT LOOK. That was also midnight to 2am and i had already been rewiring my 69 Beetle for about 6 hours before hand so i wasnt in my right mind.

The other hangups i ran into were trying to get the tire rod out of the spindle (the simply hammer smacking really didn't work for me, i might need a bigger hammer) Rotating the strut cap 180 didn't seem to work for me (i had to make significant adjustments afterwards and kinda just had to figure out the alignment based off top stud spacing) the video doesn't mention the wiring held up by the exhaust hanger on the passenger side so i didn't know what to do with it loose (the written instructions mention it but not how to secure it afterwards as the new bolts are too large for the connector, i just zip tied it to the exhaust hanger, it already didnt move much so its probably fine loose, but when it doubt just zip it). The last issue i had was, my old Craftsman floor jack doe not lift the car high enough to put the wheels back on the front of the car, i had to use the standard scissor lift from the spare tire well to lift the car enough for the front wheels. Easy simple and free solution, but not the new fresh hell i was anticipating at 2am just trying to finish one side.

Muiltiple hands, a bigger hammer, and checking the included hardware, i probably could have reduced the time it took me from 9 hours down to 4-5 honestly, the video is very detailed and helpful, but I'm kinda slow, have limited tools and tend to be more ambitious then i am capable, but a couple short test drives showed me that i didn't tighten the Driver side sway bar enough, nor the passenger side Tie Rod. Took care of those and everyting is spectacular now. Now i need to schedule an alignment.

Oh, and fun fact, because these spacers change the tops of the front struts to have built in studs instead of bolting holes, this lift is not compatible with the Steeda Strut Tower brace. I will need to figure out some soliton to that or i will be selling the Strut Tower Brace.

Here is a picture of the BS with the lift installed, i might take some comparative measurements when i have a chance, but i got a hiking trip this weekend before preparing for a tropical storm so, who knows.
Ford Bronco Sport Vorpal - Horse N Buggys BS Badlands Build PXL_20240802_202208172.PORTRAIT
Love the personal touches, Stoge! Thanks for sharing with the forum.
 
OP
OP
Horse n Buggy

Horse n Buggy

Badlands
Well-Known Member
First Name
Stoge
Joined
Aug 30, 2022
Threads
4
Messages
215
Reaction score
615
Location
Florida, USA
Vehicle(s)
2022 Bronco Sport
Having put one large group Excursion under the belt of the Bronco Sport, it was time to look at the weak points on the trip and figure out how to improve or fix those issues. The first of which was poor cell reception in the mountains. Now, I'm fully aware that you cannot conjure cell signal from nothing, and that cell boosters only enhance what is there, not creating something from nothing and that is fine. For my application that is all I'm really looking for.

Ford Bronco Sport Vorpal - Horse N Buggys BS Badlands Build 1. Power

For my usecase, and with the research I've done i decided to install Weboost cell booster on my roof rack. I purchased this during a steep sale on Amazon and figured it was worth the try. All of my install on this is... very temporary and removable based on its performance going forward. Starting off was installing the heatsink and power controller. Considering future modification on my list i wanted to keep the front cabin clean during this install and considering we only have two 12v outlets in our Badlands, the rear seemed like a fantastic place to start. I've literally just placed the heatsink/power controller in one of the foam cutouts and will be monitoring its operating temperatures, if it never gets to hot then there it will remain. It draws power from the rear 12v outlet and routes identically to my solar connections (additionally i will be powering it through my Jackery battery because my memory is terrible and ill forget to turned this durned thing off seeing as I've hidden its power indicator).
Ford Bronco Sport Vorpal - Horse N Buggys BS Badlands Build 2. int ant

The small black rectangle above the yeti dry bag is the internal antenna, its mounted with sticky velcro that was included, it wires with an identical path as the power line. The Weboost system is straight forward, internal antenna into power controller into external antenna. What is received with the outside antenna is rebroadcasted with the inside antenna, and what is sent inside and boosted outside.
Ford Bronco Sport Vorpal - Horse N Buggys BS Badlands Build 3. routin

Mirroring my solar install, the coax and ran along the weatherstripping for the trunk and under the rack going toward the front of the car.
Ford Bronco Sport Vorpal - Horse N Buggys BS Badlands Build 4. ext ant

There is a secondary post that is held upright with zipties (i want to make this better) that cradles the antenna when not upright. I opted to lay left to right because i dont have a ton of room front to back for obvious reasons
Ford Bronco Sport Vorpal - Horse N Buggys BS Badlands Build 5. ant u

The folding mount itself is simply T-nutted into my rails, making the install surprisingly easy, but i will be doing some efficacy testing whenever possible. Otherwise viola. Now i get to move onto my next tast. Mounted GMRS transceiver

Also, questions to anyone with knowledge, does the rear 12v outlet timeout eventually with the car off? Or is my garbage memory posing the chance i nuke my battery with this thing left on?


Top