- Thread starter
- #1
First time installing a sub so wanted to list some notes for anyone that wants to try. I've been reading everything I can on the forums but there were a lot of small things that I didn't realize until actually doing it. These don't really affect the install but nice to know.
Best 2 threads to get started with pictures
https://www.broncosportforum.com/forum/threads/installing-aftermarket-speakers-and-sub-in-bronco-sport.2550/page-6#post-77060
https://www.broncosportforum.com/forum/threads/custom-sub-box-and-amp-install.2919/
YouTube Videos
Getting room for the power cable to get through the fire wall
[/////https://www.youtube.com/watch?v=dCuxSq3WoEk&t=565s/////]
How to remove the door panels
[/////https://www.youtube.com/watch?v=MNjIGGMP8IA&t=755s/////]
[/////https://www.youtube.com/watch?v=D5_Ngl9kiB0/////]
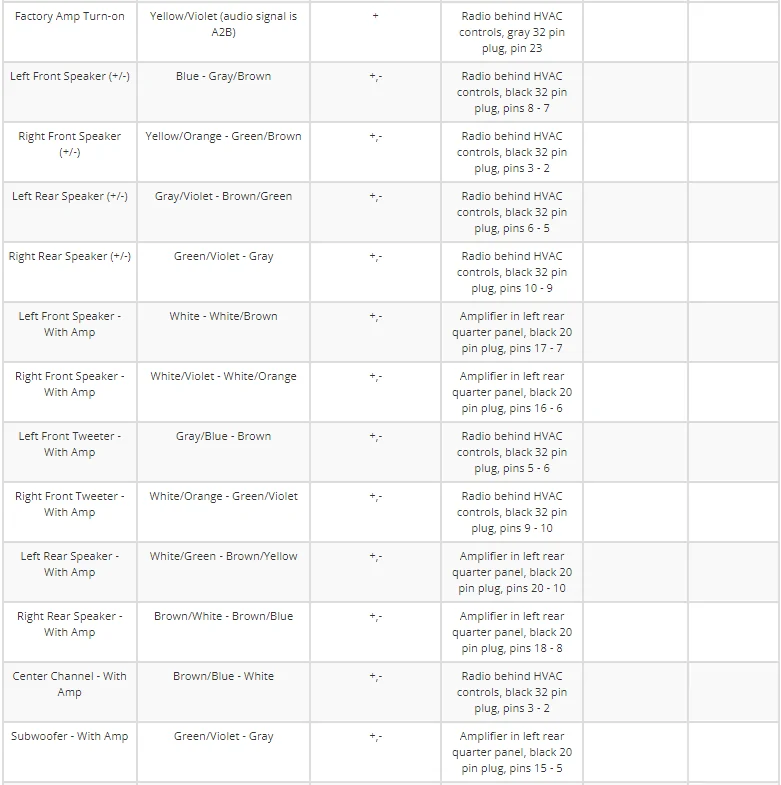
Wire Colors

Equipment
EFX 8 awg amp kit from Crutchfield
Wire nuts for 8 awg power and ground to sub's 10 awg wire harness
New 1/2" ring terminal to replace the terminal that came with ground to fit the ground seat bolt
Separate 30a ANL fuse for amp kit (Cerwin Vega recommended a 20a but Crutchfield said 30a was ok)
Fuse tap (micro 2 or micro 3) with 5a (LC2i recommended a 1a but it was hard to find)
16 awg speaker wire for LC2i power and ground
16 awg speaker wire for door speakers
16 awg ferrules
LC2i line output converter
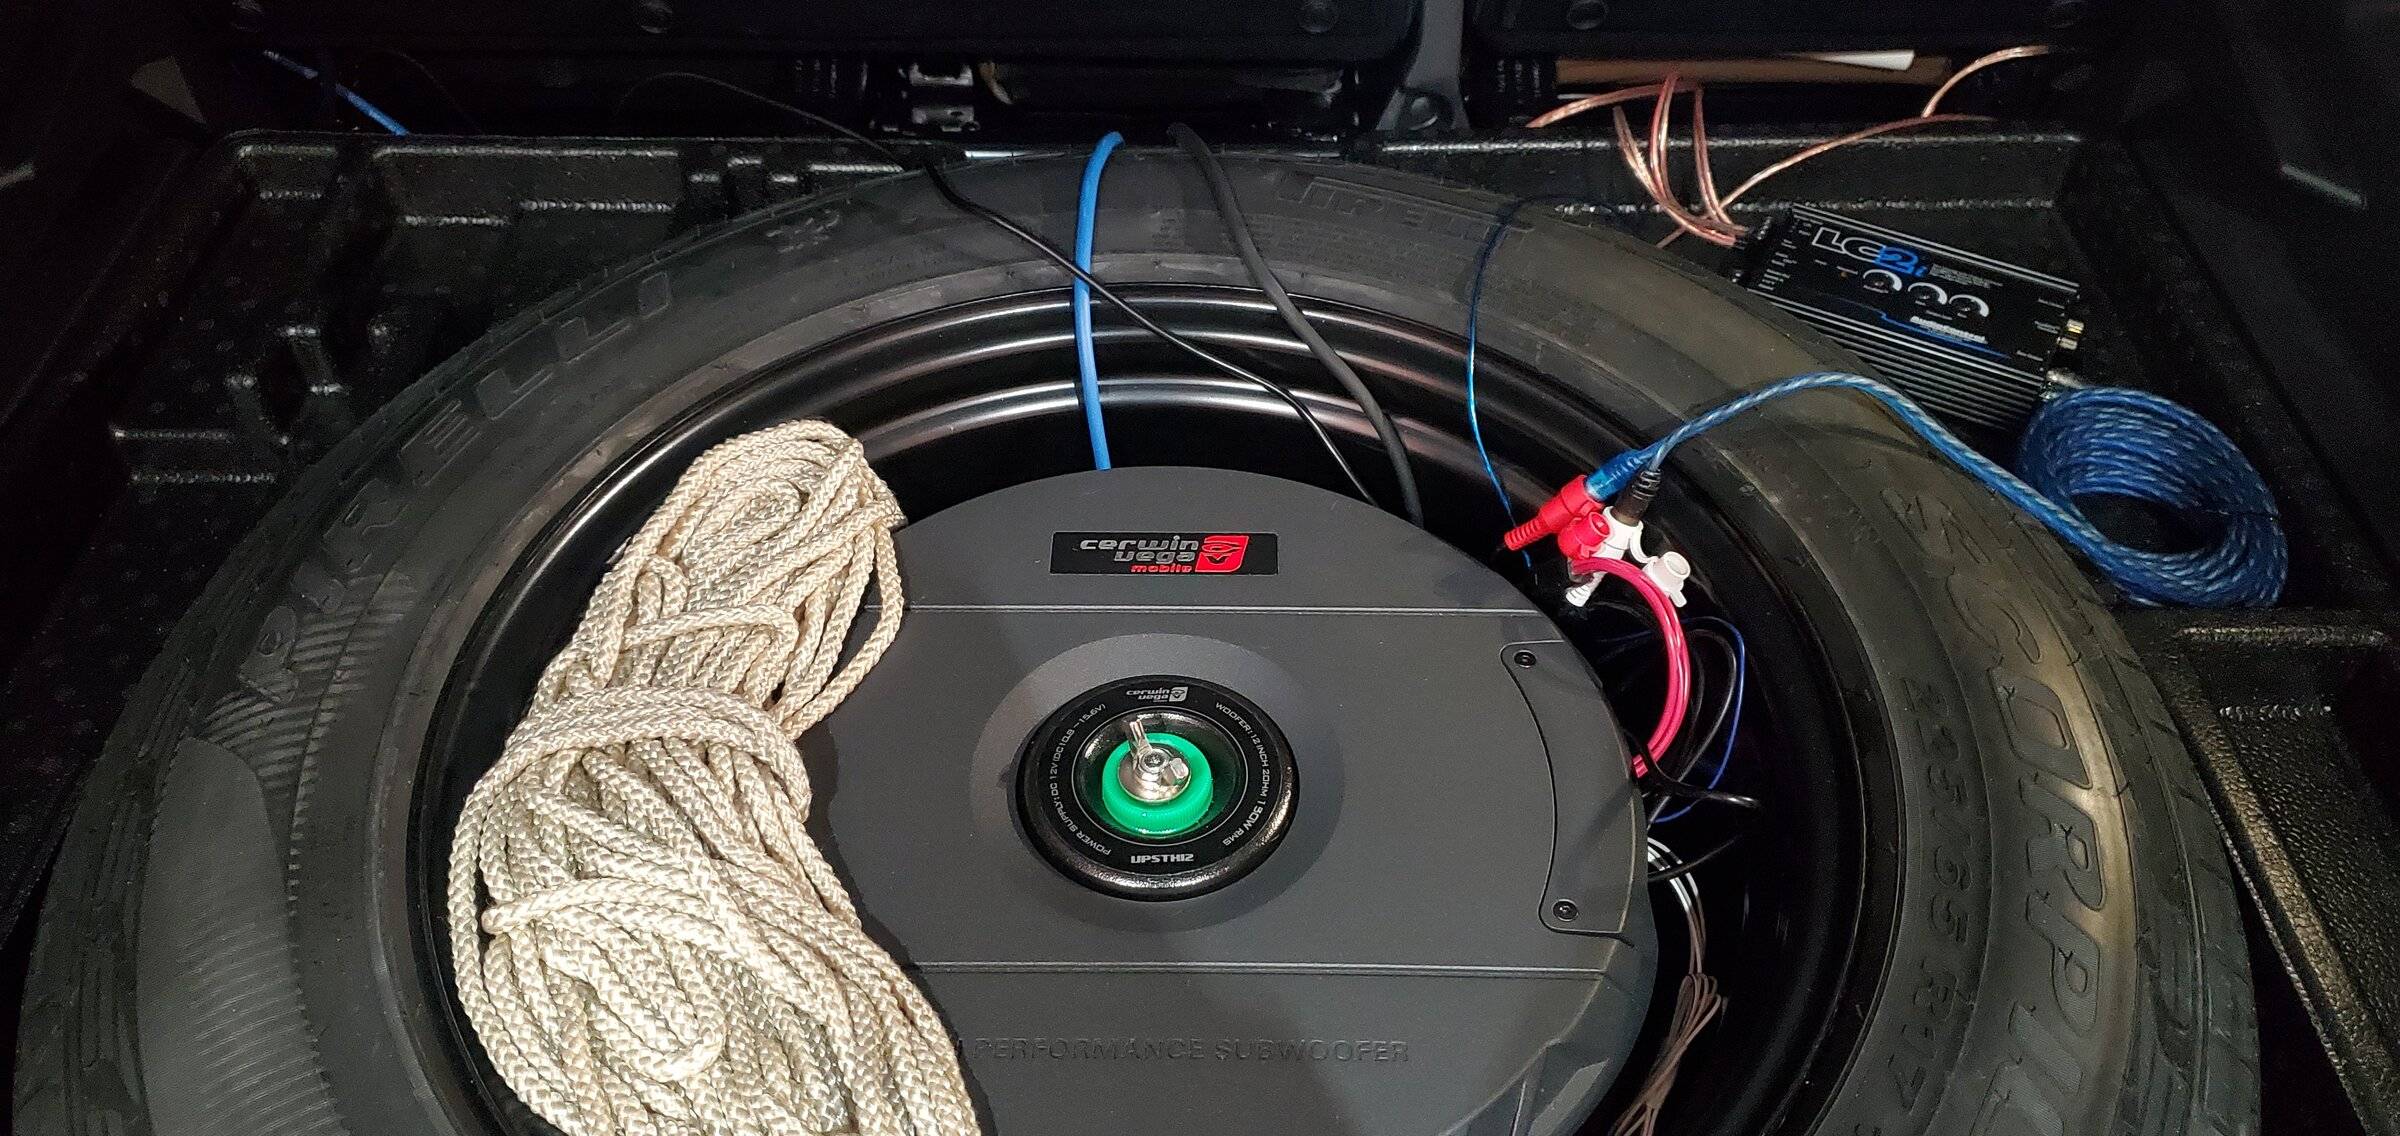
Cerwin Vega spare tire sub (shallow version) from Amazon
Trim pry tools
Positaps (gray for 16 awg)
Socket extensions 3/8" 7mm, 8mm, 10mm
Wire stripper
Wiring
Battery through firewall, power wire under driver side trim, ground to bolt on back bottom of rear seat by cargo floor, 12v fuse tap (micro 2 or micro 3 with 5a fuse) to LC2i, remote out wire from LC2i to sub harness, ground for LC2i to the same seat bolt, speaker wires from B pillar (I only used the passenger side), speaker wire ferrules for RIGHT into LEFT input for LC2i (if doing only one side, LC2i only works off the left), jump from LEFT +/- to RIGHT +/-
Noob Realizations
I am not an audio head so the system didn't sound too bad to start with. I could tell the bass kinda rolled off on higher volume so it is nice to have the LC2i and sub help provide a little more punch. Overall, I underestimated the time this would take but it was fun. Playing Kanye West - Mercy was a good test and I'm still working on adjusting the LPF, phase, gain, and other LC2i knobs. Almost bought the JBL Bass Pro Hub but this one seemed to get great reviews at a cheaper price to pay for the LC2i.
I was too cold to take pictures along the way but if you have any requests let me know! Now to see if I have this oil leak recall.

Best 2 threads to get started with pictures
https://www.broncosportforum.com/forum/threads/installing-aftermarket-speakers-and-sub-in-bronco-sport.2550/page-6#post-77060
https://www.broncosportforum.com/forum/threads/custom-sub-box-and-amp-install.2919/
YouTube Videos
Getting room for the power cable to get through the fire wall
[/////https://www.youtube.com/watch?v=dCuxSq3WoEk&t=565s/////]
How to remove the door panels
[/////https://www.youtube.com/watch?v=MNjIGGMP8IA&t=755s/////]
[/////https://www.youtube.com/watch?v=D5_Ngl9kiB0/////]
Wire Colors
Equipment
EFX 8 awg amp kit from Crutchfield
Wire nuts for 8 awg power and ground to sub's 10 awg wire harness
New 1/2" ring terminal to replace the terminal that came with ground to fit the ground seat bolt
Separate 30a ANL fuse for amp kit (Cerwin Vega recommended a 20a but Crutchfield said 30a was ok)
Fuse tap (micro 2 or micro 3) with 5a (LC2i recommended a 1a but it was hard to find)
16 awg speaker wire for LC2i power and ground
16 awg speaker wire for door speakers
16 awg ferrules
LC2i line output converter
Cerwin Vega spare tire sub (shallow version) from Amazon
Trim pry tools
Positaps (gray for 16 awg)
Socket extensions 3/8" 7mm, 8mm, 10mm
Wire stripper
Wiring
Battery through firewall, power wire under driver side trim, ground to bolt on back bottom of rear seat by cargo floor, 12v fuse tap (micro 2 or micro 3 with 5a fuse) to LC2i, remote out wire from LC2i to sub harness, ground for LC2i to the same seat bolt, speaker wires from B pillar (I only used the passenger side), speaker wire ferrules for RIGHT into LEFT input for LC2i (if doing only one side, LC2i only works off the left), jump from LEFT +/- to RIGHT +/-
Noob Realizations
- Getting to the firewall needed the battery and the air intake removed. Taking it apart the first time was slow but getting it back together was quick following the YouTube videos. I had to get socket extensions to reach some bolts.
- There is a firewall grommet that is perfect for looping a wire through that drops it down by the pedals. There is one made of a harder plastic and one that is above that one made of a softer rubber. The rubber one was still pretty thick, and if you use a knife to get through one layer, there is another layer to get through. Stick to the far right as the wires will be harnessed together in the middle/left.
- There are 3 positive terminals on the battery and I used the top left one. I should have routed the wire and fuse holder farther away from the engine heat.
- It is tricky grabbing the smaller micro 2 fuses, hopefully you have a tweezer that comes with any new fuses you buy.
- The rear seat bolt is nicely placed in reach of the sub and has a wide flat surface to sand down. You may need a breaker bar to get the bolt off first.
- The bolt was M12 I think, so I used a 1/2" ring terminal for the sub ground and used the small fork terminal to get under the flat part of the same bolt head for the LC2i ground.
- B pillar was tricky but you need to remove the trim panel by the back of the door sill first
- The wire harness from the door boot will have the speaker wires but be careful. I used a scissor an accidentally cut the window switch wire that needed a butt connector to reconnect.
- It was easier with a retractable xacto knife and slowly fileting the wrap so there is enough room to tap.
- The speaker wires are the thicker ones and braided together, but don't get them confused with another set of thick braided wires (might be the power for the window regulator).
- Barely enough room to use the positaps but I had them going in different directions because of the braiding
- You won't need to take off the door panels if you follow the wiring chart and colors but wouldn't hurt to doublecheck. The B&O ones have "amp" and are towards the bottom half of the list.
- Looks like the rear door for the B&O system has two speakers but they use the same wire in the B pillar. I thought one would be a high tweeter without a bass signal but it seemed to work for the sub.
- Make sure the EQ in the head unit has the bass up to test everything. I found out mine was super low so I thought my sub wasn't working.
- I am using the surround sound setting.
- I was too lazy to get both B pillar speaker wires so I just jumped the wires. Sounds OK to me so far. If you go to the right speakers only, make sure they start in the LEFT on LC2i (from what I've read online somewhere).
- The jack under the tire won't fit anymore so I stored it separately. I didn't realize this so I scratched the spare rim a bit as it scraped the jack.
- LC2i could also fit in the rear seat storage if you wanted quicker access to adjust settings.
- The sub remote is just sitting under my driver seat in case I need it.
- The M10 bolt to keep the sub in the tire had a slight gap at the top when it bottomed out. I used the green bottle cap for now to cover the space but I would need a few washers eventually.
I am not an audio head so the system didn't sound too bad to start with. I could tell the bass kinda rolled off on higher volume so it is nice to have the LC2i and sub help provide a little more punch. Overall, I underestimated the time this would take but it was fun. Playing Kanye West - Mercy was a good test and I'm still working on adjusting the LPF, phase, gain, and other LC2i knobs. Almost bought the JBL Bass Pro Hub but this one seemed to get great reviews at a cheaper price to pay for the LC2i.
I was too cold to take pictures along the way but if you have any requests let me know! Now to see if I have this oil leak recall.